|
Son of Alexander and the late Sarah Ann Burnsides. Guy Alexander Burnsides
was born on the 12th of September 1899 at Doncaster, South Yorkshire, to parents Alexander, occupation, a Signalman in the
employment of the North Eastern Railway Company and Sarah Ann Burnsides (nee Silversides). One year after the birth of Guy, the family relocated to the village of Raskelf
located to the north of Easingwold, North Yorkshire, where the family took up residence at Halwin Cottages located near the
Station Depots. Tragedy
was to strike the Burnsides family when in 1903, Sarah Ann died aged just 35 years. No doubt as a consequence of his mothers
untimely death, Guy at some stage in his early childhood was sent to live with his father's parents, the 1911 Census details
recording that at this juncture he residing with his Grandfather, Joseph Burnsides, occupation, Sheep Dipper, in premises
at Horsefair, Boroughbridge, North Yorkshire. Of his father, Alexander, the 1911 Census records that he was now residing in
lodgings in premises located at 17, Park Row, Starbeck, Harrogate. Still in the employ of the North Eastern Railway Company
it was whilst in these lodgings that Alexander would meet one Edith Sigsworth, a General Domestic Servant, the daughter of
one William Sigsworth, a Platelayer in the employ of the North Eastern Railway Company and a native of Raskelf. The following
year would witness a union of marriage when on the 10th June, 1912, Alexander would marry Edith, in employment at this period
at Kirkstall Vicarage, St. Stephens Church, Morris Lane, Kirkstall, Leeds. Educated at Harrogate Secondary School, the exact dates
of his tuition at this establishment are unknown however the Harrogate Herald dated the 7th of July 1915 records one "Burnsides"
playing in a cricket match against Ashville College. Residing with his father and step mother at premises located in The Avenue,
Starbeck, this address being recorded on his attestation in 1917, the 1918 electoral register confirms this abode as being
the family residence. Regarding employment after departing education, a newspaper article dated October 1918 records that
he had found work at the London Joint City & Midland Bank, High Street, Boston Spa, prior to the outbreak of the Great
War, this employment being confirmed by his inclusion on the London Joint City & Midland Bank War Memorial now located
at Canary Wharfe, London. Enlistment
An
analysis of the Soldiers Died In The Great War Database records that Guy had initially enlisted into the Royal Flying
Corps at South Farnborough, Hampshire. Numbered 100309, his service with the R.F.C. commenced on the 7th of November 1917
and after what I can only surmise was a period of assessment, he was deemed as "unfit FO in any capacity," presumably
for flying operations and a subsequent commission. As a consequence, he was then transferred to the Rifle Brigade on the 13th
of December 1917 under War Office Authority dated the 1st of October 1918. (Source:- T.N.A. Air 79/905). Issued the Serial
Number S/36283, the "S" Prefix denoting a wartime enlistment into the ranks of the Rifle Brigade, Guy was just one
of a large number of drafts from the R.F.C. that would ultimately be posted on attachment to the 2/10th London Regiment Rifle
Brigade (Prince Consort's Own). Initially posted to the 10th Reserve Battalion of the Regiment, 1st London Reserve Brigade,
at this juncture the 10th Battalion were billeted at Frith Hill Hutments, north-east of Farnborough. As has previously been
stated, Guy numbered in a large draft of young men posted from the R.F.C., young men such as Reginald Ault, a native of Thornton
Heath, born, 1899. Gordon Ellicott Batten Wakley, a native of Herne Hill, London, and Augustus Wilson, a native of Warrington,
Lancashire, to name but a few.
As regards the exact date of entry into the theatre of war, the aforementioned
newspaper article states Guy's posting to the battalion as of June 1918. This is confirmed in a surviving medical document
stating that he was admitted to the 2nd General Hospital located at Le Havre on the 28th of June 1918 suffering from PUA
(Pyrexia of Unknown Origin). Recorded as only serving two weeks in the field, this points to an estimated disembarkation
date of on or about the 13th/14th of June. (Source:- T.N.A. MH 106/991). Posted to duty on the 4th of July, the battalion
on this date were in support positions to the south of Lavieville, west of Albert. As Guy had been posted to France in the
month of June 1918, after a brief summary of the formation of the battalion, I will duly commence his commemoration during
that respective month. 2/10th
London Regiment, Rifle Brigade (The Prince Consort's Own) A Second Line Territorial Regiment that was formed
in London in September 1914, Mobilisation Centre located at 208, Mare Street, Hackney, London, the battalion was originally
contained in the 2/3rd London Brigade, 2/1st London Division, the latter being redesignated the 175th Infantry Brigade of
the 58th (2/1st) London) Division in 1915. The brigade consisted of the following units as of June 1918 :- 9th (County of London
Regiment) Battalion (Queen Victoria's Rifles) 12th
(County of London) Battalion (The Rangers) 2/10th
London Regiment, Rifle Brigade (The Prince Consort's Own)
Divisional Commander, Tempoary Major-General Albemarle
Bertie Edward Cator D.S.O. Battalion
Commanding Officer, Acting Lieutenant-Colonel Edward Percy Cawston
After occupying various stations such as White City
and Crowborough, in early September 1915, the battalion moved to Bromeswell Camp, located to the east of Woodbridge, Suffolk,
followed by a move to Ipswich in December. Moving
to Longbridge Deverill near Warminster, Wiltshire in mid 1916, the battalion embarked for France via Southampton - Le Havre
on the S.S. Archangel on the 4th February 1917. Witnessing fighting in most of the major engagements of 1917, the
division performed good service during the various phases of the German spring offensives of March and April 1918 as a constituent
unit of both Fifth and then Fourth Armies. Suffering heavy casualties in particular during the Battle of Villers-Bretonneux
in April, their Commanding Officer, Lieutenant-Colonel William Frederick John Symonds D.S.O., also succumbed to wounds received
in this action after being shot by a sniper on the 24th of April aged 48 years. June 1918 On the 1st of the
month, the 2/10th London's were at rest in the Behencourt area north-west of Amiens before a move was conducted to a camp
near Molliens-au-Bois a short distance to the north-west. Providing working parties in addition to commencing a programme
of training, it was on the 10th of the month that the battalion moved by bus to Briquemesnil-Floxicourt west of Amiens whereupon
they proceeded to billet. Whilst here, the battalion remained conducting specialist and tactical training, route marches etc.,
before returning to a wood located to the south-east of Molliens-au-Bois on the 18th. Here, as a precusor to moving into reserve
positions in the line, a Battle Surplus was assembled who then proceeded to the nearby village of Mirvaux. Remaining
in these reserve positions until the 24th, the battalion, now commanded by Acting Lieutenant-Colonel Edward Percy Cawston
who had assumed command on the 9th of May vice Captain Frederick Gould, Second-in-Command, now moved into the front line.
Contained
in III Corps, Fourth Army under the command of General Sir Henry Seymour Rawlinson, the battalion now commenced a relief of
the 7th London's, 174th Infantry Brigade, 58th Division in the front line near Dernancourt, west of Albert, Somme. The
situation in the front line was described as quiet albeit with the men subjected to sporadic shelling by the enemy's artillery
resulting in the wounding of one man on the 25th. During the following day, it was observed that there was more increased
activity in both the front and the rear lines of the enemy trench system. In addition to the frequent shelling of his artillery,
trench mortars now 'played' on the British trenches with the result that one man was killed and three wounded. The
remainder of the month followed a similar pattern of desultory shelling by artillery and trench mortars with a further nine
men wounded and one Other Rank killed. Authors note: Due to numerous anomalies in various sources such as the Commonwealth
War Graves, Medal Index Cards and Soldiers Died, the names of the men who were killed during this tour in the line requires
further analysis. A comprehensive examination therefore of the latter sources reveals that between the 25th-26th June, three
men were either killed or died of wounds. Private James Alfred Cutterham, 423621, killed in action on the 25th and buried
Bavelincourt Communal Cemetery, Private John Willie Hubbard M.M., 422420, died of wounds on the 25th, buried Pernois British
Cemetery, Halloy-les-Pernois and Private Daniel Henry Croft, 420523, "D" Company, died of wounds on the 26th and
also buried in the latter cemetery. In addition to these men, Sergeant Harry Allen, 422552, succumbed to wounds on the 29th
June and is now buried in Montigny Communal Cemetery, Somme.
|
|
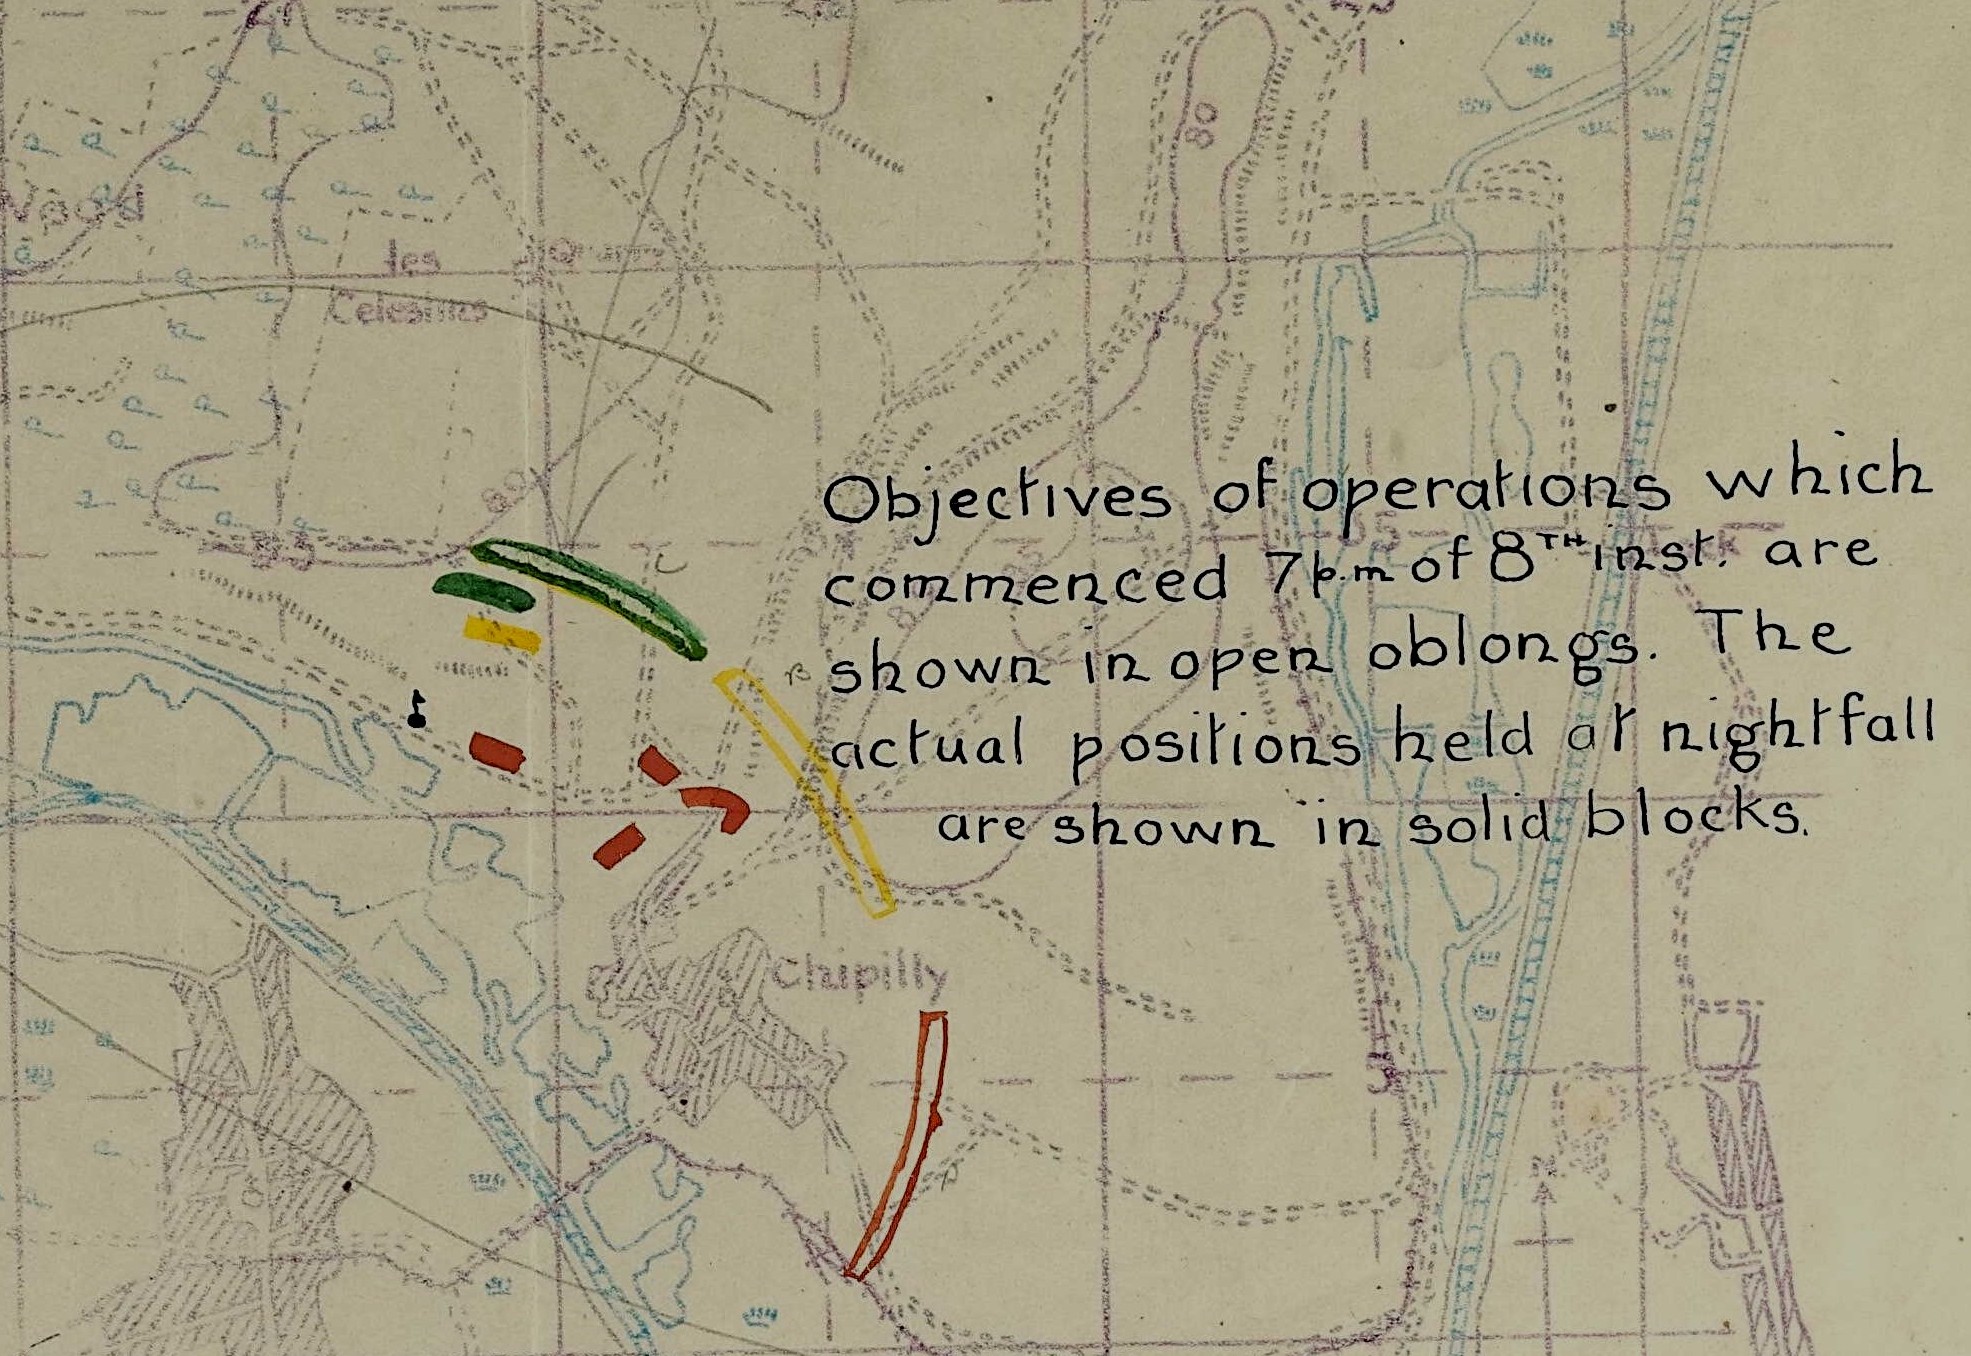
| Extract Of Map, France, Edition 1 (Revised) C (Local) Sheet 62D |
July: Divisional Reserve, Support, & Front Line
Positions Relieved
by the 9th London's, 175th Infantry Brigade on the 2nd July, the 2/10th London's moved into support positions located
in Darwin Reserve, to the south of Lavieville and astride the Albert-Amiens Road. Remaining in these support positions
until the night of the 6th/7th, upon relief by the 2/4th London's, 2/1st London Brigade, 58th Division, the battalion
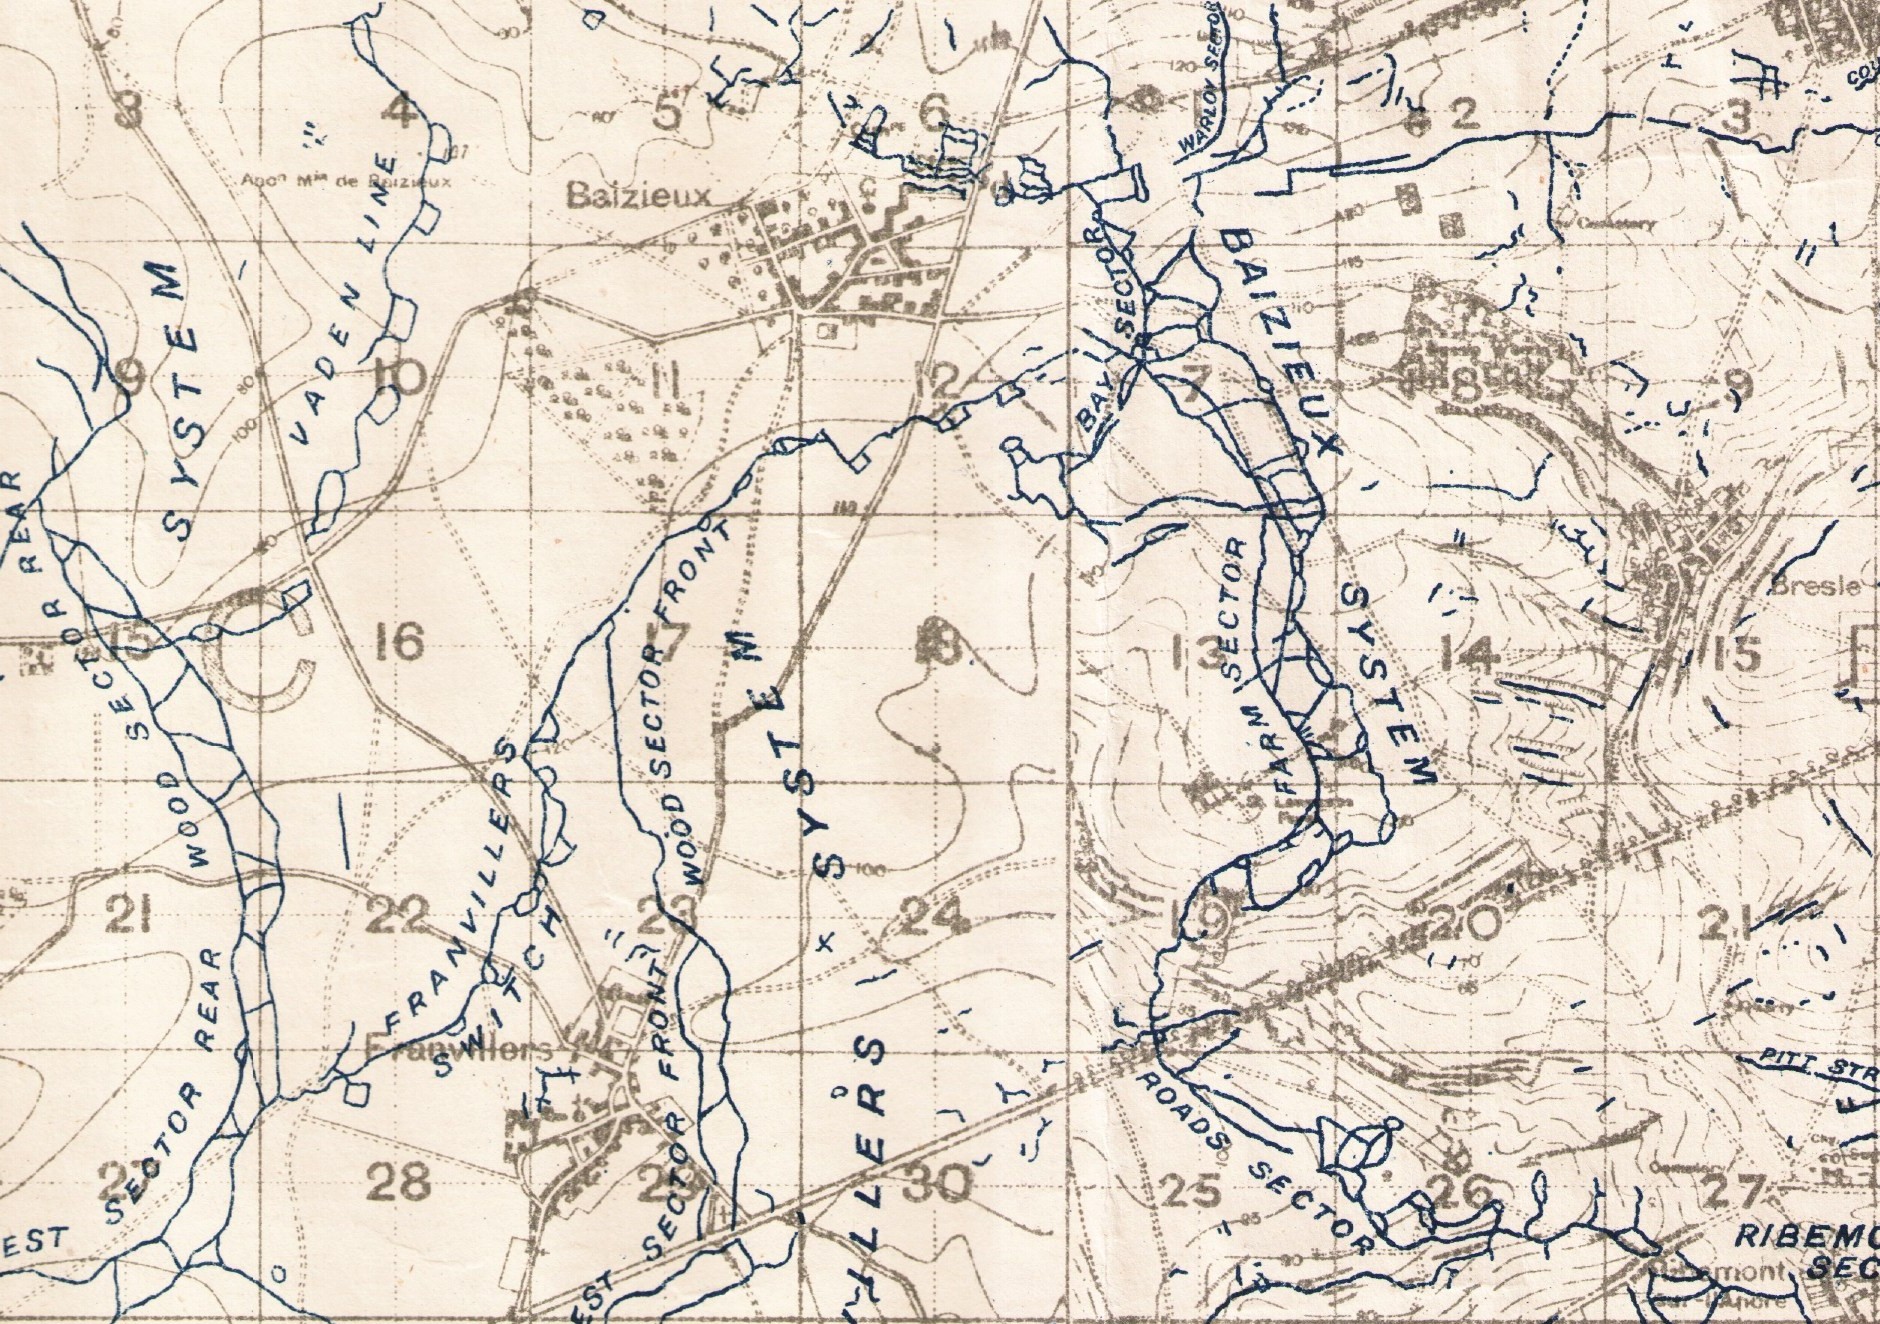
moved into Divisional Reserve at St. Laurent Farm located to the south-west of Bresle. Occupying positions in the Baizieux System at 10 a.m. on the morning
of the 11th July the battalion were inspected by the G.O.C. Division Major-General Cator D.S.O. however his comments are unfortunately
not recorded in the pages of the War Diary. Relieving
the 8th London's, 174th Infantry Brigade on the night of the 12th/13th, this tour in the line resulted in the deaths of
two O/R's. Private Albert Reynolds, 425485, killed in action on the 14th, now lies in Bavelincourt Communal Cemetery,
Somme, albeit commemorated by his Medal Index Card entry and the Commonwealth War Graves Commission Database as serving with
the 10th Battalion. Lance-Corporal Henry Thomas Parkes, 421403, a native of Hackney, London, was killed on the 15th July.
His body unidentified after the war, Henry is now commemorated on the Pozieres Memorial, Somme. Relieved on the night of the 16th/17th by the 12th London's, 175th Infantry
Brigade, under the cover of darkness the battalion moved into support positions in the Baizieux System however one
O/R was wounded in the process, a further two, wounded but remaining at duty. This wounded man may have been one Private Thomas
Walter Humphreys, 421465, "D" Company. Thomas aged 21 years and a native of Mile End, London, unfortunately succumbed
to his wounds on the 17th and is now buried at Pernois British Cemetery. Remaining in support and with a further two O/R's wounded on the 18th, it was during
the following day that the battalion lost an officer who had served with the battalion since November 1917. Lieutenant George
William Cranmore, a married man of Storrington, Sussex, who had been commissioned into the 10th London Regiment in August
1915, was unfortunately killed along with one Other Rank, Private John William Johnson, 425811, resident of Deptford and aged
just 18 years who died of wounds. Lieutenant Cranmore is now buried in Bavelincourt Communal Cemetery whilst Private Johnson
now lies at rest at Montigny Communal Cemetery his epitaph chosen by his family simply reading "A Mother's Love
A Father's Care It Was God's Will He Should Lay Here."
|
|
| Extract Of Map, France Edition 1 (Revised) C (Local) Sheet 62D |
Upon relieving the 9th London's, 175th Infantry Brigade, in
the Right Battalion Sector, Left Brigade, the situation remained relatively quiet until the night of the 20th/21st
when the Left Sector of the 175th Infantry Brigade, held by the 2/10th Londons, was subjected to a heavy bombardment
consisting of 77 cm, 5.9 and 8 inch howitzer shells. The situation that now developed, quite frankly, is best described as
one of chaos and confusion as an enemy raiding party attempted to gain a footing in the trenches held by the Left Front
Company. With communications to supporting artillery units being severed, communication to Battalion Headquarters was
only possible by the use of Runners and it was in no small part that their information supplied to the Officer Commanding
assisted greatly in the situation being remedied. Of the raiders, a small party momentarily did manage to gain a footing in
the trenches but were expelled almost immediately. Other parties that comprised the raiding force never even reached
the front line and were subsequently dealt with by Lewis guns and an artillery barrage and it was estimated that their casualties
were considerable. A wounded German was found in front of the wire and brought in and subsequently identified as a soldier
of the 86th Fusiliers. Casualties to the brigade numbered 5 Other Ranks killed and 1 officer and 29 Other Ranks wounded (Source:-
175th Infantry Brigade War Diary, T.N.A. WO95/3008/4). One man, Rifleman Ronald Irvan Neish, 48936, 2/10th Londons, a native
of Beckenham, Kent, would succumb to wounds at the 4th Casualty Clearing Station located at Pernois aged just 19 years. The situation in this sector of the line was to take a turn for the worse
when on the 24th July the trenches were exposed to a barrage of enemy gas shells. For a period of one hour between 9.30 p.m.
- 10.30 p.m. the men were exposed to Mustard Gas, a second barrage of this chemical agent being launched between
2 a.m. - 3 a.m. early on the morning of the 25th. As
this agent burned the skin and dissolved in the respiratory tract, men would begin to exhibit symptoms in a specific timescale
dependant upon the concentration of gas that they were exposed to. Coughing up blood as the gas dissolved in the lungs and
also in some cases the blinding of the eyes, this exposure resulted in the gassing of Lieutenant William Bernard Lindley,
Second-Lieutenants Cecil William Ardley, Langford Smetham and 69 Other Ranks. One O/R was also reported as wounded whilst
another was killed, Sergeant Frank Henry Beecher, 423366, a native of Walthamstow, London, and now buried in Dernancourt Communal
Cemetery Extension. At 10
a.m. on the morning of the 25th, in conjunction with a daylight raid conducted by the 8th London's (Post Office Rifles),
a barrage was put down on the sector. The War Diary records that on this date the battalion suffered three casualties killed
in action and a further eight wounded however of the men purported to have been killed on this date there is no direct association
to be found with the 2/10th London Regiment in either the Soldiers Died or Commonwealth War Graves databases. Relieved by the 7th London's, 174th Infantry Brigade on the 27th, the
battalion then proceeded to Baizieux and then to Round Wood near Franvillers where they remained at rest. Relieving the 6th London's, 174th Infantry Brigade in the line in front
of Dernancourt on the 30th, the relief passed off without incident. As the men settled into their positions during the following
day, the battalion were subjected to heavy enemy shelling between the hours of 10 a.m. - 1.30 p.m. resulting in the deaths
of 5 Other Ranks and the wounding of 3 more. Authors note: Only four men can be identified; Private Albert Edward Rose, 421208,
Private Frederick Ernest Herring, 422366, Rifleman Harry James Lowton, S/36463 and Corporal Alfred Hayward Springall M.M.,
420466. All of these men now lying in adjoining graves at Dernancourt Communal Cemetery Extension. Upon relief by the 132nd Battalion, 66th Infantry Brigade, 33rd American
Division that were attached to British Third Corps, the 2/10th London Regiment moved to bivouacs in the St. Laurents Farm
area, south-west of Bresle and into Divisional Reserve. August: The Battle Of Amiens, 8th - 12th August On the 2nd August, Lieutenant-Colonel Edward Percy Cawston O.C. inspected
the battalion prior to the mounting of offensive operations on the German trench system to the west and north of the village
of Sailly Laurette nestling on the northern bank of the Somme river. Preliminary
orders dictated that the battalion were to proceed to Vignacourt located to the north-west of Amiens and there the 175th Infantry
Brigade were to be placed in Corps Reserve. These orders were subsequently rescinded and the brigade under the temporary command
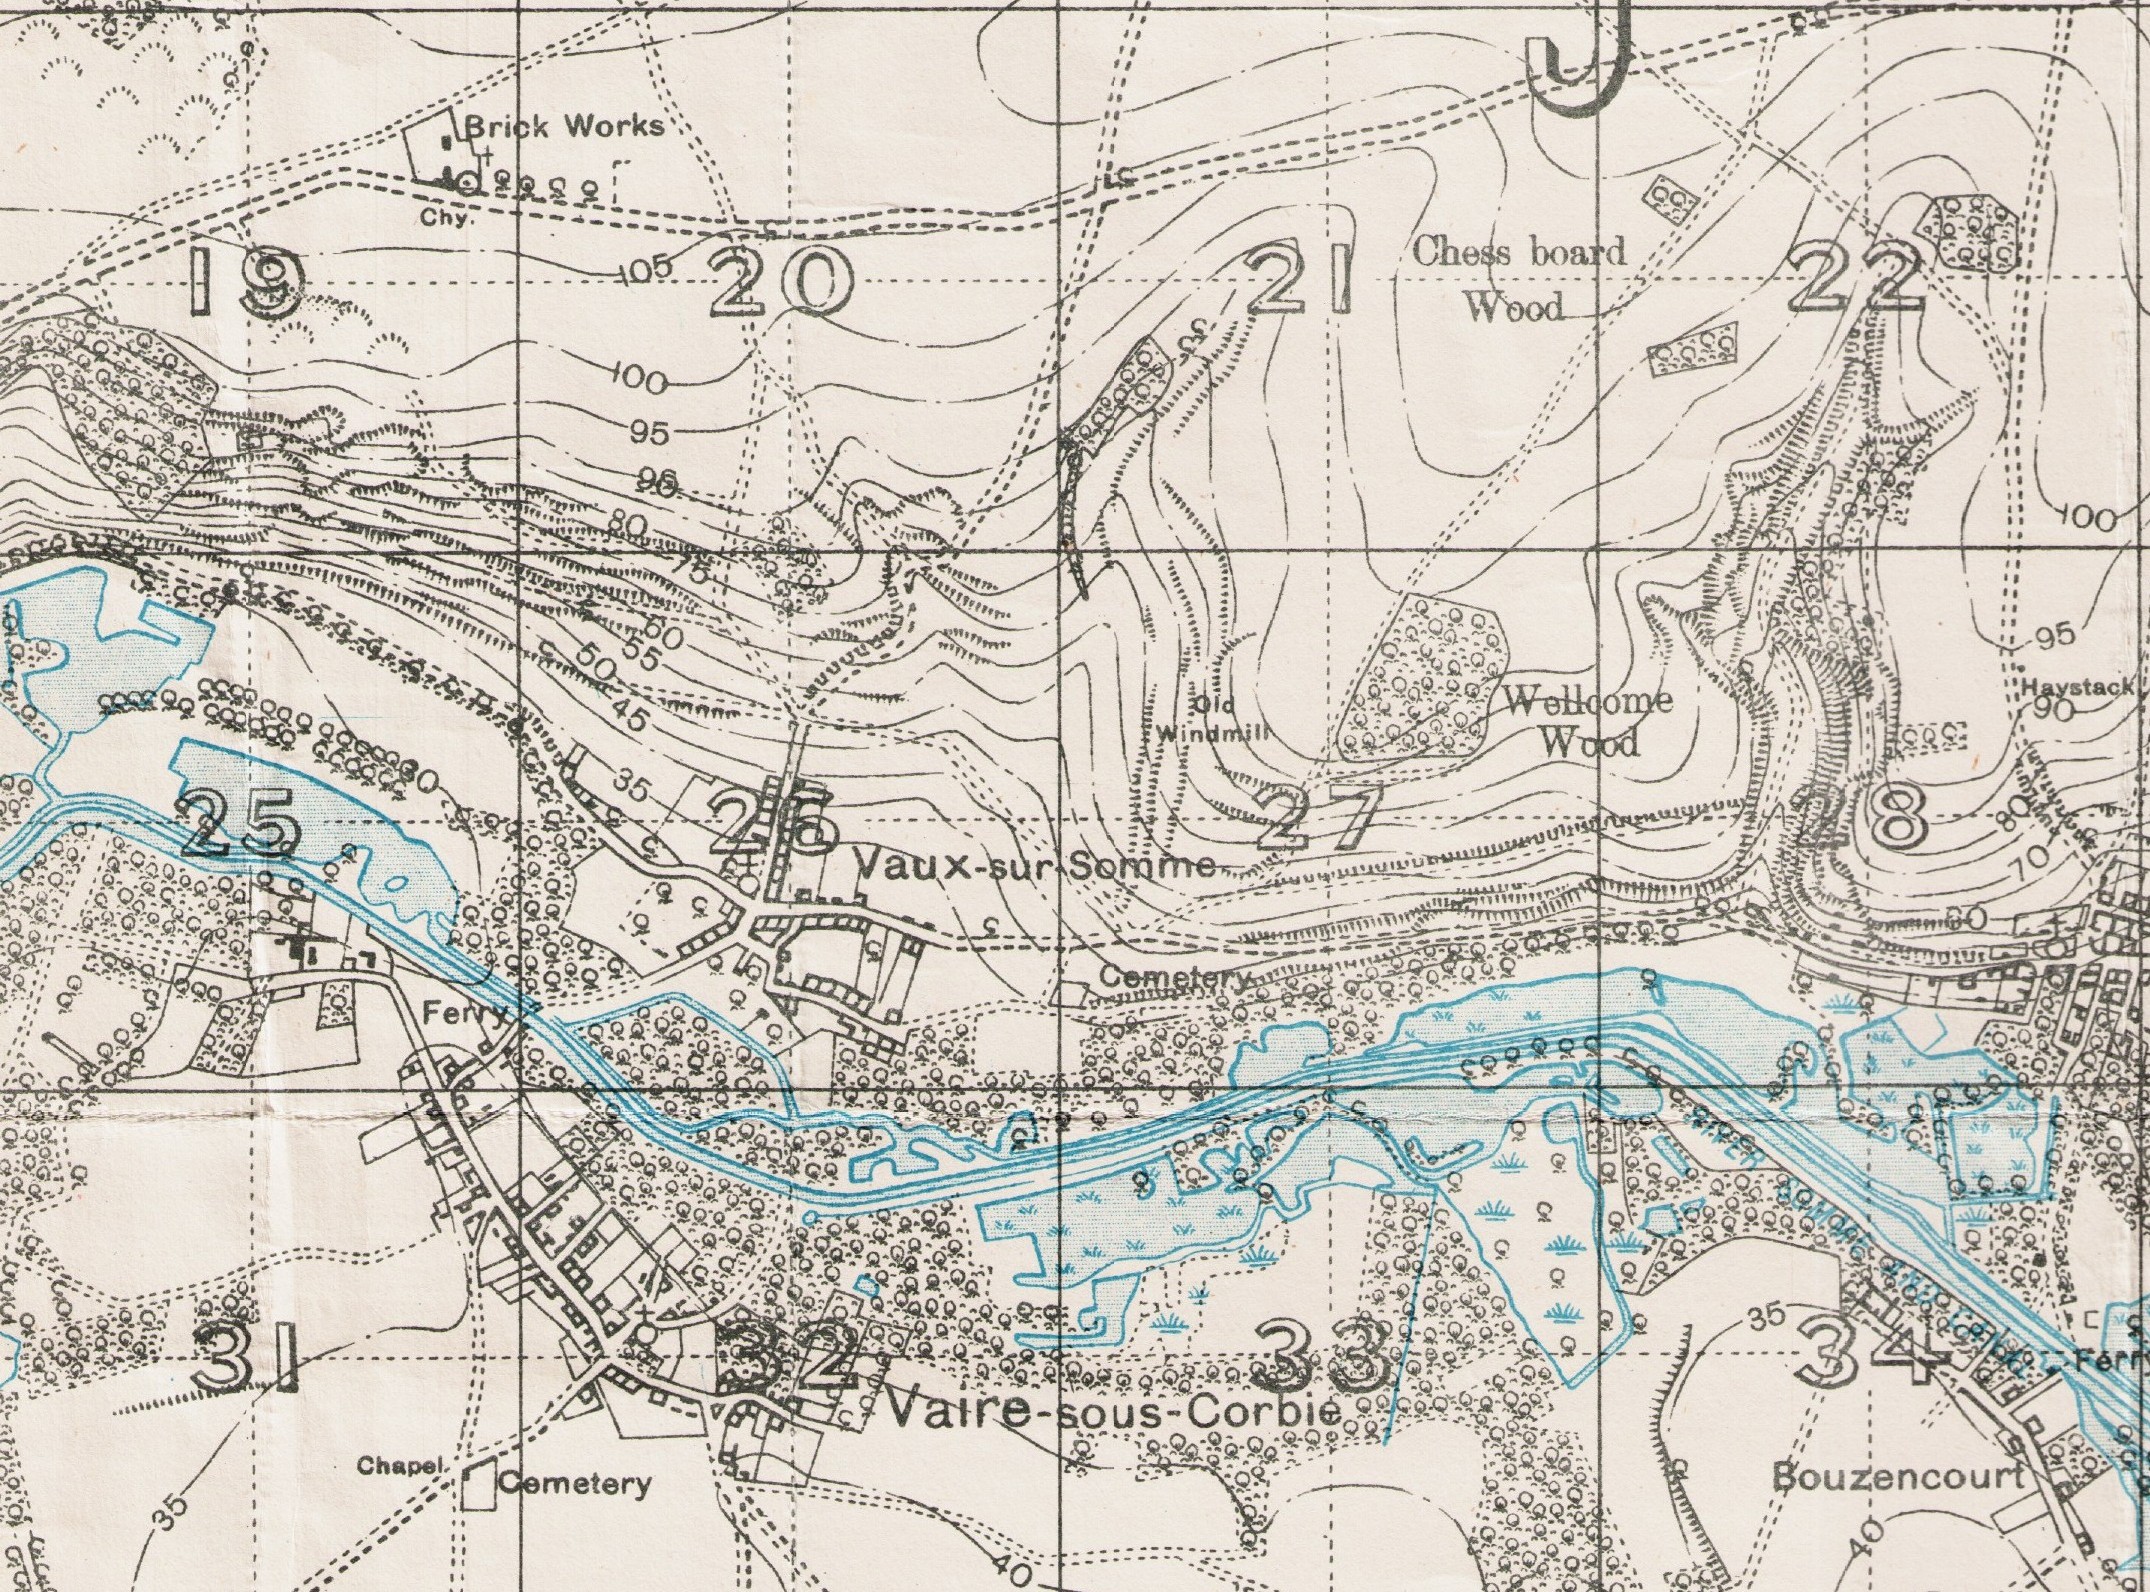
of Brigadier-General Walter Joseph Constable-Maxwell-Scott D.S.O. were ordered to proceed to Heilly and assemble in a valley
located at trench map reference J.27.a. about 750 yards north-east of Vaux-sur-Somme. On assembly at this position,
the 175th Infantry Brigade would be placed under the command of the G.O.C. 174th Infantry Brigade, Brigadier-General Charles
Graeme Higgins D.S.O., both brigades of the 58th Division then mounting offensive operations on the morning of the 8th August.
Largely in part due to the successful attack of Monash's Australian
Corps at Le Hamel on the 4th July, a planned strike eastwards from Amiens was placed before the British Fourth Army Commander
General Rawlinson on the 13th July. The consensus of opinion now shared by the heads of the Allied Armies was that a real
opportunity now existed to break free from the defensive stance adopted to one of the offensive. At an Allied conference held
on the 24th July at the Commander-in-Chief of the Allied Armies Headquarters, General Ferdinand Foch, the proposal was agreed
to with a specific directive issued by Foch to Haig on the 28th July:- 1. The aim of the operation is to free Amiens and the Paris-Amiens railway,
and to attack and push back the enemy stationed between the Somme and Avre. 2. To achieve this, the covert offensive in the north via the Somme is to be pushed
as far as possible in the direction of Roye. 3.
It will be executed by: 1) The IV
British Army, initially of a strength of 12 divisions and 3 cavalry divisions, supported by: 2) I French Army, reinforced by 4 divisions, operating one on the north,
the other on the south of the Route de Roye, once the opening south of the Luce and east of the Avre has been secured.
From a translation of the
document. Source:T.N.A. WO 158/29 To
assist Rawlinson in the forthcoming offensive, Haig placed at Fourth Armies disposal the Canadian Corps under the command
of Lieutenant-General Sir Arthur William Currie as well as two British divisions which were already in a position of
readiness astride the Somme river. Foch, as stated in the above directive, placing the French First Army under the command
of General Marie-Eugene Debeney at Haig's disposal. With
the commencement of the assault fixed for the 8th August, absolute secrecy as to the true intentions of the Allies was paramount
so as to achieve maximum surprise. To maintain this security, various schemes of bluff and subterfuge were initiated. In Flanders,
Canadian battalions were placed in the line in the Kemmel sector and identified as such by enemy forces. In addition, Corps
Headquarters were prepared and Casualty Clearing Stations were constructed in areas visible to the inquisitive enemy flying
aerial reconnaisance missions. On First Army front, wireless traffic was intensified and in addition a ruse was created to
suggest that Tanks were concentrating in the area of St. Pol, infantry and Tanks performing co-operation exercises in this
locality when enemy reconnaisance aircraft were believed to be in the vicinity. Intelligence gathered after the various phases of the Allied advance confirmed that the
enemy had indeed been convinced by the acts of misinformation and bluff, believing that an all arms offensive was to be launched
in Flanders. The attack,
if successful, also had wider implications if the momentum of a thrust eastwards could be maintained. With details of the
Allied plan finalised in early August, it was agreed that the assault would commence early on the morning of the 8th August.
Proceeded by an intense artillery bombardment of the enemy's positions, infantry supported by Tanks would then advance
with cavalry and additional mobile forces exploiting any breakthrough. The Attacking Force Rawlinson's Fourth Army would advance on a front of eleven miles from
a point south of the Amiens-Roye road to Morlancourt, south of Albert to the north. On the right of the attack were disposed
the Canadian Corps under the command of Lieutenant-General Sir Arthur William Currie, this force comprising of the 3rd, 1st
and 2nd Canadian Divisions in the line, closely supported by 4th Canadian Division. The centre consisted of Australian Corps under the command of Lieutenant-General Sir John
Monash and comprised of the 2nd and 3rd Australian Divisions in the line with the 5th and 4th Australian Divisions in support.
To the north of the Somme, and on the left
of the attack respectively, were disposed Third Corps under the command of Lieutenant-General Sir Richard Harte Keatinge Butler
and comprising of the 58th and 18th Divisions in the line, with the 12th Division in support. Of the French First Army under the command of General Marie-Eugene Debeney,
their attack was to be executed on a front between four to five miles in length between Moreuil, south-east of Amiens and
the British right, this assault timed to commence about one hour after that of the British Fourth Army. It was envisaged that
as the Allied attack made progress, the right flank of the French First Army was to extend in a southerly direction ultimately
leading to the southern flank of the Allied front being anchored on Braches south of Moreuil. At the appointed "Zero" hour and behind the British front line,
the British Cavalry Corps under the command of Lieutenant-General Sir Charles Toler MacMorrough Kavanagh would concentrate
two miles to the east of Longueau near Amiens. Consisting of three Cavalry Divisions, the 1st, 2nd and 3rd Cavalry Divisions
respectively, this force would be also be augmented by a special mobile force of two Motor Machine Gun Brigades (Armoured
Cars) and a Canadian Cyclist Battalion under the command of Brigadier-General Raymond Brutinel, "Brutinel's Brigade."
The orders issued to this force were to exploit any success along the lines of the Amiens-Roye Road. 2/10th London Regiment On arrival at Heilly on the 3rd August and under the cover of darkness as
per operation orders, it was found that the only road leading from the village to the rallying point in the valley was heavily
congested by ammunition wagons and lorries who were in the process of establishing an ammunition dump in the Ancre Valley
to the south of Heilly. With a never ending stream of transport entering the village from the direction of Franvillers to
the north-west and from Bonnay to the south-west and all converging at a narrow bridge that spanned the Ancre, two broken
down lorries close to the latter only exacerbated the problem. Unable to proceed further via this route, the only option was
to take a circuitous route to the valley via Bonnay but due to the time it would take, dawn would be upon the battalion before
it had reached its destination. With the traffic
picketed only "B" and "C" Companies under the commands of Captain Edward Arthur Bye D.C.M. and Lieutenant
Bertram Vivian Le Breton respectively, "dribbled in single file through the traffic to the valley." Battalion
Headquarters and the remaining companies remaining at Heilly due to the constraints of the situation the battalion now faced.
It was now imperative that
Brigade Headquarters be informed of the situation that had befallen the battalion but no information was available as to their
exact location. Resourcefully and most likely under the direction of Lieutenant Ernest Arthur Hudson, Battalion Signals Officer,
a number of gunners wires were tapped resulting in contact being established with 55th Infantry Brigade Headquarters, 18th
Division who were located behind the chateau at Heilly, a wire then being sent via 58th Division to 174th Infantry Brigade
Headquarters informing them of the situation. In
the late afternoon of the 4th orders were received from 174th Infantry Brigade Headquarters for the 2/10th Londons to proceed
to a wood, west of Vaux-sur-Somme, "B" and "C" Companies receiving instructions to vacate their bivouacs
in the valley which was initiated at dusk. Before setting forth for Vaux, Temporary Major James Nichols M.C., Second-in-Command,
rode to Lahoussoye located to the south-west of Heilly to confer with a Staff Captain of 174th Infantry Brigade H.Q. regarding
accomodation and bivouac sheets. As a consequence of this consultation, the battalion were then ordered to remain at Heilly,
this change in orders being communicated by wire to 174th Infantry Brigade H.Q. At 11 a.m. on the morning of the 5th, Lieutenant-Colonel Cawston reported
to 174th Infantry Brigade H.Q. at Lahoussoye to receive orders. Upon receipt of the latter, the battalion were ordered to
take up positions in the valley located at J.27.a., this movement being conducted at dusk. These orders further stipulated
that the attack would commence on the morning of the 8th August with assembly positions confirmed for the assault on Sailly-Laurette.
"Zero" hour being fixed as 4.20 a.m.
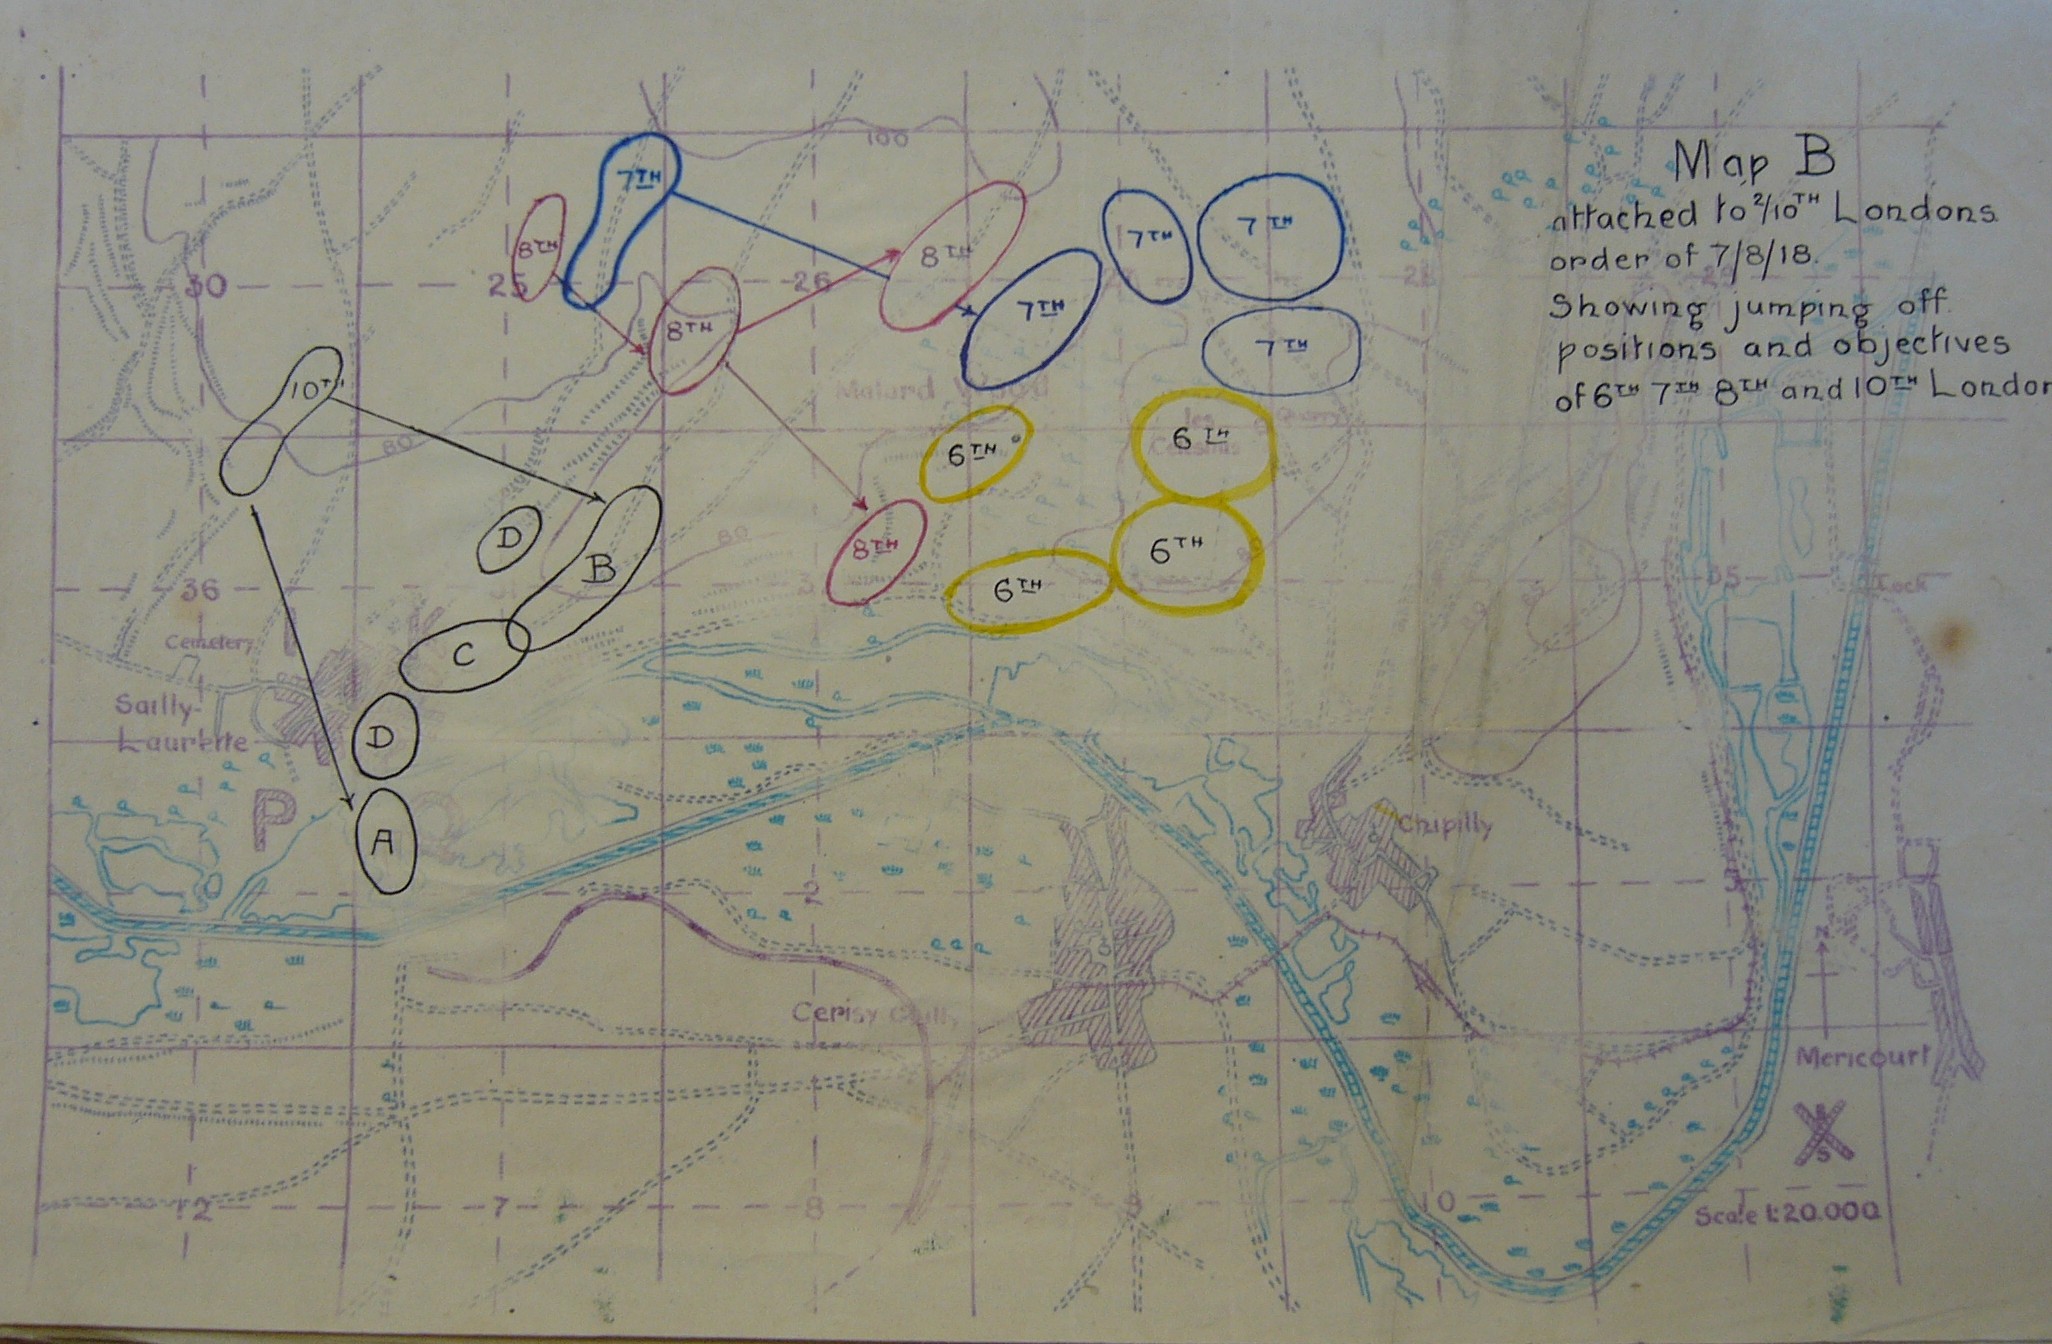
|
|
| Dispositions Of 6th, 7th, 8th & 10th London's. War Diary, 2/10th London's, T.N.A. WO95/3009/5 |
On the night of the 6th August, one company of the 2/10th London's
received orders to relieve a company of the 6th London's, 174th Infantry Brigade, in the trenches astride the Sailly-le-Sec
- Sailly-Laurette road. As a consequence, "A" Company, strength, two platoons, moved forward to complete the relief,
their right flank resting on the Canal de la Somme. It was imperative that all the battalion's objectives during the forthcoming attack were be clear in the minds
of both officers and men so to this end, Colonel Cawston accompanied by T./Major Nichols M.C. (Second-in-Command), Lieutenant
H. Wood (Intelligence Officer), Lieutenant Reginald James Martin (Lewis Gun Officer), Company Officers and Senior N.C.O.'s
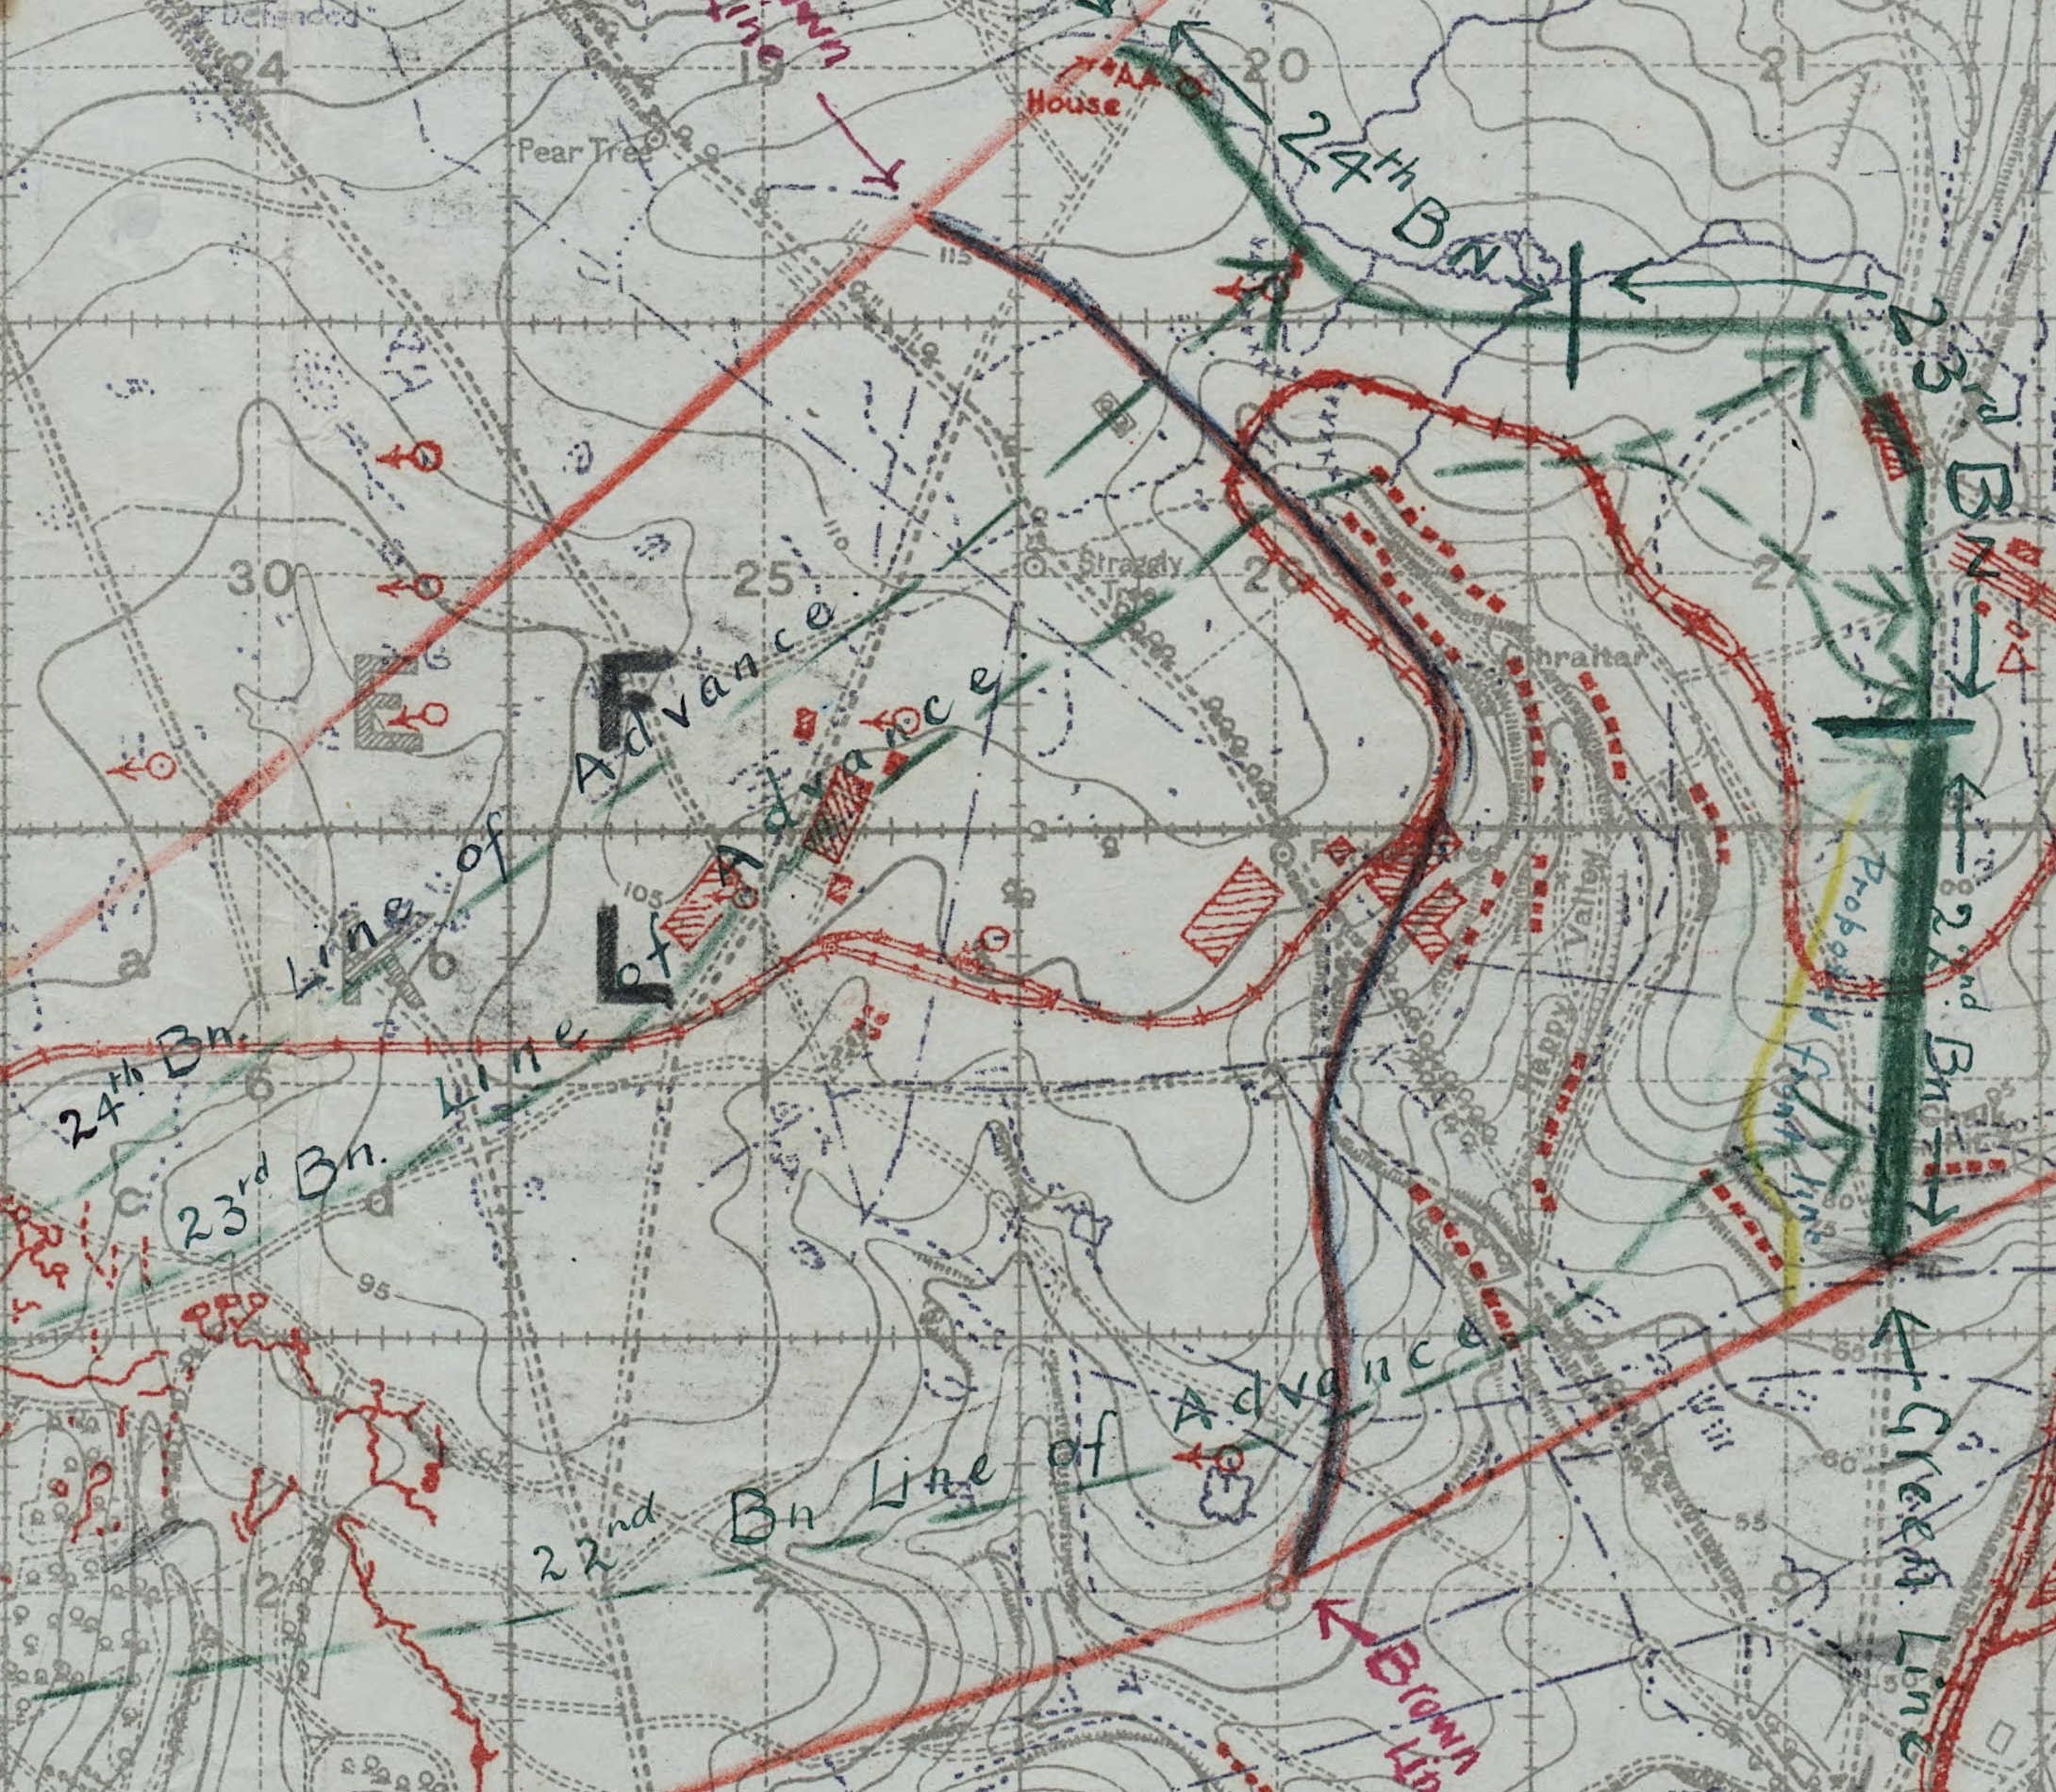
reconnoitered their objectives on the 6th and 7th from the Australian Support Line located to the north-east of Le Hamel. The Plan Of Operations The 174th Infantry Brigade, 58th (2/1st London) Division, to which the 2/10th
London's were attached, were assigned as their first objective the Green Line, east of the village of Sailly-Laurette.
Simultaneously, the Australian Corps would launch their assault south of the Ancre river whilst on the left of 174th Infantry
Brigade, 18th Division along with 12th Division on their left respectively, would commence their attacks. The assault of the infantry was to be proceeded and supported by a barrage
performed by over 1400 artillery pieces of numerous calibres firing a variety of shell including gas. The barrage of the 18-pounder
field guns would consist of a series of timed 'lifts' supporting the assault whilst heavier calibre artillery would
fire on positions to the rear of the enemy's defensive systems and also execute counter-battery work. In addition, as
the infantry advance gained their objectives, some artillery batteries would be moved forward to provide support to the advance,
the fire plan as a whole proving to be all the more remarkable as no registration had been conducted so as to achieve maximum
surprise. Over 400 Tanks
would also be committed to the attack, 10th Battalion, "C" Company, under the command of Acting Captain William
Stewart Ponsford, R.F.A., Special Reserve, being attached for operations. Three tanks were to be assigned to the 2/10th London's
for the attack (Source:- Narrative of Operations contained in the War Diary) this narrative also recording that the
attack on the village at "Zero" hour was to be supplemented by an advance conducted by two platoons of the 173rd
Infantry Brigade in conjunction with the Tank "Jutland," however in anticipation of a possible hitch in
the operation, 2 platoons of "D" Company, 2/10th London's were detailed to co-operate with the advance. Companies
were warned however that they were not to wait for the Tanks or to rely on their direction taken as indicated in plans issued.
Authors note:- In the course of the action, the emphasis placed on not waiting for the Tanks to arrive proved to be the correct
course of action. Of the
Tank "Jutland," although detailed to take part in the attack with a route designated for its advance on
a map contained in the narrative, the precise identity of this Tank is unknown. Operation orders issued to the attacking infantry
states that a platoon of "D" Company attached to "A" Company, were upon reaching their assembly position
and further augmented with one further platoon of "D" Company, would at "Zero" advance in a south-easterly
direction between the Tank "Jutland" and Track "A," rendezvousing with the Tank at the
entrance to the village of Sailly-Laurette. Remaining platoons of "D" Company would then follow about 50 yards to
the rear the advance of "C" and "B" Companies and move forward. Operation Orders:- "The 10th Londons will capture SAILLY-LAURETTE, exploiting the work
of Tanks in that village. The
approx: assembly positions and the objectives of the Companies are shown on attached Map "C," each Company being
represented by its Company Colour. Authors note: "A" Company, Blue, "B" Company, Yellow,
"C" Company, Green, and "D" Company, Red.
Time by which Companies will be in position in the assembly area and
the Line on which they will form up will depend on the tactical situation and be notified verbally. Mop up the copse K.31.a.5.8. and on reaching K.31.a. central will remain
in Support in K.31. central, keeping in touch with the situation on "B"s left and in the event of failure on the
part of Troops on his left will form a defensive flank facing N.E. and act on the initiative of O.C. "B" to reinforce
where most required. "C"
Company will work in conjunction with Tank JUTLAND as far as the North edge of the village." Orders for men co-operating with Tanks were specific:- "Platoons working with a Tank must not close round it but will follow
it one on either side at a distance of about 30 yards and so as to be able to take advantage of any situation created by the
tank. On arrival in the village or
other obstacle, Tank Platoon Commanders must act on their own initiative and adopt whatever formation is best to kill the
garrison and clear the village." Once
cleared and established in the village, the infantry would:- "When the whole of the village has been thoroughly dealt with and riflemen or Lewis
Guns posted to shoot any enemy who have been overlooked and to control all exits, the Tank Platoons of "D" Company
will hold the Line Quarry (K31c.8.2.) North of Causeway (Q1a.2.8.) and "A" Company will prolong thence to Gailly
Bridge (Q1c.4.7.) at which point liason will be established with the 42 Battalion Australians. O.C. "C" Company will when he has established his Green Line
will push his right flank forward to link up with the Left. "D",s (sic) Tank Platoons at the Quarry and
C & B Companies will also co-operate by establishing posts along the Dotted Lines and thus control the Valley. During the clearing of the Village "A" will drop 2 Lewis Gun
Teams about the Cross Roads J.36.d.2.4. to deal with any opposition from the S.W. corner of the village. B. will establish liason with the 8th Londons or other nearest Troops
on his left. The
Tank following route "B" should be of assistance to O.C. "B" but the routes given are liable to be varied
and B & C Companies must keep their own direction." The Operation Orders are even more extensive, detailing signals, medical evacuation etc.,
some orders being issued to the men verbally. With the men keeping close to a 'creeping barrage,' Guy and the men
of the 2/10th Londons made themselves ready for "Zero" hour. The Taking Of Sailly-Laurette As the men proceeded towards their assembly positions, the night became foggy
at about 1.30 a.m. and by 2 a.m., the fog became very dense indeed, masking the landscape but also assisting the attacking
units to assemble unobserved. At 3.45 a.m. the 2/10th Londons were in position however it was noted that due to their dispositions,
the south-eastern approaches to the of Sailly-le-Sec lay unprotected. As a consequence, 174th Infantry Brigade were informed
of the situation and approved of the assembly positions despite this lack of protection. As the artillery barrage began to fall, the 2/10th Londons attack commenced
completely surprising the enemy garrison of the village despite none of the three Tanks assigned to the advance, 'starting
off' until ten minutes after the assault on the village of Sailly- Laurette had commenced. Of the two platoons of the
173rd Infantry Brigade which were to co-operate with the advance of the Tank 'Jutland,' none were observed.
With the companies of the 2/10th Londons relying
on their direction of attack to be maintained by the Tank advance, it is a testimony to the command and control of the battalion
that they pushed forward and quickly seized their objective, the capture of the village, by 6.30 a.m. There were however pockets
of enemy resistance with two machine gun teams holding out in the village church until, with the assistance of a Tank, the
position was cleared at 7 a.m. As
the battalion advance continued eastwards, stiff opposition was met in the Sunken Road to the north-east of the village
and at the Quarry. Both these positions had however been noted prior to the commencement of operations and their
strength taken into account. To this end, two 18-pounders had been allocated to the battalion to supplement the divisional
barrage and these were used to good effect enfilading the Sunken Road running from the centre of the village,
up the centre of the Spur located to the north-east to K.32 Central. The fire of these two 18-pounder guns
then lifted at "Zero" plus fifteen minutes to the Quarry Terraces and the road leading between the village
and K.32 Central. To supplement their fire, one section of machine guns located south of the Sailly-le-Sec - Sailly-Laurette
Road and placed under the command of Lieutenant Bloomfield had specific orders once the village had been secured. Consolidating
lines to the north-east of the village, Bloomfield and his section of guns then moved up to the Quarry, two being
placed at the southern aspect affording a good field of fire over the Chipilly Road and the slopes to the north, whilst two
more guns were placed on the northern edge of the Quarry offering cover over the Spur. By 7 a.m., "B" & "C" Companies were now positioned
and consolidating a line to the east of the village with Colonel Cawston establishing his Headquarters in the Quarry.
"A" Company were established to the south of the village in effect forming a defensive flank whilst "D"
Company, apportioned as it was due to operation orders, were located in the southern edge of Sailly-Laurette and also in what
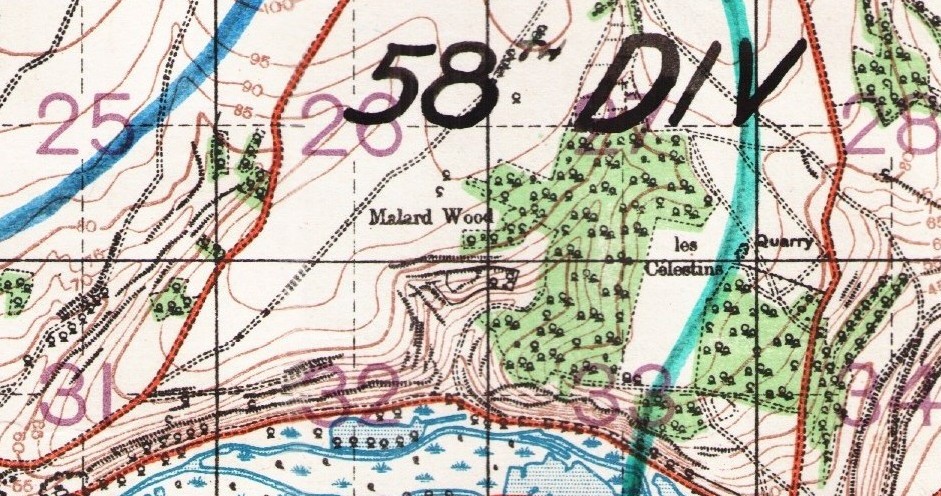
was effectively support positions to "B" Company. At 9.30 a.m., the 2/10th Londons had advanced their line a further 1000 yards forward and
were now commanding an excellent position high upon the Spur towards Malard Wood. This advanced position
was well protected with one half of a machine gun section established on both right and left flanks and augmented by four
captured German machine guns that were placed in the Quarry and in an excellent position for operations along the
valley towards Chipilly. The latter were subsequently utilised and supplemented by the machine gun section under the command
of Lieutenant Bloomfield.
| Extract Of France, Edition 2, Sheet 62D |
|
|
| Map Attached To Accompany Aust. Corps Battle Instructions No. 1, Dated 1/8/18 |
A narrative of operations included in the Battalion War Diary
records at this point the numbers of the enemy taken prisoner. Conservative estimates numbered about 500, of which, 150 were
captured from the defence lines located to the west and north-west of the village of Sailly-Laurette, 100 from the village
and 70 from the Sunken Road and their lines to the north-east. In addition to these prisoners, a further 150 men
of his force were captured in the Quarry. At Battalion Headquarters located in Sailly-le-Sec, 285 prisoners were
processed before 10 a.m., the estimated number of the enemy killed being about 150. The Advance Continues: Onwards To Chipilly Colonel Cawston at some point during the late afternoon was summoned back
to the Headquarters of the 174th Infantry Brigade which was still located in the valley north-west of the village of Sailly-le-Sec.
The Colonel was issued orders to the effect that two of his companies were to continue the advance and proceed under a 'creeping
barrage' at 7 p.m. to a position due east to the side of the Chipilly Spur where elements of the 174th Infantry
Brigade were presumed to be located. Operation orders dictated that the 2/10th Londons were now to operate on the right along
the valley, and clear the village of Chipilly that was believed to be undefended. There was however one fundamental problem,
the two companies at Cawston's disposal who were supposed to be in positions in the Green Line at K.33.b.
were in fact holding positions at K.32.a., positions west and south-west of Malard Wood. Positions
of all four companies were in fact as follows:- "B" Company, due west of the Wood, "C" Company, to the
south-west, left and right flanks respectively, "A" Company, on the Causeway located between Sailly-Laurette
and the Canal and "D" Company, who were holding reserve positions in the valley about K.31. Despite the 2/10th Londons positions being due west of the envisged 'start
line' for the continuation of the advance, the attack was to commence anyhow. A barrage of 18-pounder guns was arranged
but in addition to this, a concentration of heavy artillery pieces were to bombard the village of Chipilly between 7 and 7.30
p.m. Returning to the Quarry
at about 6.30 p.m., the Colonel had what was described as "misgivings." If the exact positions of
his own battalion were not clear to brigade, what of that of the elements of the 2/4th Battalion, the latter having not consolidated
further east than K.33.a. Central. With
the hour of the advance fast approaching and with limited time available, at least one company, it was desired, may make use
and benefit from the impending barrage that was to fall a distance of one mile in front of the forward company. To this end,
"C" Company under the command of Lieutenant Bertram Vivian Le Breton, were ordered to push forward along the crest
of a cliff located between Malard Wood and the valley and here form a defensive flank on the other side of
les Celestins. In conjunction with this manoeuvre, "B" Company under the command of Captain Edward Arthur
Bye D.C.M., were ordered to follow closely behind and in turn form a defensive flank facing north-east so as to protect the
eastern flank of "C" Company. In support, "D" Company, under the command of Captain Jack Sylvester Thomas
Berrell, was ordered to push forward, their advance being protected from the north and north-east by "C" and "B"
Companies respectively. They were then to press on having taken and 'mopped up' Chipilly and continue their advance
up the Spur to the east and south-east of the village. Captain Keith Stuart Bowron D.C.M, Officer Commanding "A"
Company, subsequently received orders to follow "D" Company and remain in reserve at Malard Valley, in
a position just off the Valley Road. To support this advance, Lieutenant Bloomfield and his machine gun section operating
captured enemy weapons, would keep up a "vigorous" barrage from positions at the Quarry from 7.30
p.m. As the artillery barrage
commenced, Captain Bye and the men of "B" Company rose to the advance as close to the barrage as possible to within
a short distance of their objective. Elements of the 173rd Infantry Brigade who had suffered a severe mauling during the afternoon,
emerged from Malard Wood from positions in K.33.a. to join the attack but after only proceeding a distance
of about 20 or 30 yards, they were hit by concentrated machine gun fire from the Terraces located on the Chipilly
Spur before reaching their objective. "B" Company of the 2/10th Londons were also hit by intense machine gun
fire before reaching their objective and were subsequently forced to consolidate on a line K.33.d. north-west of
Chipilly with "C" Company just to their north, a sound defensive position being adopted due to the latter
being protected by a cliff to the north of the road. A party of one platoon under the command of Sergeant Leonard Frank Huffey,
480872, a veteran of the Dardanelles Campaign, pushed forward to a farm located on a hairpin corner at the northern entrance
to the village of Chipilly but almost immediately they came under heavy machine gun fire from three different directions.
Suffering several casualties, the position they had reached was maintained until midnight whereupon the survivors were withdrawn
and the men of the 2/10th Londons prepared for an assault on the village to be launched on the following day.
| Extract Of Map "D" |
|
|
| War Diary, 2/10th Londons, T.N.A. WO95/3009/5 |
Notes on map:- "B" Company Yellow
"C" Company Green
"D" Company Red N.B. "A" Company still holding a line extending southwards from Sailly-Laurette (Sailly-Laurette - Gailly
Road) Q.1.a. For
the German Army, the opening day of the Battle of Amiens was described by General Erich Ludendorff as the "Schwarzer
Tag des deutschen Heeres" ("The Black of the German Army"), estimated losses being numbered in excess
of 27,000 men and officers being either killed, wounded or taken prisoner. The 8th August 1918 would witness the commencement
of the 'Hundred Days Offensive,' a series of engagements that would ultimately lead to the collapse of the German
Army on the Western Front and the signing of the Armistice on the 11th November 1918. Tenaciously, despite overwhelming odds
and mounting casualties, the enemy would fight on as the Battle of Amiens now moved into its next phase. The Capture Of The Chipilly Spur Although casualties sustained by the 2/10th Londons on the first day of battle
were minimal, on the 9th August, Lieutenant Stanley Thomas Denham joined the battalion with a draft 100 Other Ranks mostly
under 19 years of age. Amongst their number was one Private Reginald Charles Chamberlaine, 426222, a Window Cleaner and resident
of Streatham, London, who had enlisted in January 1918 at Camberwell aged 18 years and 2 months. Posted to France on the 11th
July, he was subsequently posted to "B" I.B.D. (Infantry Base Depot/Detail) located at Etaples on the 15th. Assigned
to the 2/10th Londons on the 1st August, Charles joined his unit in the field on the 8th. We will follow Reginald later during
the course of this commemoration but as he and his fellow drafts attempted to assimilate themselves into their surroundings
and the battalion, plans to take the Spur were already formulated and finalised. Shortly after noon on the 9th, orders were received from the 173rd Infantry
Brigade that the 3rd Battalion, London Regiment, were to launch an attack from the Green Line with the Red Line
as their objective after a bombardment of the Chipilly Spur between the hours of 4 - 5 p.m.. The 2/10th Londons
received orders to follow on the latters advance in close support. To assist in the attack, the American 131st Regiment, 33rd
American Division, would be attached to the 58th Division for this operation. (Authors note:- The attack of the 173rd Infantry
Brigade, 2/2nd Londons, 3rd Londons, 2/4th Londons and an attached American Battalion, would commence at 5.40 p.m., Colonel
Cawston was as yet unaware of the change in operation orders). As the barrage opened at 4 p.m., no men of the 173rd Infantry Brigade were observed at their 'jumping off'
positions. As the minutes ticked by and the attack of the 174th Infantry Brigade had already commenced, it was at 4.20 p.m.
that the initiative was taken by the O.C. 2/10th Londons as the attack of the 6th Battalion, Officer Commanding Lieutenant-Colonel
Charles Bingley Benson D.S.O., had already begun to falter in the face of heavy opposition. It is at this juncture that we
will examine the fortunes of the 6th Battalion, London Regiment, as they advanced to the attack. The 6th Londons, 174th Brigade, had been detailed to advance and seize a
position roughly to the north-east of the village of Chipilly, this attack being supported by three tanks, promptly at "Zero"
hour, the 6th Londons advanced from positions to the south-east and from the confines of Malard Wood. Intelligence
had 'suggested' that the village and les Celestins (Celestines Wood) were "probably clear"
of the enemy however this information was treated with some caution. In the event that the enemy still occupied these
positions, orders were issued to pay particular attention to the flanks, especially the right flank, two machine guns being
placed on this flank and two on the left respectively. As soon as the infantry debouched from the eastern aspect of the Wood, they were met with intense machine
gun fire from the Chipilly Ridge/Spur and from the south-west corner of les Celestins. Heavy casualties
were sustained and in the face of this concentrated fire, no progress could be made and the two machine guns in position on
the right flank were 'pushed up' no doubt in an attempt to provide suppressive fire. At this point, the 2/10th Londons
arrived and from their narrative of operations, we shall now examine and analyse their attack. The Advance Of The 2/10th Londons The Officer Commanding the 2/10th Battalion, London Regiment, Colonel Cawston,
had assembled his companies roughly in a position to the south-west (Authors note:- The War Diary records south-west but positions
were in fact to the south-east according to a schematic also included in the former) of Malard Wood, these companies
being disposed as follows:- "C"
Company Right Forward Company "B"
Company Left Forward Company "D"
Company Support Company Right Forward "A"
Company Support Company Left Forward Operation Orders anticipated that it was most likely that the companies on the left flank would be held up in their
advance either by the high ground or machine gun fire from the direction of the Terraces on the Chipilly Spur.
As a consequence of this scenario, the officers of these two companies were ordered to consolidate and place a "vigorous"
fire on the Spur and the Terraces on the western slope of the Spur whilst the right companies
were to continue their advance towards their right and take the Spur from that respective flank. With the attack of the 6th Londons facing heavy opposition, Colonel Cawston
ordered the 2/10th Londons to commence their advance. As the battalion advanced through the Wood, heavy machine gun fire was
encountered from the Terraces west of the Chipilly Spur as anticipated. Due to this intense fire, both companies
on the left flank, "B" & "A" respectively, plus, a section of "C" Company on the right,
could not advance eastwards from the Wood and thus, began to consolidate a line whilst maintaining a steady fire upon the
Spur. Of the remainder of "C" Company relatively unmolested by enemy machine gun fire, they began to continue
their advance in a south-easterly direction protected as they were by the cover of the Cliff north of the village
of Chipilly. Reinforced by "D" Company, it soon became apparent that troops on the left flank of the 2/10th Londons
were also held up by the fire from the Terraces, machine gun fire being most intense from an enemy position sited
in a clump of trees at K.34.c.9.2. just to the north of the village. The Colonel now issued orders for a flanking manoeuvre to eliminate this
troublesome position but at this point was ordered to report back to 173rd Infantry Brigade Headquarters located in Malard
Valley to the west of the Wood but upon his arrival, Colonel Cawston was informed that Brigadier-General Charles Edward
Corkran C.M.G. had gone forward from his headquarters. Returning to the battle zone, timely assistance was offered by Colonel
James M. Eddy, Officer Commanding 1st Battalion, 131st American Regiment. With the advance of the 1st Battalion of this regiment
also being held up on the flank of the 2/10th Londons by heavy machine gun fire, "K" Company, a company from the
American reserve battalion, were sent forward to assist the Londons in their flanking operation. Led by Captain George R. Miller, Colonel Eddy however requested that an officer
of the 2/10th Londons should take command and lead "K" Company into the attack, duly, Lieutenant Ernest Arthur Hudson,
the Battalion Signals Officer was dispatched and at 7.30 p.m., the company moved forward. Supporting artillery units were now informed of the situation and a request
was sent to open up a barrage on the machine gun positions located on the Terraces on the western aspect of the Chipilly
Spur. In addition to this barrage, a request was also sent for the artillery to fire a smoke screen on the southern approaches
to the village of Chipilly and as the artillery commenced fire, four machine guns located on high ground close to Battalion
Headquarters also supplemented the artillery by opening a barrage on the Terraces. Captain Berrell, O.C. "D" Company with just a small party of men
was observed to have dealt with the enemy garrison located in the Quarry north of Chipilly and was now working his
way along the top of the Terraces towards the nest of machine guns under the clump of trees that had so far held
up the advance. Not only were his party subjected to fire from the former enemy position as they inched their way forward,
they were also now caught in a deadly cross-fire from enemy machine guns positioned in the Chipilly Valley. To compound
an already dangerous position, Berrell and his party had cleared the smoke barrage sooner than was anticipated and upon reaching
the Terraces they were now suffering casualties from the British machine gun barrage. As is so often the case, a
hero emerged from the assembled ranks, one Sergeant Herbert Levi Darby, 421370. Born at Bengeo, Hertford, a married man and a resident of Ipswich, to indicate the position of Berrell's party
to the machine gunners and troops on the west side of the Valley, Sergeant Darby "deliberately stood up and faced
the triple machine gun fire and waved his steel helmet on the top of his rifle, thus giving the necessary information and
the machine gun barrage lifted right over the CHIPILLY SPUR." (Narrative of Operations:- War Diary T.N.A. WO95/3009/5).
Herbert, for his gallantry, was awarded the Distinguished Conduct Medal for this and other actions, Supplement To The London
Gazette Dated 15th November 1918. Attaining the rank of C.S.M. and surviving the war, Herbert was one of nine brothers who
served with the Colours. His youngest brother, Stanley James Darby M.M., would fall in action just over a week later whilst
serving with the 1st Battalion, Bedfordshire Regiment. Awarded the Military Medal for actions on the 31st July 1917 whilst
serving as a Lance-Corporal with the 1st Battalion, Hertfordshire Regiment, Stanley now lies in Achiet-le-Grand Communal Cemetery
Extension. The
Taking Of Chipilly As
the smoke barrage continued in the Valley, this smoke screen greatly assisted in the advance of the remainder of "D"
Company, 2/10th Londons and "K" Company of the Americans to follow on and support the advance of Berrell and his
party. The latter now reached the clump of trees to the north of the Village that concealed the machine gun nest that had
wrought havoc and halted the advance, as this was subsequently dealt with, 50 men were made prisoner and 8 guns captured.
To eliminate any pockets of resistance in the area, Berrell had previously detailed half a platoon of "D" Company
to work through the Village and round to the south of the Chipilly Spur whilst his own party pushed on to form and
consolidate a line east/west along the 85 Contour.
During the attack, the survivors of the 6th Londons were withdrawn
to a position at K.33.b.6.0. where a force of the 131st American Regiment was encountered. Lieutenant John Hugh William
Idris, his fellow officers all casualties, assumed command of the Americans and rallied the remnants of his own company. This
force then proceeded in a north-easterly direction through les Celestins and then due east, aiming for, as their
objective, the 85 Contour. Successfully reaching this point along with the party of "D" Company, 2/10th
Londons who had arrived at the objective about forty minutes previously, Idris fired the 'success signal' and proceeded
to supervise the consolidation of the position. This advanced line was now handed over to the Americans whereupon the party of the 2/10th Londons proceeded to withdraw
to support positions located on the western slopes of the Spur to the north of Chipilly. With the three remaining
companies of the battalion advancing and establishing themselves at this position at about midnight, Battalion Headquarters
took up station in the village. The
morning of the 10th August was spent in collecting the bodies of the dead and treating the wounded. Roads were cleared and
accomodation tidied for billets and for the use of associated headquarters. The men took the opportunity to bathe and there
was an almost jubilant mood when the band arrived from Sailly-le-Sec at 11 a.m. in the morning. During the afternoon, the
2/10th Londons relieved the 131st American Regiment who were holding positions on the eastern side of the Chipilly Spur.
The tenure of this position however was of a short duration as during the early hours of the morning of the 11th, the Londoners
were relieved by the Americans whereupon they proceeded upon relief to Chipilly, rejoining the 175th Infantry Brigade during
the afternoon who were located in the re-entrant north of Malard Wood. Casualties Casualties sustained by the 58th (2/1st London) Division had been heavy but
the losses to the enemy had been greater still. The Narrative of Operations contained in the War Diary of the 2/10th London
Regiment estimates that in operations against the village of Chipilly 100 of the enemy were taken prisoner and 25 were killed
however this does appear to be a rather conservative estimate. The 2/10th Londons had also suffered considerable losses and
to represent the true nature of the severe fighting during operations, their losses were recorded in the Narrative as follows.
(Annotations by Author) Officers
Killed Acting Captain
Keith Stuart Bowron D.C.M.
"A" Company
Lieutenant
Vivian Bertram Le Breton
"C" Company Lieutenant
Cecil James Greenwood
"A" Company
Second-Lieutenant Edwin Harold Struebig M.M. "D" Company
Officers Wounded
Lieutenant John
Woodbridge Aris?
"C" Company Lieutenant
Stanley Thomas Denham Lieutenant Reginald
Montgomery Parker?
"C" Company
Second-Lieutenant
Donald George Ritchie
"D" Company
Second-Lieutenant
Jack Withers Clark
"C" Company
Second-Lieutenant
Ivan Hugh Sly
"A" Company
Second-Lieutenant
Charles Arthur Burton "C" Company Sergeants Killed Sergeant Timothy Morris, 423387 Sergeant Leonard Frank Huffey, 420872 Sergeants Died Of Wounds Sergeant Alfred James Wintringham, B/201052 Sergeants Wounded Sergeant Thomas Lindsell, 740906 Sergeant Frederick Charles Corck, 425728 (Subsequently Died of Wounds) Sergeant Frank John Salter M.M., 741259 Sergeant Henry Leach, 421249 Sergeant
Edwin George Butcher M.M. (Bar Awarded 1919) 423400 Sergeant Gerald Kitchenmaster, 741039 (Narrative Records Number 422303, Subsequently Died of Wounds) Sergeant Frank Withrington, 423351 (D.C.M. Awarded For Operations) Other Ranks Killed 22 Wounded 148 Missing 4 Total Killed 4 officers 2 Sergeants 16 Other Ranks Total Died of Wounds 1 Sergeant 6 Other Ranks Total Wounded 7 officers 8 Sergeants 148 Other Ranks Total Missing 4
Other Ranks An analysis
of the Commonwealth War Graves records confirm that between the 8th - 11th August, 4 officers, 5 Sergeants and 22 Other
Ranks were either killed or died of wounds. (Authors note:- Sergeant Corck would succumb to wounds over a month later in England
in addition to Sergeant Kitchenmaster who would die of wounds received on the 10th August). Numbered amongst the wounded was the young Private Reginald Charles Chamberlaine
who had only been at the front for a matter of days. Receiving a shrapnel wound to his left foot on the 10th August, Reginald
was initially treated for his wounds at the 55th Field Ambulance, a medical unit contained in the 18th (Eastern) Division
before being admitted to the 41st Casualty Clearing Station located at Pernois, north-west of Amiens. Transferred to the 2nd
Canadian General Hospital at Le Treport, Reginald was then evacuated to England via H.M.H.S.St. David on the 15th
August and continued to receive treatment for his injuries in both the Western Hospital, Torquay and the Crownhill Military
Convalescent Hospital, Devon. Posted to the Army Reserve in March 1919, Reginald would be eventually discharged a year later,
and die, aged 64 years in 1964. Relief
& Rest On
the 11th August, the 2/10th Londons commenced a relief of the 5th Battalion, Royal Berkshire Regiment, 36th Infantry Brigade,
12th (Eastern) Division, in the Morlancourt Sector. With the relief conducted on the night of the 11th/12th, the battalion
now found itself occupying the Left Sub-Sector. Tenure of this sector was once again of a short duration when on
the night of the 12th/13th, the 175th Infantry Brigade was in turn relieved by the 142nd Infantry Brigade, 47th Division.
Proceeding to a position in a valley located due west of Morlancourt (J.11.d. & J.12.c.), Brigade Headquarters
were established in J.11.d.8.8. respectively. Upon receipt of a Warning Order, at 4.30 p.m. on the afternoon of the 13th, the 175th Infantry Brigade proceeded
by route of march to shelters located in Escardonneuse Wood, west of Bonnay, Brigade Headquarters being established
at Frechencourt. Now in Corps
Reserve, the men began to clean up their equipment in addition to their accommodation. Comparative rest was however limited
as on the 15th August, a programme of training was initiated resulting in the following day of a tactical exercise being performed
entitled "The Battalion in the Attack." This exercise, no doubt far from welcome by the men after their
exertions in battle, was performed by both the 2/10th & the 12th Battalions, Brigadier-General Horace Walter Cobham D.S.O.
casting his watchful eyes over the performance of his men. Of interest to note, during this period of training an interesting musketry demonstration was performed to the brigade
by "D" Company of the 9th Londons (Queen Victoria's Rifles). Under the command of Second-Lieutenant Percy William
Powell, this demonstration consisted of the use of tracer bullets showing the effect of the fire power of a platoon where
fire power and fire discipline is good. One for future lectures and the military manual no doubt! Continuing their programme of training over the next few days, it was on
the 21st that Divisional Order Number 148 was received by the 175th Brigade in relation to an attack to be carried out on
the 22nd August. The 58th Division were to be placed Corps Reserve and as a consequence of orders received, a reconnaissance
was made of an area to the west of Morlancourt for a suitable site for assembly. The Second Battles Of The Somme: The Attack On The Green Line
On the 21st
August, attacks were resumed by the Third Army under the command of General Hon. Sir Julian Byng on a frontage of about nine
miles north of the Ancre river from Miraumont to Moyenneville. This assault, supported by tanks, was launched by Fourth and
Fifth Corps and initially made good progress despite heavy enemy counter-attacks in the area of Achiet-le-Petit and Logeast
Wood. After heavy fighting, both the village and the wood were taken and the line was advanced to the Albert - Arras Railway
Line which was duly crossed after the fall of the villages of Courcelles-le-Comte and Moyenneville. To the south of this advance,
the 21st Division of Fifth Corps operating on the north bank of the Ancre river in the vicinity of Beaucourt, successfully
attained their objectives resulting in the capture of about 2000 of the enemy. With this first phase of operations brought
to a conclusion, a second phase was about to be conducted by Third Corps of the Fourth Army to the south. Fourth Army under the command of General Sir Henry Rawlinson would launch
the second phase of the attack on the enemy with Third Corps under the command of Lieutenant-General Sir Richard Butler. To
their right and to the south respectively, the attack would also be conducted by the 3rd Australian Division, Australian Corps
under the command of Major-General Sir John Monash. Allocated a small force of Tanks and Corps Cavalry in addition to aircraft to support the advance of the infantry,
Third Corps would launch the attack at the designated "Zero" hour scheduled to take place at 4.45 a.m. with the
47th (2nd London), 12th (Eastern), 18th (Eastern) Division, 3rd Australian Division and the 38th (Welsh) Division co-operating
on both flanks. The
Attack Of the 47th (2nd London) Division: Operation Orders The 47th Division, G.O.C. Major-General Sir George Frederick Gorringe K.C.B., K.C.M.G., D.S.O., would commence their
advance from positions located in the Old Amiens Defence Line east of Tailles Wood (Bois des Tailles), the final
objective to be reached being denoted as the Green Line, this line being drawn as a position on high ground located
to the east of Happy Valley. As a precursor to the taking of the latter objective, a line denoted as the Brown
Line would be initially taken, this being defined as about the course of the Albert - Bray Road. This objective would
be assaulted and taken by the 141st Infantry Brigade and it was then that the 142nd Infantry Brigade were to pass through
or 'leapfrog' their sister brigade and press on to capture the Green Line. The 140th Infantry Brigade would
be placed in Reserve however if enemy resistance proved to be weakening, they would then be moved forward through the 142nd
Brigade and the Green Line to continue the advance. (Authors note: 140th Brigade O.C. Brigadier-General Henry Brewster Percy Lion Kennedy C.M.G., D.S.O., 141st Brigade
O.C. Brigadier-General William Frederick Mildren C.M.G., D.S.O. and 142nd Brigade O.C. Brigadier-General Robert McDouall C.M.G.,
D.S.O.). To support the infantry
attack, an 18-pounder artillery barrage would advance at the rate of 100 yards in four minutes from "Zero" plus
4 minutes to "Zero" plus 200 minutes allowing for a 'halt' on the first protective barrage line. The barrage
would then move forward at "Zero" plus 118 minutes at the same rate and then at "Zero" plus 200 minutes
cease short of the objective of the 23rd Londons, 142nd Brigade. During the 18-pounder barrage, heavy calibre artillery pieces
would also bombard this area as long as it was safe to do so in an attempt to avoid any casualties by 'friendly fire.'
To mark the Left Divisional Boundary, i.e. that with the 35th Infantry Brigade, 12th (Eastern) Division, one round
of Thermite would be fired every two minutes, on the Right Divisional Boundary and due to the scarcity of the latter,
a 4.5 inch Howitzer would fire one round of smoke shell every two minutes to mark the boundary with the 9th Australian Brigade,
3rd Australian Division respectively. The artillery programme was even more extensive than can be detailed during this account
but upon the capture of all objectives, the plan was then to move the artillery forward, 86th Army Field Artillery Brigade
(R.F.A.) to positions roughly due north of the Bois des Tailles, the 150th Army Field Artillery Brigade (R.F.A.) to a position
north-east of the Wood. To
supplement the artillery, there would also be a machine gun barrage performed by the 47th Battalion, Machine Gun Corps, Officer
Commanding, Lieutenant-Colonel Wyndham Raymond Portal D.S.O., M.V.O. Three Sections (12 guns), would be allocated to the advance
of the 141st Brigade, One Section to each of the assaulting battalions whilst a third was to be placed in Reserve. Three Sections
(12 guns) would also be allocated to the advance of the 142nd Brigade, these moving up with the left battalion, 24th Londons,
to positions about L.2.b.0.9. (the Forked Tree located to the west of Happy Valley). From this
position the machine guns would place a barrage to cover the second objective, the Green Line, this barrage being
directed towards the north and the north-west of Happy Valley in map references F.20.a. - F.21.d. Aircraft would also be employed during the attack in both an offensive and
contact role. From "Zero" plus 2 hours to "Zero" plus 4 hours, smoke bombs would be dropped on high ground
to the west of Fricourt (X.26.d.) and to the north-west of Billon Farm (F.23.a.), special aircraft being
detailed to engage any enemy balloons as required. To enable the assistance of contact aircraft, each of the attacking brigades
would be issued with tin discs to be used as a primitive heliograph, these, being used in conjunction with flares and other
means of communications on the ground. The Operation Orders for the attack were even more detailed than can be included here such as arrangements for attached
Royal Engineers, Signals and Medical Units. At this juncture we will examine both the roles and objectives of the Tanks of
the 5th and 6th Battalions, Tank Corps, and that of the Corps Cavalry, the 1/1st Northumberland Hussars, attached for operations.
Tank & Cavalry
Support 1 Section
(4 Tanks) were to be allocated to the attack of the 141st Brigade and 2 Sections (each Section numbering 3 Tanks) allocated
to the advance of the 142nd Brigade respectively. Major Henry Christian Seymour Combe, Officer Commanding "A" Company,
5th Tank Battalion, attached to 142nd Infantry Brigade Headquarters for operations. The Tanks assigned to the advance of the 141st Brigade would at first be
assembled in their concentration area at K.26.c. west of Malard Wood. Moving forward on "Y"
/ "Z" Night to a position 1000 yards to the rear of the present front line, they were to commence their advance
at "Zero" hour plus 12 minutes so as to clear the infantry's assembly positions before an anticipated enemy
artillery barrage began to fall. Their objectives were to neutralise enemy strong points and dug-outs and to clear up any
other pockets of enemy resistance so as to assist the 'mopping up' parties of the infantry. When the first objective
was reached, i.e. the Brown Line, the Tanks would then be assembled and concealed in a position so as to assist in
any operations should the enemy launch a counter-attack. Tanks allocated to the attack of the 142nd Brigade would also assemble in map reference K.26.c. and move
forward on "Y" / "Z" Night to a forming up position located east of the Second Line System
roughly at about map reference K.11. (Central), a forked cross-roads west of the Bois des Tailes. Also commencing
their advance at "Zero" hour plus 12 minutes, the objectives of these Tanks was to engage the enemy and clear him
from his positions in Happy Valley and to deal with the enemy garrison located in the Chalk Pit and banks
to the south-west of the latter position. These operations were more detailed with specific tasks being assigned; One Section
(3 Tanks), would advance on Happy Valley to complete the task of clearing this position whereupon a further Section
(3 Tanks) would be halted and placed under cover in about map reference L.3.a.1.1. in the southern aspect of Happy
Valley, due west of the Chalk Pit. One Tank would then be sent forward to the latter position followed by a
second if deemed necessary, to clear the Pit. This Tank, suffice to say if two were not to be utilised, would then
return as per Operation Orders to its Section to be placed in Reserve so as to be used as required. These Tanks, as of those
assigned to the 141st Brigade, placed in a suitable position should the enemy launch a counter-attack. Once the Green Line had been taken and secured, two Squadrons of
the 1/1st Northumberland Hussars along with six Whippet Tanks of the 6th Battalion, Tank Corps, were to press on
to objectives on high ground to the east of Happy Valley. Operation Orders stated the objectives of the Hussars. The leading Squadron, "A," was to establish a position
on the southern contours of high ground located in map reference F.22. on the eastern slopes of Citadel Valley,
this position now roughly equating to the location of Point 110 New Military Cemetery. Once established in this position,
they would then deploy their Hotchkiss machine guns facing in an easterly direction. "B" Squadron were then, upon
entering the confines of the valley, to turn in a northerly direction due south of the Bois Francais, with the objective
of the destruction or capture of enemy guns in the immediate vicinity whilst then establishing their machine guns to the east
so as to prolong the left flank of "A" Squadron. To support the advance of the leading two cavalry squadrons, "C"
Squadron which was divided in Troops throughout the Corps, were to reform and support the attack if deemed necessary. Of the six Whippet Tanks, their orders were as follows. Three Tanks
were to advance across the northern level crossing, cross Happy Valley and continue to the high ground to the east
whilst the remaining three were to advance across the southern level crossing. The leading two Tanks were then continue their
advance due north to assist "B" Squadron of the Northumberland Hussars in the destruction of the enemy guns. Once
this objective was completed, they were to continue their advance up on to the Plateau stretching along the heights
north-east of Happy Valley whereupon the third tank of this group was to continue its advance up on to the high ground.
Operation Orders, as orders
normally do, look good on paper. As events transpired, the presence of the Tanks would be virtually negligible due to numerous
factors, for the Northumberland Hussars, their actions, though heroic, would have disastrous consequences.
|
|
| Extract Of Map, France, Edition 4, Sheet 62D N.E. Ordnance Survey (O.B.) Aug. 1918 |
"Zero" Hour:- The Advance Of The 141st
The advance
of the 141st Infantry Brigade would be conducted as follows:- 19th Battalion, London Regiment Left Flank 20th Battalion, London Regiment Right Flank 1/18th London Irish Rifles
Support Brigade Battle H.Q.
Established on the 21st to the south of Morlancourt (K.14.B.2.1.)
On the night of the 21st, the enemy opened up a barrage consisting of 4.2
inch howitzer and Blue Cross gas shell (diphenylchloroarsine, an irritant), harrasing both the front and rear areas
from 10 p.m. onwards. At 3.45 a.m., the 19th London's, Officer Commanding, Lieutenant-Colonel Henry Gaspard de Lavalette
Ferguson D.S.O. reported his men in position on the left, on the right flank, the 20th London's, O.C. Lieutenant-Colonel
William Bernard Vince D.S.O., M.C. also reported his men in position (Authors note: The exact time is unknown as the War Diary
for the month of August is 'missing'). In support positions, the 1st London Irish, O.C. Lieutenant-Colonel George
Henry Neely M.C., moving forward to their assembly positions at 2 a.m., exact time of assembly not recorded.
At "Zero" hour,
4.45 a.m., the barrage duly opened as the troops moved forward from their assembly positions. Keeping as close to the barrage
as possible, almost as suddenly as this advance commenced, enemy artillery opened up a barrage on the front line positions
and the Bois des Tailles. This however was not a speculative response to the advance as intelligence gleaned from
captured Germans after the attack revealed that English prisoners taken previously had disclosed information as to the actual
date and time of the attack. Fifteen minutes into the attack, enemy artillery increased in intensity but at 5.30 a.m., a report
was received at Brigade Headquarters from the Irish Rifles stating that "satisfactory progress was being made"
and that the Left Company of the 19th London's, "A" Company respectively, had advanced over one
thousand yards into the enemy line. Although this company had lost all their officers, the men, who wavered somewhat, were
rallied by Acting Captain Cecil Richard Causabon Vincent M.C. of the Irish Rifles who took command and led them on to their
objective. This initial advance had progressed well without meeting any heavy opposition but due to a mist and dust accentuated
by the barrage, topographical features proved to be difficult to identify and as a consequence on the right flank in particular,
the 20th London's began to consolidate a position short of the preliminary objective, the Brown Line respectively.
It is at this juncture that we will now follow the actions of the Tanks allocated to the 141st Brigade for the attack, the
6th Battalion respectively. Witnessing
numerous actions during early August, the battalion had suffered significant casualties in the proceeding days. Under the
command of Acting Major Ronald Beaumont Wood (Lieutenant-Colonel as of the 9th of August, London Gazette dated the 30th of
September 1918), it was on the 15th of August whilst at Le Quesnel Wood, south of Villers-Bretonneux, that the battalion was
redistributed on an Army and Corps level. "A" and "C" Companies thereupon proceeded to Tronville Wood,
east of Amiens, before then entraining at Longeau, Amiens, on the 18th, for operations under the Third Army south of Arras.
"B" Company however, under the command of Captain Harold Darby M.C., remained at Le Quesnel pending further operations
under Fourth Army. It was whilst instructing his crews of operational orders, that Major Wood was unfortunately mortally wounded
near Courcelles and died almost immediately. Information
as to the actions of the Tanks assigned to support the advance of the 141st Brigade is limited to say the least, the 6th Battalion
War Diary (T.N.A. WO95/107/3) furnishing no details whatsoever. Likewise, the War Diaries of the infantry brigades involved
in the attack mention no advance by the Tanks or supporting actions, just one passing remark in the 141st Brigade Diary that
states "that the work of attached Tanks was not very good" but this reference may indeed
refer to the actions of the Tanks as a whole.
142nd Brigade
It was at about 8 a.m. that the 142nd Brigade passed through the 141st to
continue the advance. As they pressed on, their advance was met by heavy machine gun fire particularly eminating from the
left flank and in the centre by concealed machine gun positions. Casualties were once again heavy however the 23rd London's
under the command of Lieutenant-Colonel Robert Hill Tolerton M.C. reached the Green Line but suffered greatly due
to losing the protection of the barrage. Of the 22nd London's, Lieutenant-Colonel Lawrence Lewin Pargiter Officer Commanding,
one company had managed to link up with the 33rd Battalion A.I.F. on their right flank at the Chalk Pit, the extreme
right of their objective. Despite having only one company at his disposal, Colonel Pargiter's men were re-inforced by
both "B" and "D" Companies of the 33rd Australians whereupon heavy fire by rifles machine guns and captured
weapons were used to great effect, checking the enemy's advance. The position was successfully held but as the hours wore
on, the situation across the battlefield was about to change. The Advance Of The Cavalry The following narrative of events is now extensively drawn from The History Of The Northumberland (Hussars) Yeomanry
1819 - 1919. Published in 1924 by Constable And Company Ltd. At 7.45 a.m., two squadrons of Cavalry of the 1/1st Northumberland Hussars, Officer Commanding Lieutenant-Colonel
Alan Boyd Reynolds, mounted their charges. The attack of the Hussars would be conducted by "A" Squadron under the
command of Major John George Grey Rea D.S.O. and "B" Squadron, Officer Commanding Captain Ralph Lambton Stobart.
"C" Squadron, under the command of Major William Burdon, was divided amongst the divisions in Troops had received
orders to reform and support the attack if deemed necessary. Operation Orders as previously stated the objectives of both the Tanks and the Cavalry. The leading Squadron, "A,"
was to establish a position on the southern contours of high ground located in map reference F.22. on the eastern
slopes of Citadel Valley, this position now roughly equating to the location of Point 110 New Miltary Cemetery. Once
established in this position, they would then deploy their Hotchkiss machine guns facing eastwards. "B" Squadron
were then, upon entering the confines of the Valley, to turn in a northerly direction, south of the Bois Francais, with
the objective of the destruction or capture of enemy guns in the vicinity whilst then establishing their Hotchkiss guns to
the east so prolonging the left flank of "A" Squadron. In addition to the support of the Corps Cavalry, six Whippet Tanks of the 6th Battalion were to co-operate
under the command of Major Harold Darby M.C., a veteran of the first tank assault in September 1916, Darby leading "B"
Company into action.
Three
Tanks were to advance across the northern level crossing, cross the Valley and continue to the high ground whilst the remaining
three were to advance across the southern level crossing. The leading two Tanks were then to continue their advance due north
to assist "B" Squadron of the Northumberland Hussars in the destruction of the enemy guns and then after this objective
was completed, continue their advance up on to the Plateau stretching along the heights north-east of Happy Valley
whereupon the third Tank was to continue its advance up on to the high ground. With Lieutenant Gerald Alfred Bulteel Latham's Troop as advanced guard,
"A" Squadron galloped off at pace towards the railway line followed by "B" Squadron some 300 yards in
the rear. Pressing on, the Hussars reached the line of the Meaulte - Etinehem track where they were now exposed and in full
view of the enemy but with momentum so vital to the attack, the advance of the cavalry continued. Due to this factor, Lieutenant
Latham's Troop upon reaching the railway line drifted off the designated course of the advance and headed too far north,
Colonel Reynolds then, as a consequence, issuing orders for Lieutenant Isaac Armorer Patterson and his Troop to take the lead.
Enemy artillery now had the
range and although no casualties were sustained, the men and the horses had to negotiate the barbed wire and trenches of the
enemy's defences. Whilst moving along the northern side of the railway line ready to change direction to the southern
aspect, there appeared to be no way through as the points were hung up until Sergeant North (Authors note: Possibly Corporal
William H. North) accompanied by two men, forced their way through with great determination. With barbed wire defences lining
each side of the railway line, the only option available for the men and their charges was to attempt to ride along the length
of the line and this they accomplished due to their skills in horsemanship despite being subjected to artillery and rifle
fire. Eventually debouching
from the confines of the track on the northern side, the Hussars headed for the northern aspect of Happy Valley as
the terrain opened out to allowing them to move at a 'hand gallop,' lengthening the stride and steadily increasing
speed. Altering their direction to avoid rifle fire, the direction of attack was now swung back slightly towards a visible
landmark on the battle, the Forked Tree but of the Tanks expected to be observed moving towards the Bray - Fricourt
Road at this point, there was no sign of their advance. Pressing on towards the Green Line, the terrain now flattened out
as the horses steadily increased pace. Upon reaching the Bray - Fricourt Road, enemy artillery shells began to fall all around
but still they pressed on with success within their grasp. Crossing the road at a full gallop, they then passed over the railway
and down the slopes of Happy Valley and on up the eastern slopes and once again onto flat ground. Before them lay
a thick barbed wire defence system and a Sunken Road and at this juncture the Hussars came under machine gun and rifle fire
from both the north and south as well as machine gun nests positioned behind the wire entanglements. As men and their horses
began to fall all around, amongst the cacophony of sound a deft signal was given and in response the leading Troop of "A"
Squadron under the command of Lieutenant Patterson swung away from the barbed wire entanglements in a southerly direction.
Upon conforming to the signal to change direction, both Patterson and his horse were hit, Major Rea, O.C. "A" Squadron
also being hit close to the enemy wire. There were many brave deeds performed on this day but of the wounding of the Major,
just one instance comes to the fore. His Orderly, Private Arthur Oliver, 270036, a native of Lesbury near Alnwick, Northumberland, rushed towards his
officer on foot. Assisted by Trumpeter Frank Gordon Cherrington, 326764 of Smethwick, Staffordshire, both these men carried
the officer to a position of safety. It was then that a shell burst amongst the three, severely wounding the Trumpeter, Private
Oliver then carrying the Major over both trenches and wire for a distance of three miles to safety. Frank, aged 17 years would
unfortunately succumb to his wounds on the battlefield and now lies buried in Bronfay Farm Military Cemetery, Bray-sur-Somme. Upon the wounding of Major Rea, Captain Dawnay (Eric Geoffrey attached,
Yorkshire Hussars?) now assumed command of "A" Squadron. Dawnay accounted for only 23 men from the squadron and
it was now became quite apparent that the gallant advance of the Hussars had come to a costly end. Colonel Reynolds therefore
issued orders to his Second-in-Command, Major Stanislaus Burrell, to lead the men back in fours and fives and this was conducted
in good order despite the fatigue of both horses and men. With casualties numbering 60 either killed, wounded or missing,
an analysis of the Commonwealth War Graves database now reveals that 8 men were killed in action or died of wounds on the
22nd August. Casualties could however have been even more significant due to an obsession in collecting 'battlefield trophies.'
The War Diary of the 33rd Battalion, A.I.F., 3rd Australian Division records the following:- " A party of the Northumberland Hussars, the remnants of a squadron,
gallopped down the BRAY-FRICOURT Road shortly after the capture of the GREEN Line. They suffered heavy casualties from machine
guns and aeroplane bombs on reaching our left flank. The leading cavalryman wore a German steel helmet and in the mist and
smoke some riflemen took them for the enemy and fired about 20 rounds, inflicting casualties to horses. 2 officers and 10
men followed by about 20 riderless horses galloped towards BRAY and reached the outskirts of the village. All except one officer
became casualties. The cavalry displayed the greatest courage and dash, but shock action against a nest of machine guns can
only end in failure." Counter-Attack It was at about 2 p.m. and after the enemy had reorganised his positions, that the enemy counter-attack began to
develop. As we have already witnessed, Colonel Pargiter had organised his one company in the defence of the Chalk Pit
with exceptional skill, being ably assisted in this task by Captain Christopher Herbert Oakley and the timely arrival
of the Australians. Authors note: 23rd Londons were subjected to a heavy counter-attack turning their left flank.
This compelled them to withdraw to the latter line about 4.35 p.m. The counter-attack had developed though as early as 1 p.m. when Lieutenant-Colonel Leslie Morshead, Officer Commanding
33rd Battalion A.I.F., had observed the enemy advancing from Caftet Wood to the north-east in map reference F.18.
Moving forward in an artillery formation, in simplistic terms, 'spread out' to avoid the effects of the burst
of artillery shell, this advance, preceded by a line in extended order, numbered about 250 men. Advancing towards the left
flank of the 47th Division held by the the 24th Londons, O.C. Lieutenant-Colonel Reginald Stewart Irvine Friend D.S.O. and
without artillery support, Morshead described their advance as "leisurely and without interruption." A
single British contact aircraft finally observed their movement and notified the artillery by wireless, then firing the warning
signal, a white parachute flare in the direction of the attack, the artillery then placed a barrage on the massing enemy who
no doubt suffered heavy casualties.
| The Advance Of The 142nd Infantry Brigade |
|
|
| Extract Of Map, War Diary 22nd Battalion, London Regiment, T.N.A. WO95/2743/5 |
Commemoration Under Construction
|