|
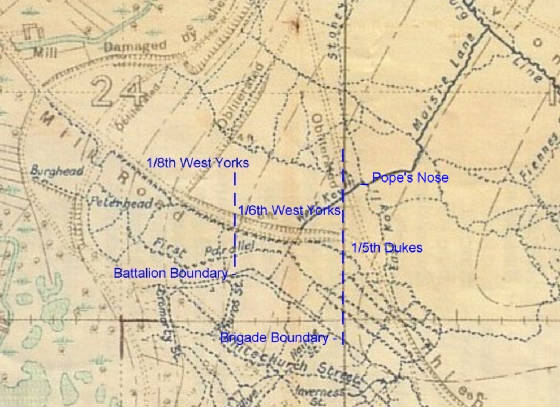
Zero Hour
At 3.45
a.m. the barrage commenced on the enemy's line. The exact formation of the companies that commenced the attack is unknown
but this would have been conducted on a two company frontage in four waves with the companies bringing up the rear leap frogging
the advance formations.
From the outset, visibility became obscured as the artillery pounded the line and the remnants
of the village, but on the left flank of the 2/6th West Yorkshire's, their sister battalion, the 2/5th, made good progress
through the lightly defended enemy front line.
The lead companies of the 2/6th began to lose direction as they attempted
to move forward to occupy the enemy's front line positions and force a link with the Australians on their right flank.
Disorientated, the lead companies, Wyrall records this as being "A" and "B" Companies,
became inextricably mixed, or at least some of them, with "B" Company of the 2/5th West Yorkshire's on
the left flank. "A," Wyrall's History continues, made efforts to correct this loss of direction, but
only a small number of men actually reached the barbed wire defences protecting the German front line. Many were just cut
down in No Man's Land before they had even reached their first objective.
So what were the circumstances surrounding
the unfortunate destruction of the lead companies of the 2/6th before they had even had a chance to penetrate the enemy's
first line of defence?
The key factor was the time allocated to the Australians to advance through the enemy's defences,
turn, and then bomb westwards to link up with the Yorkshiremen. If this advance was not carried out apace and accomplished
as soon as feasibly possible, the right flank of the 185th Infantry Brigade's attack would be completely exposed to enfilade
fire. It is also worthy to note that the Australians had been ordered to give the 2/6th West Yorkshire's a 'head start'
as their advance wave would require a period of time to regroup and push on to its next objective.
It is with some unfortunate
irony that the coup de grace that befell the leading companies came from an abandoned British tank to the south-eastern
corner of the village. Utilised by the enemy as an observation and machine-gun post, the advance to the wire was clearly visible
from this location and consequently subjected to enfilade fire. In under ten minutes the men of these lead companies had either
been killed, wounded or captured.
"C" and "D" Companies were now committed to the attack. Leap
frogging what remained of the advance wave, "C" Company on the left flank managed to penetrate the wire defences
and succeeded in occupying a portion of the enemy's front line located to the south-eastern corner of the village.
"D" Company pressed on still further passing through the ranks of "C." Establishing posts in the centre
of the village, the advance continued as far as the church where they were joined by men of "B" and "C"
Companies of the 2/5th West Yorkshire's who pushed out parties further to the north and the east.
At the very least
it is difficult to assign any chronology to the attack but at the 185th Infantry Brigade Headquarters we have a
fascinating insight into some of the events as they transpired recorded by Major Wiltshire, A.I.F, in his diary and available
on line courtesy of the New South Wales State Library, Australia.
Wiltshire records that at 4.45 a.m. that the Australians
were reported to have taken the first line of the enemy's trenches however that no word of the British attack had been
received. By 5.15 a.m. he records further that there were still no reports received and that a barrage continued. The
War Diary of the 22nd Battalion, A.I.F. records that the front line position was taken at 4.01 a.m. but almost immediately
enemy bombing attacks developed from the left flank (right flank of the 2/6th West Yorkshire's) as there was no support
from the British in this sector. This underlines the catastrophic destruction of the latter battalion in such a short timescale.
As the second and the third waves of the Australian attack pressed on and took the second German line at 4.18 a.m. attempts
were made to establish strong points about 150 yards in advance of the latter position but this was not successful owing to
heavy machine-gun fire from the left flank that the diary records was "up in the air."
On the right flank of the Australian 6th Brigade it soon became apparent that the 5th Brigade had begun a retirement
due to heavy enemy opposition that had killed most of their officers. The remnants of the latter brigade however were
rallied and sent forward once again with attached units of the 7th Brigade.
The situation that the 6th Brigade now
found itself in was critical to say the least with both flanks compromised.
For the next couple of hours the attack descended
into a series of 'bombing duels' as the Australians attempted to gain trench bay by bay.
To the west the
actions of the tanks allocated to the attack of the 62nd Division were virtually over just a few hours after they had started. It
soon became apparent that the tanks had been subjected to armour piercing bullets that had caused mayhem to the crews confined
in their claustrophobic surroundings. It was a brave attempt that like the first battle had ultimately resulted in failure.
"C" Company of the 2/6th West Yorkshire's, occupying a position to the south-west of the village attempted
to gain ground eastwards towards the Australian left flank but were counter-attacked by the enemy. Falling back under increasing
pressure a 'block' was established in the trench near the Ecoust - Bullecourt road and this precarious foothold was
maintained by bombers with their ever dwindling supplies of grenades. Lieutenant Robert Bickerdike, a native of Barkston Ash,
had gallantly attempted previously to press on towards the Australians. Taking command of the company and destroying three
enemy dug outs, they continued this bombing duel until forced to retire, Bickerdike himself being wounded. For his actions
he would be awarded the Military Cross.
As Bickerdike was wounded, Lieutenant Tom Armistead continued the action until
he himself was wounded. It was by this stage that it became clear that the position had become untenable.
Possibly in
a position well forward, Second-Lieutenant Robert Frost, although wounded attempted to advance accompanied by just a few men.
Accounting for a number of the enemy himself, this officer was awarded the Military Cross for his actions on this day.
At about 6.30 a.m. it had soon become apparent that the fight for the centre of Bullecourt by parties of the 2/5th
and 2/6th West Yorkshire's was being held up by the enemy. As a consequence of this struggle to maintain or improve the
position "D" Company of the 2/7th West Yorkshire's were sent forward to reinforce the beleaguered garrison.
Two platoons were allocated to support the 2/5th whilst the remaining two platoons were to be sent to the 2/6th.
Unfortunately, due to a misunderstanding, the Officer Commanding on witnessing two battalions withdrawing on his left flank,
possibly assumed that this was the retirement of the very units his men were intended to support. Proceeding no further, the
company withdrew in accordance with the retirement on the left to the railway embankment. The men in the centre of the village
would have to fight on alone.
"D" Company of the 2/6th West Yorkshire's that had pressed on beyond the
church had by now suffered heavy casualties as it had established posts from the centre of the village. Captain Eric Craven
Gregory was numbered amongst the wounded and one of the last reports of any news received as regards their position was from
Captain Arthur Estough Green, "B" Company, 2/5th West Yorks, who himself was wounded. Of the fate of the men
and Captain Gregory, no further information was received. The men simply fought on until surrounded, killed, wounded or captured,
the survivors either falling back to the railway embankment or to a block established by Captain Green and the men of the
2/5th to the south-west of the village. Green himself had returned to to the British front line during the morning to gather
bombs and ammunition to continue the defence of the position. Under increasing pressure from enemy counter-attacks the supply
of bombs eventually ran out and with just a handful of men left to defend their isolated position the order was
given to retire to the railway embankment about 11.30 a.m.
Casualties
Of the
393 Other Ranks who went into the battle at Bullecourt, 287 of them were either killed, wounded or missing. All 12 company
officers who went into the attack were either killed or wounded, most, experienced officers that the battalion could ill afford
to lose.
Lieutenants Tom Armistead, George Charlesworth, Gerald Knapton Brown, Edward Stewart Fletcher and John
Gilbert Hall were all killed. Captains George Stewart Gordon and Eric Craven Gregory were wounded and Lieutenants Robert Frost,
Robert Bickerdike, Vivian Burdett Dowling, James Rhodes and Victor Wilson wounded.
The 2/5th West Yorkshire Regiment
had also paid a high price in the attack suffering 257 casualties of which 4 officers had been killed, 1, a Prisoner of War
and 7 wounded.
As a whole the 62nd (West Riding) Division had suffered nearly 200 officer casualties and over 4000 Other
Ranks.
For the Australians who had attacked the Hindenburg Line and gained a tentative foothold that would be exploited
in the days that followed,Second Bullecourt, by its closure on the 17th May, had cost the Australians a further 7000 casualties.
Restructure And Rebuilding The Battalion: The First Drafts Arrive
At 10 p.m.
on the night of the 3rd May the survivors of the 2/6th West Yorkshire's were relieved by units of the 7th Division and
proceeded into caves at Ecoust.
The battalion was now reorganised on a cadre of 3 platoons and even though few in number
were the men they were held in a state of readiness until 8.30 p.m. on the 4th where they marched to their original billets
located at Ervillers.
After a few days of refitting, training and rest, the battalion was reorganised once again into
one company consisting of about 130 Other Ranks under the command of Captain Hardy John Behrens. This company were attached
to the 2/7th West Yorkshire's and proceeded for duty in the line on the 7th.
On this date also the first of
many drafts to the battalion arrived when 96 Other Ranks were posted from the 33rd Infantry Base Depot or 'Detail'
as this establishment was so often referred to, located at Etaples. Just as soon as the battalion set about training the new
arrivals a further draft of 63 O/R's was received on the 9th, this time from the 32nd I.B.D.
On the following
day a conference was held with the G.O.C. Fifth Army, General Gough, at Achiet-le-Grand as regards the attack at Bullecourt.
Gough made his feelings clear, rightly or wrongly, as regards his opinion of the conduct of the division during recent operations.
Lack of discipline, a need to adopt a more offensive spirit to name but a few accusations laid before the Commanding Officers
of their respective battalions. It is fair to say that in some of his criticisms, his opinions were correct, but what remained
in particular with the officers, was the feeling that they had now required a bad reputation. In the case of the 2/6th, virtually
destroyed on the battlefield, the opportunity now arose for the Phoenix to rise from the ashes.
After an inspection
by the Brigadier-General who no doubt reiterated Gough's opinions, the first of one of many new officers, Lieutenant George
Ambler was posted to the battalion on the 11th May.
During the 13th May, Captain Behrens and his company of 130
O/R's were relieved in the line by the 186th Infantry Brigade and proceeded to the camp located at Ervillers. During the
following day the battalion relocated to Courcelles where in the days that followed further training and reorganisation was
carried out.
Moving further to the north under Brigade Operation Order No. 30, the battalion moved into support positions
at St. Leger and were placed under tactical orders of the 187th Infantry Brigade.
On the 21st a draft of new officers
arrived from base; Second-Lieutenants William Vero, Walter Moorhouse, George H. Haigh, John N. Parker, John Moor, Leo T. Sweeney,
Walter Garlick, John J. Wagstaff and Thomas V. Ruddin.
The battalion were now quartered in the ruins of St. Leger Chateau
and in the grounds. Further reorganisation took place as the new drafts were trained with the battalion now adopting
a formation consisting of 8 platoons.
It was now that the area where future operations were to be conducted was
reconnoitered by all officers (Authors note: Vaulx-Vraucourt) whilst the men continued their programme of training.
Yet
further drafts of men arrived to the battalion; Second-Lieutenant W. J. Willie on the 24th and 9 Other Ranks from Etaples on
the 27th respectively.
On the day previously the battalion had received instructions from the 185th Infantry Brigade
to prepare for a move to Gomiecourt. This was duly carried out on the 29th of the month on relief by the 2/3rd London Regiment
(Royal Fusiliers) of the 58th Division, but before this relief commenced, 1 officer and 80 Other Ranks had been attached
to the 252nd Tunneling Company for the construction of dug outs at Croisilles.
The month of June consisted of the
now familiar routine of training with a particular emphasis on the training of 'specialists' i.e. Bombers and Lewis
Gunners. A preliminary reconnaissance of routes to Vaulx-Vraucourt had taken place by Company Commanders and Regimental Staff
as a precursor to an intended attack by the 62nd Division but this order was later cancelled whereupon the men continued to
train and provide working parties for the repairing of roads at Mory to the east.
On the 4th June Second-Lieutenant
Charles Geoffrey Henrich and 38 Other Ranks joined the battalion.
A further improvement in the training programme was
initiated on the 6th when a Brigade Course commenced for N.C.O.'s and 43 Other Ranks formulated paying particular intention
to general work, no doubt a euphemism for discipline and organisation, training of Signallers, Lewis Gunners and Bombers.
As new drafts were arriving there was also the parting of ways for some members of the battalion. On the 13th June
Major Walter P.M. Scott, Second-in-Command, departed for a posting to the Chinese Labour Corps.
Training still continued
but this was frequently 'interrupted' by the formation of working parties at Achiet-le-Grand for example where the
battalion were required to provide labour on the light railways in the vicinity under the auspices of Canadian Railway Troops.
In addition to this task men were also required to work at an ammunition dump located at Behagnies.
On the 19th, a draft
of 10 Other Ranks was received by the battalion and on the following day the 185th Brigade received preliminary instructions
to relieve the 60th Infantry Brigade, 20th (Light) Division, at Queant.
As the month drew to a close, Second-Lieutenants
H. Horton and Frank Lockwood joined for duty on the 22nd followed by Lieutenant George Rollo Selborne Walker on the 25th.
Vaulx-Vraucourt
On the 25th June the battalion left the village of Vaulx-Vraucourt
located to the north of the Bapaume - Cambrai road to prepare for a tour in the line to the east. Leaving the village the
battalion moved into a support position in the Lagnicourt Sector. On relief of the 6th King's Shropshire Light Infantry,
20th (Light) Division which was completed at 2.30 a.m. on the morning of the 26th, the battalion took up rest positions in
the sunken roads located to the north and south of the village.
Contact was maintained with the battalions holding the
right and left sectors of the front line whilst touch was also established with the support battalion occupying positions
to the right. Authors note: 185th Infantry Brigade, Right Sector, 186th Infantry Brigade, Left Sector. The 187th Infantry
Brigade was to remain in reserve.
The sector was described as 'quiet' but during the morning at 9.30 p.m. two
working parties were formed comprising of 4 officers and two sections of 100 Other Ranks detailed for work with the battalions
holding the right and left sectors of the front line. The work consisted of the construction of a Main Line Of Resistance
should the enemy opposite the line conduct any offensive operation.
On this date also, the replacement for Major
Scott arrived when Captain Edward George Lang Whiteaway, attached from the King's Own Yorkshire Light Infantry, assumed
the role of Second-in-Command.
Working parties continued until the 29th June when the battalion were relieved by the
2/8th West Yorkshire's whereupon they proceeded to the support line. With the relief completed by 12.35 a.m. on the morning
of the 30th, the men took up quarters in the ruined buildings of the village of Vaulx-Vraucourt. However, for the men of "A"
Company, they were detailed as a 'Special Garrison' for the manning of the Second Line Of Defence, 62nd
Division Area. This area encompassing a line that stretched from the Ecoust Valley - Vaulx - Ecoust Road to Morchies.
Training and the provididing of working parties was the order of the day as the first days of July passed.
On
the 4th July the battalion set about the relief of the 2/7th West Yorkshire's in the Right Sub Sector at Lagnicourt. With
this relief completed at 12.50 a.m. the battalion distributed "B" and "D" Companies in the Outpost
Line whilst "A" and "C" Companies occupied the Main Line Of Resistance. With the men in
place, four listening posts were established forward of the Outpost Line after dark. The situation as it was described,
remained "quiet," with aerial activity by both the German and the British as below normal which would appear
to be unusual as the weather was recorded as being fine and clear. One factor worthy of note however is that the War Diary
records that the wind, possibly referring to the direction, should the enemy discharge gas, remained "dangerous."
On the 6th however, the battalion was to suffer its first casualty in this new sector when Private Fred Costin, 242151,
was killed and 1 O/R wounded.
During the 8th July "A" and "C" Companies relieved "B" and
"D" in the Outpost Line with this relief being completed by 1.15 a.m.
As a precursor to a patrol due
to be carried out by the 2/7th West Yorkshire's, a gap was cut in the wire in the vicinity of the Left Outpost.
This patrol consisting of an officer, one N.C.O. and two Other Ranks set forth across No Man's Land on the 10th with the
objective of raiding an enemy post. On closing up to the enemy's defences it was ascertained that the post itself was
situated behind a well constructed outpost line consisting of three posts. It was soon realised due to the position of the
objective that the chance of success or a withdrawal should the post be attacked was virtually impossible, therefore, the
patrol was abandoned. The War Diary of the 2/6th West Yorkshire's however reports that the attitude of the enemy was becoming
more aggressive possibly due to the above operation.
It was with some sadness that on the 11th July Lieutenant-Colonel
Hastings, as the diary records, left the battalion "a resignation." The exact circumstances surrounding
this statement are unclear but it suggests that higher authority were now of the opinion that the time had come for a 'new
broom.' The Colonel was therefore removed from command and appointed Area Commandant, Arras, and graded for the purposes
of pay as a Staff Captain. In addition to this, he was made a Companion Of The Distinguished Service Order in August
1917 and a Mention in Dispatches for his troubles.
Command of the battalion was now assumed by Lieutenant-Colonel Charles
Hervey Hoare D.S.O. of the West Kent (Queen's Own) Yeomanry. Colonel Hoare had previously seen service in the Dardanelles
campaign attached to the 53rd Division as a Brigade Major.
As if a script had already been written to welcome the new
C.O., the enemy launched a hurricane bombardment of the Outpost Line. The enemy too were intent on gaining intelligence
as to what and whom lay before them across No Man's Land and on cessation of the barrage it was found that Private Ernest
Lister, 241266, of "C" Company had gone 'missing' from No. 32 Post.
Authors note: G.H.Q. were quick
to condemn this man as a possible deserter. After numerous correspondence in which the 62nd Divisional Headquarters were
basically accused of 'dragging their feet,' a number of Court of Enquiries were held to ascertain the
circumstances surrounding Lister's disappearance.
In a letter dated the 4th May, 1918, the exact circumstances were
stated:
"At about half an hour after evening stand down, a heavy barrage was put over by the enemy and
the section to which this man belonged ordered to stand to at their usual posts. Pte. Lister was in the extreme right hand
Bay of the post, and was eventually placed in a Bay by himself. A tour of the posts was made by the Platoon Officer later
and Pte. Lister was found to be missing.
The O.C. 2/6th West Yorks Regt is of opinion that there is not sufficient evidence
to determine the reason of the disapperance of this man."
Officially reported as a Prisoner of War, 31
August 1917, Ernest, a native of Laisterdyke, was imprisoned at Limburg Camp, Germany, and eventually repatriated on the 27th
December, 1918.
On the night of the 12th, the enemy tried once again to probe the line when a party was observed
approaching the right company in the line, however, this body of men was dispersed by rifle fire. Later, an enemy rifle
was discovered near to the site of the attempted probe and on this occasion another enemy patrol was encountered but driven
off.
During the night of the 13th the battalion were relieved in the line by the 2/4th Dukes, 186th Infantry Brigade, this
relief being completed by 2.15 a.m. whereupon the battalion proceeded to "C" Camp located at Favreuill. The relief
was however not without incident as Captain Hardy John Behrens, Second-Lieutenant George Ambler and 1 Other Rank were wounded.
Authors note: Possibly in the further attempt by the enemy to raid the line on the 13th.
Favreuill
and a return to the Bullecourt Sector
Quartered in tents the battalion commented that the accommodation
was "good."
The men took the time to clean their equipment and take the opportunity to bathe at the
Divisional Baths.
The Brigade was not entirely at rest however as on the night of the 16th July a party of men of the
2/7th West Yorkshire's assembled to prepare to raid a post in the enemy's line. The results were far from convincing
with 1 officer and 2 O/R's wounded, and 3 O/R's missing (Source: Wyrall).
The weather had by now turned colder
but the men were kept busy in the usual routine of training and the construction of a rifle range and an assault course designed
for bayonet fighting.
After a series of inspections of the various companies Colonel Hoare proceeded on special leave,
command devolving on Major Whiteaway. Men were still provided for the endless working parties that took up the infantry's
time whilst on supposed rest; 2 officers and 100 O/R's at Achiet-le-Grand on the 19th and 1 officer and 25 O/R's on
the construction of the range during the following day.
Once again the battalion prepared to move into the front
line but prior to this a reconnaissance took place by the C.O. of the positions to be occupied. The relief commenced at 9.00
a.m. on the morning of the 21st July however due to congestion and traffic at Vaulx-Vraucourt this was not completed until
3.30 a.m. on the morning of the 22nd when the battalion relieved the 2/4th Yorks & Lances, 187th Infantry Brigade in the
line.
Immediately the battalion set about improving the trenches but whilst the men continued their work one man, Private
George Hewitt, 242317, was killed and 2 Other Ranks wounded.
During the 24th, the Corps Commander, General James A.L. Haldane,
visited the sector held by the battalion, no doubt his visit coinciding with a brigade order issued the day previously as
regards patrol work.
There was now a move of position on the 24th when the battalion proceeded with 4 companies to take
over the Left of 3 Section. Authors note: Previously one company of the 2/7th West Yorkshire's held this section however
there is a suggestion that they may have been attached to the 2/6th until relieved. War Diary records that this sector of
the line would now be held by 4 companies instead of 5. alluding to this fact however there is no recorded evidence located
in the diary.
The battalion was now to conduct the first of many active patrols that would gather intelligence
as to the defence of the enemy's positions. At 11 p.m. on the night of the 24th July, Second-Lieutenant Herbert John Greenwood
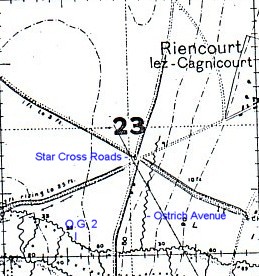
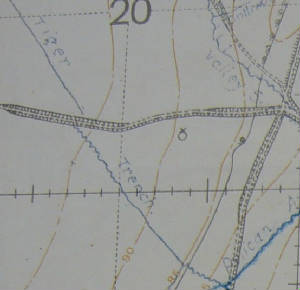
crossed No Man's Land to reconnoiter an enemy position located at Trench Map reference U.29.b. (Roughly south
of the village of Riencourt-les-Cagnicourt and to the south-east of a position known as Star Cross-Roads or Six
Cross-Roads). On his return Greenwood reported that the position was held by the enemy. As the battalion
was about to be relieved once again, no further patrol activity was carried out for the remainder of the month. The men returned
to their tasks of improving the positions that resulted in the wounding of a further 2 O/R's on the 25th.
During
the night of the 27th the battalion were once again relieved by the 2/7th West Yorkshire's, this being completed by 1.30
a.m. Once again this was not carried out without incident as 3 Other Ranks were killed; Privates Herbert Benson, 203726, William
Ferguson, 306442 and Thomas Clegg, 17/1665 with 1 O/R wounded.
The battalion were now disposed as follows; 2 Companies
in Joint Trench, 1 Company at Iggaree Corner (Igri Corner, a forward dump to the north-west of Noreuil), 1/2
Company located at the Sunken Road (east of Noreuil) and 1/2 Company located at Vaulx-Vraucourt. Battalion
Headquarters was to be established at the latter place.
Working and wiring parties continued with a major focus of the
work being the construction of dug outs and the construction of a new trench in trench map reference U.29.a.
As
the month of July drew to a close the weather remained hot with occasional heavy thunderstorms.
A new draft of men
was soon to arrive. In this draft would be one soldier returning to the front that he had left behind in September 1916. A
lad from Wetherby name of John Willie Pratt.
August: The Return To The Front
On
the 1st August as the men still toiled constructing dug outs a Brigade Order was received for the proposed relief of the 20th
Brigade, 7th Division, in the Bullecourt Sector. This movement was confirmed the following day stating that the battalion
were to be relieved by the 2/4th Dukes, 186th Infantry Brigade, during the night of the 3/4th August. Accordingly at 9.30
p.m. on the night of the 3rd, all working parties ceased construction activities upon the commencement of relief, this being
completed by 1.30 a.m.
Proceeding back to "C" Camp located at Favreuill the men were accomodated in tents as
the weather had by now turned cold and wet with weather described as "wild." After a period of rest and
a general clean up orders were received for a Brigade Defence Scheme of the Favreuill area however a further instruction
was received to perform a visit to the 20th Brigade with the intention of commencing a relief of the latter at Bullecourt.
With the possibility of commencing a relief in this sector Colonel Hoare visited the 20th Brigade and the 2nd Border Regiment
contained in the latter to perform a reconnaissance of the area, orders being confirmed to commence the relief on the 8th.
As the men continued a programme of training Company Commanders and the Battalion Intelligence Officer proceeded to reconnoitre
the positions held by the Border's at 3.30 a.m. on the morning of the 8th with advance parties being sent to the position
followed by the remainder of the battalion who left Favreuill at 8.30 p.m., relief being completed by 2.25 a.m. the following
morning. The relief had been carried out without sustaining any casualties but it was the weather that had proved to be the
enemy. A cloud burst had been experienced between the hours of 7 and 8 p.m. resulting in the trenches being knee deep in water.
To add to this, the ground was reported as being very soft possibly alluding to the collapse of breastworks or associated
constructions.
The battalion now occupied the Right Sector of the Bullecourt Sector and were disposed as follows; "A"
Company, Left Front Line Sector, "C" Company, Right Front Line Sector, "B" Company in
Support and "D" Company in Reserve at the Railway Embankment in Railway Trench. Battalion Headquarters
were located just to the east of the latter and to the south of Bullecourt village.
During the following day the first
patrols of this tour in the line took place when Second-Lieutenant Reginald J. Luscombe and 5 Other Ranks set forth to reconnoitre
enemy positions to the north-east of the village in a section of the Diagonal Road to the west of the Star Cross-Roads
or Six Cross-Roads.
On advancing a distance of over 150 yards from his starting point Luscombe ascertained
that the trench was occupied by the enemy. Patrolling further to the east, Lieutenant Harold Smith also accompanied by 5 O/R's
encountered a party of the enemy near a dug out located at 200 yards from his start point. During this contact, 1 Other Rank
was wounded but remained at duty.
During the night of the 12th August, a relief of "A" and "C"
Companies occupying positions in the front line was carried out by "B" and "D" Companies respectively.
"D" Company now held the Front Line Support in a position of depth consisting of 15 Posts; "B"
Company were now placed in the front line with "C" Company in Support. "A" Company now held a Reserve
position at Railway Trench to the south of Bullecourt with 1 platoon, and also in the Horseshoe west
of Central Road with a further platoon. As Reserve Company, amendment orders were issued for the whole of the
company to assume a position in the Horseshoe. This relief as a whole was completed by 2.50 a.m.
The weather
had by now become changeable with periods of bright sunshine followed by intermittent heavy showers. As a consequence the
major preoccupation of all units in the sector was the problem of drainage and for this purpose 100 O/R's of the 2/7th
West Yorkshire's were attached to the battalion to be employed on this duty. Even these tasks drew the attention of the
enemy and as a result Second-Lieutenant George H. Haigh was wounded during the course of the day.
As the 12th August
drew to a close, one officer, Second-Lieutenant John Richard Allett, reported for duty in addition to a draft of 80 Other
Ranks however these were immediately dispatched to the Divisional Reinforcement Camp. Amongst their number was one returning
soldier, Private William Pratt, 200193.
Drafted To The 2/6th Battalion, West Yorkshire Regiment
William's surviving service documents, contained in the 'Burnt Document' series are, at the very least,
difficult to decipher after his transfer to the United Kingdom.
Initially he was assigned to the Depot of the West Yorkshire
Regiment that probably suggests a period of convalescence in the north-east. Recovery was lengthy resulting in 119 days in
hospital. Further sickness ensued when on the 23rd January, William was diagnosed with German Measles that resulted in
a period of hospitalisation for 57 days.
Posted to the 5th (Reserve) Battalion, West Yorkshire Regiment located at Clipstone
Camp on the 30th March, William fell foul of army discipline when he overstayed his sick furlough resulting in an absence
of two days. The subsequent punishment awarded resulted in two days of fatigues.
Posted to Ripon in April, on the 17th
instant it would appear that there was a recurrence of measles, there appears to be a 'ditto' on his medical
records, that this time resulted in 50 days in hospital.
Posted back to the 5th (Reserve) Battalion at Clipstone Camp on
the 6th July 1917, William embarked at Folkestone on the 27th July for Boulogne where he was posted to the 33rd Infantry Base
Detail at Etaples. Originally allocated as a draft to the 2/7th West Yorkshire Regiment, this was rescinded on arrival at
the latter place whereupon after a period of training he was posted to the 2/6th West Yorkshire's on the 12th August and
as stated previously was dispatched to the Divisional Reinforcement Camp.
Favreuil and Noreuil
As William and his fellow drafts were being put through their paces at Camp the battalion had been busy wiring
their front positions on the right to a length of 350 yards and placed 3 yards in front of existing defences.
At
4.35 a.m. on the morning of the 15th moved into support positions at Bullecourt on relief by the 2/7th West Yorkshire's and
were disposed as follows; "A" Company, Railway Trench, Left Company, "B" Company, Railway
Trench, Right Company, "C" Company, located on the Ecoust - Noreuil road as a permanent garrison and allocated
the task of the defence of Ecoust, and "D" Company also located in the latter road. Battalion Headquarters were
established in caves at Ecoust.
As working parties continued under the control of the Officer Commanding 2/7th West Yorkshire's,
Lieutenant-Colonel Charles K. James, "A" and "B" Companies respectively, "C" Company were attached
to the 460th Field Company, Royal Engineers at Ecoust whilst "D" Company constructed a Strong Point located near
the Station to the south of the village at U.27.c.4.7.
Casualties sustained during the 13th - 16th August were
3 O/R's wounded, with 1 Other Rank killed, Private Lawrence Schofield, 241420, aged 20 years and a resident of Leeds.
It was on the 17th August that William, accompanied by 77 Other Ranks, joined the battalion from their induction period
at the Divisional Reinforcement Camp. The battalion also received a further draft of 59 Other Ranks on this date and these
in turn were sent to the Camp for a period of instruction.
With dispositions relatively unchanged during the following
day, William was allocated to "C" Company who along with "D" were busy out in front of the line at night pulling
out single belt wire consisting of 16 strands in front of a strong point. Authors note: Railway Strong Point. During
the day "A" Company had taken over 3 Vickers gun positions and had mounted 3 Lewis guns in positions on the
Railway Embankment, immediately due south of the village of Bullecourt. Trench map references, U.28.c, U.27.d
and U.27.c right to left respectively. At nightfall this company along with "B"
also provided working parties under the O.C. 2/7th West Yorks. The work was dangerous, but fortunately no casualties were
incurred as William passed his first night back on the Western Front. However, during the following day as the working parties
continued their various tasks, 6 Other Ranks were not so lucky and were wounded. The War had indeed become one of attrition.
Relieved during the early hours of the 21st by the 2/4th Dukes the battalion proceeded to the now familiar surroundings
of "C" Camp at Favreuil where they were accommodated in huts where they were joined by one new officer, Second-Lieutenant
George Herbert Hodgson who reported for duty. Hodgson, like so many of a new 'breed' of officer arriving on the Western
Front, had, before being commissioned, won the Military Medal as a Private whilst serving with the 49th (West Riding) Division.
As the weather remained hot and close with frequent heavy downpours the battalion commenced a further programme of training
whilst preparations were in hand for the institution of a Defence Scheme for the Favreuil area. Further drafts continued to arrive
from the Divisional Reinforcement Camp; 2, on the 21st, 61 on the 23rd whilst 12 reported for duty at the at the latter place
to be absorbed by the battalion at a later date.
Divisional Order Number 810 received on the 24th and dated the 22nd
August mentioned Captains George R.S. Walker, George C. Turner and C.S.M. Martin Silkstone, 240730, for meritorious service
during recent operations.
In addition to the above, Military Medals were awarded to two men of "B" Company
on the 25th; Private Alfred Wright, 306624, and Private Leslie G. Matthews, 41950.
During the 27th the battalion received
advance warning of an impending relief of the 2/5th King's Own Yorkshire Light Infantry, 187th Infantry Brigade. Consequently
at 8.40 p.m. on the night of the 28th advance parties moved forward to the Noreuil Sector to the south of Bullecourt, relief
being completed by the whole battalion at 11.45 p.m.
The 2/6th West Yorkshire's were now disposed as follows as the
Support Battalion, Noreuil Sector; "A" Company, left half of Pontefract Trench, "B"
Company at Iggaree Corner (Igri Corner), William and the men of "C" Company in Reserve at Vaulx, and finally
"D" Company who held the right half of Pontefract Trench. Battalion Headquarters were located at Iggaree
Corner.
Working parties commenced immediately on the construction of dug outs. One party of 2 officers and 50 Other
Ranks conducting the aforementioned task under the Officer Commanding Centre Sub-sector whilst another party of similar
strength provided a detail for work in Hobart Avenue to the east of Noreuil in the Hirondelle Valley.
On the
night of the 30th August the first of a series of patrols was conducted by two young officers who would both become adept
at traversing No Man's Land to gain vital intelligence about the enemy's positions and movements. At 2.45 a.m. Second-Lieutenants
George E.J. Brooksbank and John R. Allett accompanied by 4 Other Ranks set forth from the front line in a north-easterly
direction to within 100 yards of the Star Cross Roads.
The party now headed in an easterly direction towards
Ostrich Avenue and on reaching the latter they then headed southwards down this trench until reaching the safety
of their own line at 4.15 a.m.
The intelligence gathered and reported to Battalion Headquarters revealed that the party
had discovered a redoubt located at U.23.d. 15.50. Further information on this sector of the enemy line was now a
priority and this was to prove to be the fist of many forays into No Man's Land by the two Second-Lieutenants.
As
the usual working parties continued and the weather remained showery, on the last day of the month orders were received for
the relief of one company of the Sector Centre battalion by the right battalion. As this month drew to a close, a
further draft was received from the Divisional Reinforcement Camp when 18 Other Ranks reported for duty. As well as those
coming in, there were changes in personnel in the Divisional Command when Brigadier-General Thomas Walter Brand, 3rd Viscount
Hampden, took over command of the 185th Infantry Brigade viz Brigadier-General De Falbe who had been invalided home on the
21st August.
As September was about to dawn, William and the men of the 2/6th West Yorkshire's were about to meet
the enemy head on. A raid was on the cards.
September: Further Patrolling
As
the weather remained fine with frequent showers, the battalion continued the routine of working parties constructing dug outs
and on a new communication trench in the line to the north-east of Noreuil, forward from Pudsey Support Trench.
Further drafts consisting of 5 Other Ranks were received on the 1st of the month and these were consequently sent to
the Divisional Reinforcement Camp to continue their training. It was also on this date that a patrol under the command of
Second-Lieutenants Brooksbank and Allett accompanied by 4 O/R's once again set forth across No Man's Land to gain
intelligence on the enemy and his positions. The party exited the safety of the front line at 9.45 p.m. and on approaching
the enemy line near Ostrich Avenue a German patrol consisting of 5 men was observed in the vicinity. More concerned
with gathering intelligence than provoking a confrontation, the British patrol also heard the activities of an enemy wiring
party to the west of Star Cross Roads and in addition observed further parties stretching out wire southwards near
where all roads converged at the latter location.
The enemy redoubt previously identified on the night 30th August was
also reconnoitered and found to be unoccupied and it was then that the patrol returned to the line with the valuable information
at 1.20 a.m. on the morning of the 2nd.
As regards further drafts, the battalion received intimation on this date that
Second-Lieutenant Alan William Bedford, of Horton, Bradford, had reported for duty at the Divisional Reinforcement Camp.
On the 5th September the 2/6th West Yorkshire's moved up into the Left Sub-Section of the line at Noreuil on
relief of the 2/8th West Yorkshire's, this relief being completed at 11.15 p.m. "A" Company now took up a position
on the left front whilst "D" Company occupied a postion on the right front respectively. The men of William's
company "C," minus 3 officers and 60 men who had been sent for 'training' at Vaulx, along with
"B" took up positions in Pudsey Support with Battalion Headquarters located on the Railway Embankment,
immediately south of the Central Road.
Authors note: The detached party of "C" Company sent to
Vaulx for training during the 6th formed the nucleus of a Raiding Party under the command of Brooksbank and
Allett however these two officers remained with their respective companies for further reconnaissance duties.
Also on
this date Second-Lieutenant Bedford joined the battalion from the Divisional Reinforcement Camp, his place being taken at
the latter by the newly arrived Second-Lieutenant Enwright (Possibly George Leo Enright commissioned from the Yorkshire Dragoons,
2897).
At 11 p.m. that night, Second-Lieutenant Brooksbank set out once again with 4 Other Ranks to examine the enemy's
wire, possibly that which was observed to be laid on the 1st, at Star Cross Roads. The party returned at 1.30 a.m.
on the morning of the 7th but a further patrol was to be sent out at night at 10.30 p.m. under the command of Second-Lieutenant
Thomas Butler Wakefield, a native of Liverpool, accompanied by 3 Other Ranks. On examination of the enemy's defences and
wire to the east of Ostrich Avenue and with the task almost completed, the enemy were alerted to their presence
and 2/Lt. Wakefield was shot and killed. It was then that Second-Lieutenant John Norman Parker went forward to try and retrieve
the body but he was also unfortunately shot and mortally wounded whilst trying to do so. Corporal James Moore, 12078, realising
the dire situation that had befell the patrol, acted immediately. With the assistance of another N.C.O., both bodies of the
two officers were recovered under a hale of machine-gun, rifle fire and bombs. For this brave action, Moore, a native of Whitby,
was awarded the D.C.M. Both officers now lie in adjoining graves at Favreuil British Cemetery.
Also out in No Man's
Land was a patrol consisting of 3 Other Ranks under the command of Second-Lieutenant Christopher J.G. Whitlam that had
also exited the British Line at 10.30 p.m. from a point west of Central Road. This patrol however returned at
1.15 a.m. without incident after an examination of the enemy's wire defences.
In addition to the two officers killed
during the nights operations, one O/R was wounded but remained at duty. The enemy had been alert but little did they know
or have any inclination that they were about to be subjected to an offensive operation designed to find out which German unit
was facing the West Yorkshiremen. The enemy was literally about to be 'put under the cosh.'
As working
parties continued and dispositions remained unchanged, 2/Lt. Enwright along with 2 O/R's reported for duty from the Divisional
Reinforcement Camp on the 8th.
Once again Brooksbank and Allett set forth on patrol on the night of the 9th as they advanced
over 100 yards down the length of Ostrich Avenue to examine the enemy's wire. The patrol returned at 1.15 a.m.
without incident however during the course of the day 2 Other Ranks had been killed, Privates Walter Giles, 242172, and William
Johnson, 242835, and 6 O/R's wounded, possibly due to the effects of an enemy artillery strafe.
During the day the
battalion had also welcomed some visitors when Captain Heselton, possibly John Lister Heselton, 1/6th West Yorkshire's,
accompanied by 4 N.C.O.'s, reported for a tour of instruction.
Raid!
With
the weather hot and sunny and with an early morning mist that dissipated about 8 a.m., Operation Order Number 45 regarding
the mounting of the raid was issued on the 10th September.
A further patrol was sent out at 11 p.m. under the command
of Second-Lieutenant Frank Lockwood accompanied by 3 Other Ranks, to conduct a further examination of the enemy's wire.
Just to the south of Star Cross Roads an enemy wiring party was observed but Lockwood and his men were not detected
and withdrew safely to the British line at 12.45 a.m.
At 4 p.m. on the afternoon of the 11th September, the detachment
of 60 men of "C" Company who had been undergoing training for the raid at Vaulx proceeded to Battalion Headquarters
located at the Railway Embankment to the west of Central Road. Here, final preparations were made and instructions
issued whilst the men proceeded to blacken their faces and bayonets and secure equipment so as to minimise noise. At 8 p.m.
the party began to move forward via Pudsey Support Trench and by 11 p.m. all the men detailed for the operation were
in place. Zero Hour was detailed for 11.10 p.m.
The raid was to be conducted under the protection of artillery firing
a 'box barrage.' Basically the artillery would fire around the area to be subjected to the attack in a box shape
preventing any incursion by enemy forces or any of the latter escaping. In addition to this barrage that would be performed
by 18-Pounders and 4.5 Howitzers the 185th Trench Mortar Battery would fire on pre-arranged targets. Construction of new trench
mortar emplacements for this purpose had started to be constructed on the 8th by a party consisting of 2 officers and 60 O/R's
running off Pudsey Support Trench. To protect the flanks of the raiding party, one section of "A"
Company consisting of Rifle Grenadiers and equipped with the Hale's pattern grenade would occupy a position on the left
flank whilst one section of "B" Company similarly equipped would take up a position on the right respectively.
The raiding party itself would be led by Second-Lieutenants Brooksbank and Allett and would comprise of 2 Sergeants, 2 Signallers,
4 Stretcher Bearers and 2 sections of Rifleman. Specialists comprising of 2 sections of Rifle Grenadiers and 2 sections of
Battalion Bombers, each led by an N.C.O. and comprising of 6 men in each section, would eliminate any strong points or pockets
of resistance. To cover the raid there was to be additional firepower provided by 1 section of Lewis gunners.
As the
men made their way forward and took up positions in No Man's Land, each man no doubt ran over in his own mind the objective.
Penetrating the enemy's front and support trenches at a point between Star Cross Roads and Ostrich Avenue,
the plan was simple, to capture a prisoner or prisoners for identification purposes, obtain any documentation as to the enemy's
dispositions and future intentions, to destroy dug outs and to kill the enemy and generally weaken his morale. At 11 p.m.
the barrage erupted and at 11.03 p.m. as the barrage lifted, Brooksbank and Allett, both into the enemy's trenches at
the head of their men, led the raid in.
Heading towards the juncture of the German front line with that of Ostrich
Avenue, Brooksbank encountered two of the enemy, one of these was shot and killed whilst the other was made prisoner.
Pressing on westwards to a distance of about 50 yards two more of the enemy were taken prisoner at the top of a dug out that
contained yet more men. Given the opportunity to surrender the enemy declined to come out so the dug out was subsequently
dealt with and destroyed by a phosphorus bombs ("P" bombs). Further fighting now ensued in the vicinity of the destroyed
dug out resulting in more of the enemy being killed.
Allett's party had pressed on to its own objective, the enemy
support trench, which was reached with little or no opposition. On reaching this trench, Allett encountered a German trying
to flee but he himself shot and killed the enemy soldier. A dug out was then discovered and this too was destroyed by the
use of "P" bombs. The party again encountered one of the enemy near Star Cross Roads but he was shot and
wounded whilst trying to escape, subsequently being taken prisoner.
The signal for the raid to withdraw was finally issued
at 11.30 p.m. after 27 minutes of taking the fight to the enemy. The raiding party now successfully withdrew to Pudsey
Support Trench and all of the men were accounted for by 12.10 a.m.
The raid had captured four prisoners of which
three were unwounded plus enemy documentation. It was estimated that over twenty of the enemy had been killed with minimal
casualties to the raiding force; 5 Other Ranks wounded in total, 3, during the raid itself.
Both Brooksbank and
Allett were awarded the Military Cross for this operation. There is no doubt that prior to the successful raid, their intelligence
gathering and reconnaissance of the enemy line tipped the scales in the raids favour and this is reflected in their citations
in the London Gazette dated 15th March 1918. In addition to the officers, 5 Other Ranks of the raiding party of "C"
Company were awarded the Military Medal.
Retaliation
The successful raiding
party now took up positions on the left of the company sector in Pudsey Support, possibly as a precursor to an anticipated
attack by the enemy. Trenches and posts were improved and shelters constructed in the latter trench in addition to the deepening
of Railway Trench. As congratulatory messages were received from Divisional and Army Commanders on the 12th, the
men settled down into the usual routine of trench life but this was soon to be shattered.
The improvement of trenches
and the construction of shelters was wishful thinking as at 4 a.m. on the morning of the 13th the enemy unleashed a terrific
bombardment of the positions held by the 2/6th West Yorkshire's. As the barrage lifted off "C" Companies positions
on the left at 5.00 a.m, 15 minutes later the barrage lifted off the right flank occupied by "A" Company. This company,
occupying a position known as The Apex (Square, U.29.d. east of the Central Road) had received
particular attention by the enemy barrage as this was the point of entry by the German raiding party consisting of about 100
men. Advancing between the left flank of "A" and the right flank of "C," the right post of the latter
company was overrun and everyman either killed or wounded after severe fighting that resulted in one enemy officer and two
of his men being bayoneted. As the enemy pressed on to London Support some distance to the rear, they were met by
Second-Lieutenant George Hodgson accompanied by 4 men. Attempting to bomb Hodgson and his men from the position, the enemy
retired as opposition began to stiffen and any further incursions into posts held by the West Yorkshiremen were repelled.
The War Diary records casualties suffered by the battalion on this date as 1 Officer and 10 Other Ranks killed, 27 wounded
and 4 missing. An analysis of Soldiers Died In The Great War records a total of 11 Other Ranks killed, 1 of
the men dying of wounds. Of these men, the battalion had lost Captain George Corrall Turner, a native of Ilkley. George was
unfortunately killed by the explosion of an enemy trench mortar shell after he had rallied the men to fight on for over an
hour in hand-to-hand combat moving between posts in the line. In Other Rank casualties, one Private, Edwin Goucher, 42358
and a native of Bramley, Leeds, was just 19 years of age.
The remainder of the day was spent in the collection of the
dead and the repairing of the front and support trenches damaged by the enemy bombardment. During the evening the battalion
were relieved by the 2/6th Dukes, 186th Infantry Brigade. On completion of this at 1 a.m. on the morning of the 14th,
the men, tired after the last few days operations, proceeded to billets located in huts at Number 7 Camp at Favreuil.
Favreuil
On the 14th September as the men performed a general clean up of kit,
Captain Turner and the 11 men killed during the enemy raid were laid to rest at Favreuil British Cemetery. The ceremony was
attended by all the battalion's officers and the men of "B" Company. During the afternoon the Divisional Band
played but during the early evening the usual working parties commenced once again when 1 officer and 20 Other Ranks of "A"
Company were sent to repair roads at Vaulx.
During the following day the battalion were inspected by Brigadier-General
Viscount Hampden who congratulated the men on their conduct during recent operations. Next came Major-General Braithwaite
who issued with a Special Order Of The Day that stated:
"The Corps Commander desires me, the Brigadier-General
General Staff, VI Corps, to convey to you to the Brigadier-General Viscount Hampden and the troops of the 185th Infantry Brigade
who recently carried out successful raids and patrol work, and also to the ranks who recently repulsed the enemy's raid
on the morning of the 13th instant; his high appreciation of their staunch and gallant behaviour."
Drafts
slowly once again began to arrive; 2 Other Ranks reported on the 17th but were sent to the Divisional Reinforcement Camp
on the following day along with Second-Lieutenant Sefton Powell.
During the next few days the battalion carried out a
variety of exercises such as firing practice on "C" Range along with the continuation of the usual formation
of working parties. On a lighter note concerts were given during the evenings by "A" Company and then the Sergeants
Mess along with a boxing competition that was held on the 20th.
Only 2 O/R's reported for duty as the battalion
once again prepared to move into support positions in the Bullecourt Sector. The 2/6th West Yorks left Favreuil Camp at 8
p.m. on the evening of the 21st to commence a relief of the 2/5th King's Own Yorkshire Light Infantry, 187th Infantry
Brigade, this being completed by 11.30 p.m.
Tiger Trench
The battalion now
occupied the left, ie., the west of the Bullecourt Sector and were disposed as follows: "A" and "B" Companies
in the Ecoust-Noreuil Road, William and the men of "C" Company in Railway Reserve, and "D," occupying
positions at the Railway Embankment. Battalion Headquarters were situated in caves near the cross-roads in the village
of Ecoust-St-Mein.
|
|
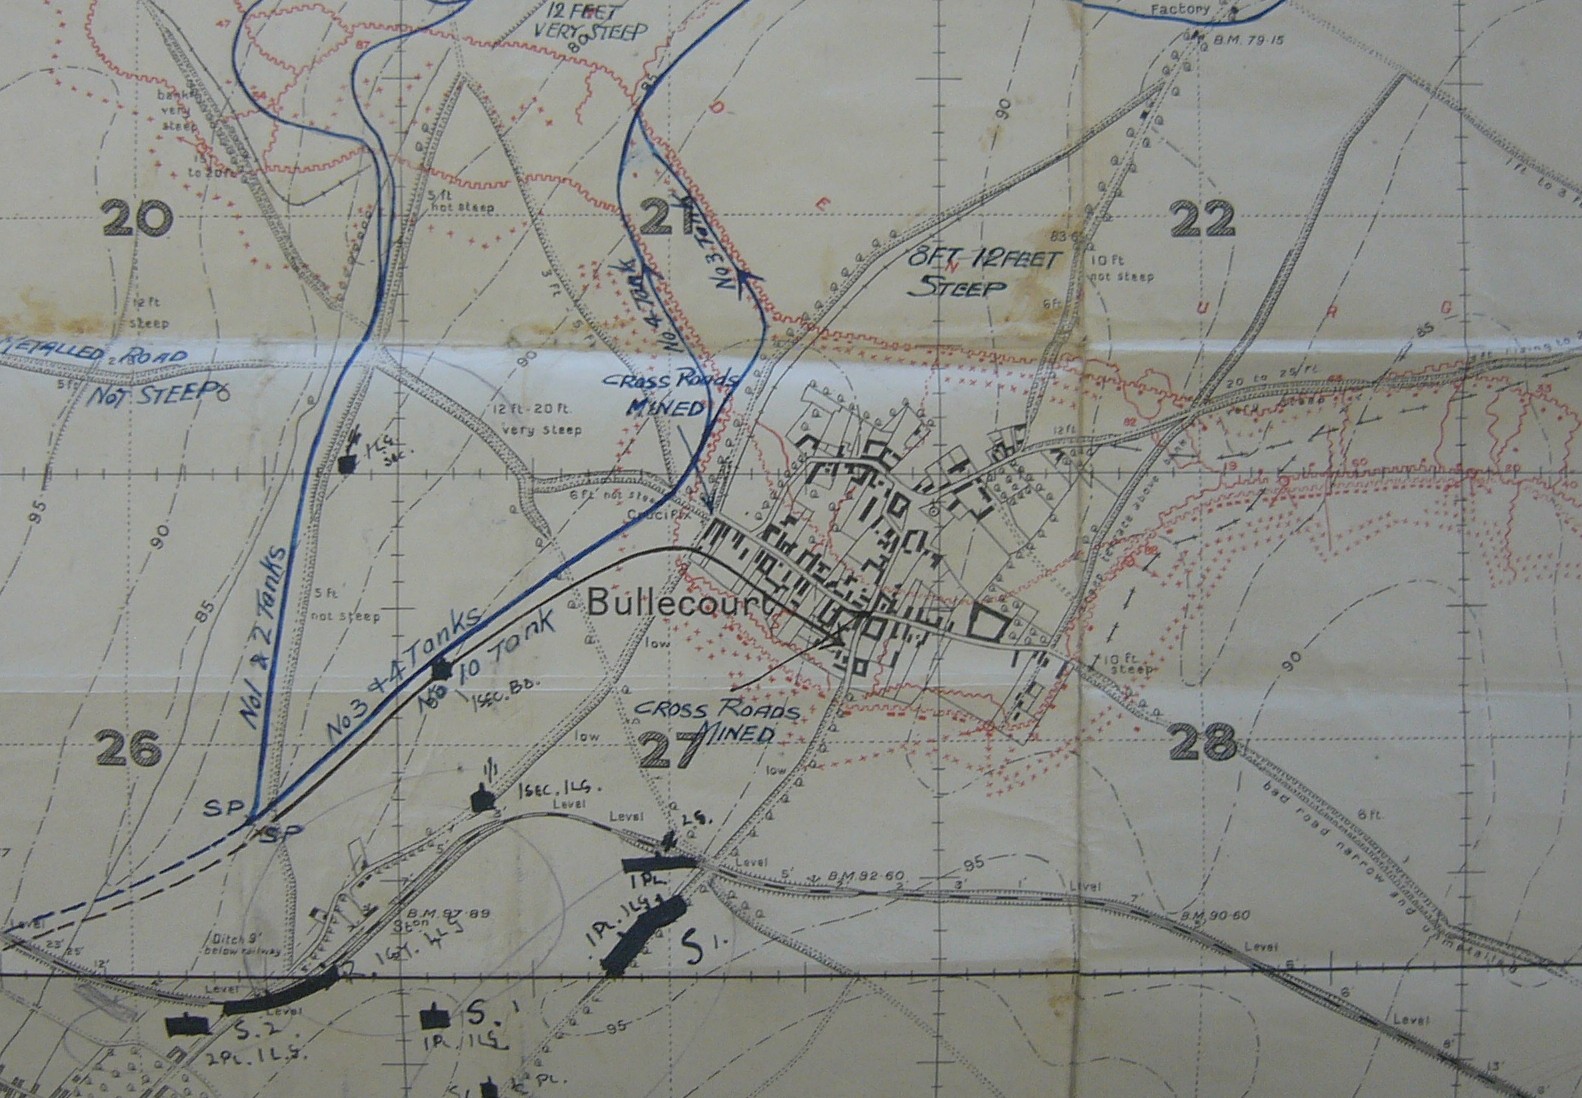
| Tiger Trench To The Junction Of Pelican Avenue |
To the south-west of Bullecourt,
as depicted by the accompanying trench map extract, lay Tiger Trench. Commencing in the road north of Ecoust Railway
Station, the trench ran in a north-westerly direction intersecting with Pelican Avenue, a trench that ran from the
western outskirts of Bullecourt to the Croisilles Road, north-east of Ecoust. The trench then continued north-west, crossing
the road to Croisilles to the west of Bullecourt, running at some distance west and parallel to the road to Fontaine-les-Croisilles.
Working parties were formed from "C" and "D" Companies and placed under the orders of the Officers
Commanding 2/7th and 2/8th West Yorkshire's respectively whilst a party of men from "A" Company consisting of
2 officers and 60 men set about widening Tiger Trench to a width of 4 feet. As this trench was the major access point
to the front line in this sector one party comprising of 1 N.C.O. and 10 men formed a pushing party on a light railway
constructed to the trench that no doubt was supplying timber and other material for the improvements. A shift of 15 Other
Ranks were also tasked with the construction of dug outs in the trench and as the weather remained warm and sunny with good
visibility it was a wonder that these parties were not subjected to the attentions of enemy artillery.
The work continued
in the days that followed in particular the widening of the trench by the party of men from "A" Company who completed
this task for a distance of over 300 yards. In addition to the task of widening, a party of men from "B" Company
consisting of 1 officer and 40 Other Ranks also deepened Tiger Trench for a distance of over 150 yards to a depth
of what is recorded in the War Diary as "normal." Authors note: This depended on local geology or tactical situation
but on average to a depth of between 6 or 7 feet.
To the south at Station Redoubt, the garrison of this position
were also busy constructing "U" Frames and revetting for one fire bay.
On the 23rd September one is
reminded of the human cost of the War not just as regards the dead and the wounded but of the mental scars that some men and
officers suffered alike. Second-Lieutenant Arthur Broomfield who had been admitted to hospital sick on the 13th August was
now 'classified' as 'shell shock.' For Arthur who had previously served with the Army Service Corps serving
in France in 1916, the War was now over but his own personal demons would no doubt remain with him for the rest of his
life.
Four officers reported for duty on the 24th; Second-Lieutenants David L.I. Hepburn, Basil J.A. Pratt, George R.
Price and John H. Fisher along with 7 Other Ranks who subsequently proceeded to the Divisional Reinforcement Camp.
Working
Parties continued on improving Tiger Trench as well as continuing work on Station Redoubt.
On the 26th
Military Medals were awarded to 5 men for their actions during the enemy raid on the 13th September, 4 to men of "B"
Company and 1 to a soldier of "C" Company respectively. On this date also 73 Other Ranks reported for inspection
and were consequently sent to the Divisional Reinforcement Camp as Second-Lieutenants Hepburn, Pratt and Fisher joined the
battalion from the latter unit. A further 7 Other Ranks joined the battalion on the 28th followed by a further 12 during the
following day as orders were received to prepare for a relief of the 2/7th West Yorkshire's on the night 30th October/1st
November. Also on this date the War Diary records that one Sergeant Taylor of "C" Company was awarded the Military
Medal however no serial number or intitials are recorded for this individual. Further research indicates that this Sergeant
was one James Richard Taylor, 242062, a native of Bradford.
As the relief was completed at 9.40 p.m. on the night of
the 30th, to some in the battalion the influx of new drafts must have been seen as a warning of things to come. The battalion
was being 'stiffened' up for a 'stunt.' What this consisted of or where this was about to happen the
men could only merely speculate.
Final Tour In The Bullecourt Sector
The battalion
now took up a position in the Right Sub Sector at Bullecourt to the east of the village.
"A" Company,
the left front company, took up a position in depth at points U.22/3 and U.22/4 and in Gordon Support
whilst "D" Company took up a position also in depth on the right in point U.22/2 and also in Gordon
Support. William and the men of "C" Company were in support to "A" with one platoon located in positions
at Railway Reserve to the west of Bullecourt Avenue and with one platoon located at Gordon Support.
"B" Company would remain in support at Railway Reserve whilst Battalion Headquarters would also occupy
a position at the latter place at U.28.c.8.2.
Working parties commenced immediately constructing new posts in
the line, a trench to the latter points and the deepening of China Lane and Fox Trot trenches.
As the
weather remained fine and warm and yet further tasks were undertaken, Lieutenant Frederick C. Lawrence and Second-Lieutenant
Dudley N. Vize arrived for duty from the Divisional Reinforcement Camp on the 2nd October. As work continued particularly
in the putting up of wire entanglements, "C" Company relieved "A" Company in the line whilst "B"
Company followed suite on the relief of "D" during the following day, "C" and "B" left and right
companies respectively.
A further change in dispositions was initiated on the 5th when "A" Company were withdrawn
from positions in support and sent to a position in the Noreuil - Ecoust Road.
Whilst William and the men of "C"
Company were occupying the line, the unthinkable happened; William was charged with "Neglect of duty whilst on sentry"
but the exact circumstances surrounding the incident are not recorded. This was a serious breach of military discipline
and was dealt with as per military regulations. Private William Pratt, 200193, was awarded 14 Days Field Punishment Number
1 by Lieutenant-Colonel Hoare, the witnesses being Major Whiteaway, Second-in-Command, and the now Acting Captain George Brooksbank.
The punishment was to commence the following day.
Field Punishment Number 1 consisted of the practice of either placing
the man in leg irons or ropes with the offender then being fastened to a stationary object such as the wheel of a gun
or a post for up to two hours a day often in a public place or in view of his comrades. The punishment was often carried
out in Field Punishment Camps but if the battalion was on the move the punishment would be dealt with by the unit itself.
It is most probable that the latter scenario befell William. As the division was about to move southwards, under Military
Law he would have marched bearing arms, still performed his military duties with additional fatigues, and treat like a regimental
defaulter. On reaching their destination, no doubt the sentence was carried out in full under the auspices of a Provost Marshal
or Assistant Provost Marshal. Whatever the scenario was, William was now paying the price for the next 14 days for his lack
of discipline.
The weather had now taken a turn for the worse on the 8th as heavy rain began to swamp both
the front and the support trenches requiring the men to dig 'sumps' to alleviate the problem of flooding.
No doubt glad to vacate the now muddy trenches "B" Company were relieved by "D" Company in the right front
position, this relief being completed by 6.40 p.m.
Raiding was still vital to the accumulation of intelligence and to
this end the left front company Outpost Line was vacated by "C" Company between the hours of 10.45 a.m
and 5 p.m. on the 9th October as artillery and trench mortars proceeded to cut the enemy's wire opposite June
Post as a precursor to a raid to be carried out by the 2/8th West Yorkshire's at 9.45 p.m.
Unfortunately the
Author does not at present have any details as regards the outcome or objective of the raid but suffice to say the 2/8th West
Yorkshire's lost Lance-Sergeant John W. Matthews, 306713, and Private Willie Rudkin, 15/1701, on the day in question but
is unknown if they were killed whilst members of the raiding party. Willie had previously served with the 15th (Service) Battalion,
West Yorkshire Regiment, however he did not serve overseas with this unit. Posted for duty with "E" Company, the
Depot Reserve of the battalion, and remaining with this company, he was eventually drafted to the 2/8th West Yorkshire's
after service with the 1st and 17th Battalions of the West Yorkshire Regiment.
On completion of the raid the gap cut
in the wire so the raiding party could debouch into No Man's Land was filled in by "A" Company.
Orders
were now received for another relief of the battalion but prior to this the Commanding Officer and Company Commanders of the
8th King's Own Royal Lancaster's, 76th Infantry Brigade, 3rd Division, visited the sector for reconnaissance purposes.
Further changes in this disposition of the battalion were also carried out on the 9th when "A" Company relieved
William and the men of "C" Company in the Left Front Company Section, this being completed by 8 p.m.
As the weather continued to be wet, particularly at night, the multi tasked working parties began to complete their
allocated tasks. Between the 8th-10th October yet more drafts, 82 in number, had joined the battalion no doubt further increasing
speculation as to future operations.
On the evening of the 11th October the relief was commenced by the Lancaster's,
this being completed by midnight. The battalion marched to Mory whereupon they proceeded by bus and lorry to the Barastre
area located to the south-east of Bapaume.
Since occupying the Bullecourt Sector the battalion and the division
as a whole had suffered severe casualties but from the disastrous attacks of the 3rd and the 11th May a new and different
infantry division had emerged. This new found confidence and esprit de corps that had not existed before the dark
days of Bullecourt was shortly to be put to the test.
Barastre
By 4.10
a.m. on the morning of the 12th October the 2/6th West Yorkshire's had arrived at Barastre en masse and proceeded
into billets consisting of hutted accommodation located to the south-east of the village.
The men now set about a general
clean up of the camp with the new drafts being inspected by the Commanding Officer whereupon they were allocated to their
respective companies. The weather had now become very wet with frequent heavy showers throughout the day turning the camp
into a quagmire. The place must have looked very un-inviting to 5 new officers who reported for duty on the 12th instant from
the Divisional Depot Battalion; Second-Lieutenants John G. Booth, Benjamin Hick, William Presher Cooper (Appointed Transport
Officer), Philip Haywood, and one Walter Mellor, a native of James Street, Wetherby. Walter had previously served in the1/5th
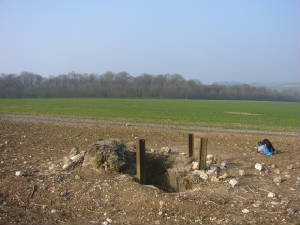
West Yorkshire's and had been gassed at the Canal Bank, Ypres, in December 1915. Wounded in the
attack on the Pope's Nose at Thiepval, Somme, in 1916, Walter was commissioned on the 31st July, 1917.
One
wonders if Walter was aware of the predicament that William Pratt had found himself in. It would be a comfort to think that
he took the time to make his acquaintance and to reassure him that there were brighter times ahead for them both.
After the lengthy period spent in the line, not only had the men suffered the vagaries of the weather but so had their kit,
in particular the mens clothing. As a consequence of this the battalion were inspected at company level during the 13th
by staff of the Army Ordnance Depot with a view to condemning their kit. It was also on this date that a further two new officers
also joined the battalion; Second-Lieutenants Henry Potterton and James William Worth accompanied by 35 Other Ranks. A native
of Leeds, prior to his commission Worth had previously been awarded the D.C.M. whilst serving with the 1/7th West Yorkshire's
for rescuing two men buried by the explosion of a shell on the banks of the Yser Canal in December 1915.
A programme
of training was shortly introduced with particular attention being paid to specialist training under the watchful gaze of
platoon commanders. Lewis gunners were put through their paces on the range by the battalion Machine-Gun Officer whilst
on the 15th yet more new drafts arrived when 39 Other Ranks joined for duty from the Divisional Depot Battalion.
Something
was definately 'on' as during the following day a 'Skeleton Scheme' for the battalion in an attack was carried
out during the afternoon, this exercise being repeated on the 17th under cold but clear weather conditions.
Training
and practice attacks continued in the days that followed but no doubt to break the monotony of continuous instruction, musketry
practice and the trials of the assault course, a battalion sports event was held during the afternoon of the 24th October
followed by a concert during the evening.
As for William, his final days of Field Punishment Number 1 were about
to draw to a close but for him there was to be no return to the battalion as yet.
Surviving service documents, although
virtually illegible and difficult to decipher, record that William was admitted to the 2/1st West Riding Field Ambulance
on the 26th October, however, the cause of this admittance is, even with electronic manipulation, impossible to read.
As
previously stated, William's punishment was ordered to proceed on the 7th October. With a movement imminent, and if military
regulations had been followed to the letter, it is not beyond the realms of possibility that his sentence was postponed until
the move to Barastre was completed. Here, according to military law, the punishment would have been carried out under the
jurisdiction of the Provost Marshal or Assistant Provost Marshal. If this assumption is correct, and with the sentence commencing
on the 12th October, the completion of this punishment would have been the 26th, the day that William was admitted to the
Field Ambulance. It maybe pure conjecture but was this need for medical treatment attributed to William's treatment during
the carrying out of the sentence? There may be just an innocent explanation however, but, without being able to decipher the
original document due to its condition we will probably never know.
One thing we can ascertain for sure is that William
was passed into the hands of the 109th Field Ambulance, attached to the 36th (Ulster) Division the following day. He would
receive treatment at this medical establishment for the next 19 days as the battalion once again prepared for another move.
After a demonstration by the Divisional Anti-Gas Officer of the effects of gas shells on the 27th and the practice
by teams on the rifle range as a precursor to a divisional competition scheduled for the 29th, Brigade Operation Order Number
48 was received in relation to a movement to Gomiecourt to the north-east of Achiet-le-Grand. On the morning of the following
day at 8 a.m. advance parties set forth followed by the remainder of the battalion at 9 a.m. With the battalion now assembled
at Gomiecourt by 1.50 p.m. the men had no sooner been accommodated in tents when Brigade Operation Order Number 49 was received
that in turn was translated into Battalion Order Number 56 relating to an impending move to Fosseux located to the south-west
of Arras the following day. Promptly at 9 a.m. on the following day the battalion set off by road where a stop for lunch was
made at Riviere to the south of Beaumetz-les-Loges as a billeting party proceeded onwards to Fosseux. As the battalion arrived
at the latter, the men found that they were to be accommodated this time in Adrian and Nissen Huts. Authors note: Adrian Hut,
about 30 metres in length. Nissen Hut, length varies as they could be either joined together or sections of 6 feet in length
added as per requirements.
It was all well that the men were under cover as the weather had now turned showery but this
did not deter the military from plunging the men once again into a rigorous training schedule. On the final day of the month
the men set about training by platoon and company followed by a short route march during the afternoon. Unbeknown to the men,
the following month would witness another offensive of 1917. This time the battle would be played out to the west at Cambrai.
Training Continues
During the first few days of the month of November the 2/6th
West Yorkshire's continued their training programme interspersed with various sporting events such as a run organised
over a six mile course.
It was on the 5th that some of the officers got a taste of things to come when six of their number
were sent to Wailly to the west of Beaumetz-les-Loges to observe a demonstration with tanks. After their experiences at Bullecourt
they no doubt viewed this exercise with some scepticism and to this end, although there is no record of what was actually
said, the Commanding Officer gave a lecture on "general lines" at 5.30 p.m. that evening.
The battalion
was to be on the move yet again when orders were received during the following day to prepare for a move to Simencourt located
to the north-west of Beaumetz-les-Loges. In response to Brigade Order Number 57, the battalion set off by route of march
on the 7th arriving at Simencourt at midday whereupon the men were accommodated in barns and huts which is just as well as
the weather had by now turned very wet. As the men settled into their new surroundings, Lieutenant-Colonel Hoare was
summoned for a conference of Commanding Officers at Brigade Headquarters at 5.30 p.m.
The 62nd Division now set
about a programme of training with the tanks. On the 8th it was the turn of the 2/6th West Yorkshire's who now set about
implementing a new formation of attack behind the tanks. The results of the operation were discussed at a conference
of Company Commanders on completion of the exercise as this training and co-operation exercise with the tanks was to be repeated
during the course of the following day.
An exercise with the contact of aeroplanes was commenced on the 12th November
south of the Berneville - Arras - Doullens Road. During the morning the battalion signallers began to send various types of
messages to the aircraft who would respond to the specific request of the infantry on the ground. This ground-to-air co-operation
amongst other elements would, as the War progressed, be one of the key elements to the ultimate victory of the Allies.
It was also on this date that Brigade Order Number 51 was received as regards to an impending move to the front occupied
by IV Corps under the command of Lieutenant-General Sir Charles Woollcombe and forming part of Third Army under the overall
command of Lieutenant-General Sir Julian Byng.
Brigade Order Number 58 was now issued during the following day and at
4 p.m. the battalion proceeded to depart Simencourt for the village of Gomiecourt. Marching through the hours of darkness,
the battalion arrived at the latter place at 11.10 p.m. whereupon the men were quartered in tents.
In accordance with
Brigade Orders the battalion were on the move once again on the 14th setting forth for Lechelle located to the south-east
of Bapaume at 4.25 p.m. and again moving by march during the dark. Lechelle was reached at 11.30 p.m. after a change of route
that had taken the battalion via Bapaume, Le Transloy and Rocquignoy. The march however was not without incident as rain began
to fall and the temperature remained warm. As a result of the alteration to the route, and the weather conditions, over 52
men "fell out," quite a significant number, and it was no doubt with some relief that the battalion took
rest in the tents and huts at Lechelle as the night drew to a close.
The battalion, in brigade, was however
ordered to move at 11.30 a.m. on the morning of the 16th to Ruyaulcourt, located west of Havrincourt Wood. During dusk,
the battalion proceeded forward arriving at 7 p.m. whereupon Colonel Hoare accompanied by Company Commanders commenced a reconnaissance
of the line at Trescault to the east of the wood, the 2/6th West Yorkshire's now being placed at the tactical disposal
of the G.O.C. 107th Infantry Brigade, 36th (Ulster) Division.
It was on this date that Private William Pratt, 200193,
rejoined the battalion from the 109th Field Ambulance. One can imagine that William was given the 'hard word'
by either his Company Commander or possibly even Lieutenant-Colonel Hoare himself. Whatever the scenario, it was imperative
that every man did his duty and Colonel Hoare even stated in Battalion Orders as regards the impending attack that "
the word 'retire' does not exist." It was quite clear what the Colonel expected of his men. They, and William,
would not let him down.
As the West Yorkshiremen prepared for the coming attack, officers were sent to establish
a liason with their fellow officers of the Tank Corps on the 18th whilst the men prepared to move to Havrincourt Wood
in response to Brigade Order Number 54. Consequently at 4.30 p.m. the men moved forward to the wood in cold but fine
weather conditions however the battalion was to be rather exposed to the elements as the accommodation consisted of 'shack
shelters.'
In the surroundings of the wood the men continued their preparations throughout the following day.
Brigade Order Number 55 was now received for the impending attack on the village of Havrincourt as Colonel Hoare accompanied
by Company Commanders reconnoitered routes to be taken to the forming up positions prior to the attack. These routes would
be taped out to assist movement to the assembly positions.
At 1.45 a.m. on the morning of the 20th November the 2/6th
West Yorkshire Regiment left the confines of Havrincourt Wood and followed the tapes to their assembly positions located in
Trescault Trench. The Battle of Cambrai would commence in little over four hours, "Zero Hour" being fixed
for 6.20 a.m.
Battle of Cambrai: The Concept
The exact period at which an
offensive in the Cambrai area was conceived is unclear but the origins of a seminal surprise attack on the Hindenburg Line
in this area may have existed as early as mid 1917.
Cambrai was a vital link in the logistical structure of the
German Army with its network of railways providing good communication access to Germany. Protected by the formidable defences
of the Siegfried Stellung, an attack on this sector of the enemy's defences was not a viable prospect until February
1917 when the German Army began its retreat from the battlefields of the Somme. By the time this retirement had stabilised
along the length of the line the possibility of a successful attempt to break the Hindenburg Line where the enemy would least
expect an attack to take place had not gone unnoticed.
Haig entrusted Rawlinson, commander of the Fourth Army, and Gough,
Fifth Army and their respective staffs to formulate proposals as to how to accomplish the task in hand. The Fourth Army however
had by now been committed to the offensive about to take place at Ypres so the sector previously occupied by the latter Army
stretching from south to north of Havrincourt near Cambrai was taken over by the Third Army under the command of Lieutenant-General
Sir Julian Byng.
It was the combined idea of an assault by tanks and a new approach to the use of artillery prior
to the mounting of offensive operations that impressed Byng in particular with three major protagonists coming to the fore
to put plans in motion.
Brigadier-General Hugh Jamieson Elles, Officer Commanding the Tank Corps in France, saw the
opportunity to prove the worth of the tank on terrain perfectly suited for its operation. In conjunction with his chief of
staff Lieutenant-Colonel John Frederick Charles Fuller, an early exponent of mechanised warfare, early plans were put into
place as regards the future conduct of operations of a joint tank, artillery nature.
For the tank to succeed, the terrain
was suitable but this was subject to the activities of the artillery. Conventional methods of the War up to press resulted
in the artillery registering on various targets by firing a series of shells and correcting their fall. In addition to this,
wire cutting by 18 -pounders along with heavy calibre artillery pieces tasked with eliminating known enemy strong points amongst
other duties, made the shell holed battlefield impassable or difficult to negotiate.
A solution to this, innovative
as it was and based on recent technological advances by the artillery, was put forward by Brigadier-General Henry Hugh Tudor,
C.R.A. (Commander Royal Artillery) to the 9th (Scottish) Division. In essence, Tudor expanded on the plans put forward by
Elles with the tanks cutting 'lanes' through the enemy's barbed wire defences for the infantry to follow. The
artillery, with no prior registration of targets so as to catch the enemy by surprise, would fire on pre determined targets
predicted by various scientific factors and calculations. Experiments into sound ranging had been performed by both the French
and German Armies, these, in particular those of the French, being improved upon by Lieutenant William Lawrence Bragg,
late Leicestershire Royal Horse Artillery and subsequently seconded to 'Maps G.H.Q. France' or the Topographical
Sub-Section. As the development of sound ranging sections evolved, each section was incorporated into the Field
Survey Companies of the Royal Engineers, with subsequently one company attached to each Army.
Sound ranging,
i.e. determining the location of a gun by the use of microphones placed in a line or later an arc as a gun fired, the sound
was measured to produce a bearing to the source of the sound. Where the bearings intersected from each microphone as they
picked up the report of the gun or mortar, the time difference to each microphone was calculated thus giving the location.
Guns now all had to be 'surveyed in,' i.e. the exact location of each artillery piece was mapped with range
and azimuth recorded relative to the target, all data recorded on to a common grid. Various other calculations were also required
such as the elevation of the gun, barrel wear of the artillery piece, plus meteorological factors to name but a few. This
ominous task was undertaken by Major Bertram Francis Eardley Keeling, Royal Engineers and a native of Bradford, who completed
the vital survey work for the artillery to conduct their plan of predicted fire.
Amassed for Byng's Third Army at
Corps level and in Reserve were 20 Divisional Artilleries consisting of over 1000 guns of all calibres.
For the
tank assault Brigadier-General Ellis had assembled 476 Tanks consisting of 378 'fighting tanks. In addition to this force,
54 were to perform a logistical role, providing ammunition, water and essential fuel and oil; 32, fitted with what was essentially
a 'grappling hook,' to pull aside enemy barbed wire defences that would in effect, as the 'fighting tanks'
carved their way through the latter, coil up and form significant obstructions for the progress of a perceived cavalry advance,
9, fitted with wireless communication apparatus and two equipped with bridging equipment. Finally, one tank was tasked with
moving forward with telephonic communication cable, as, the advance progressed.
One problem that existed for the tanks
was the crossing of extremely wide enemy trenches and to this end a simple but ingenious solution was employed. Mounted on
the roof of the tank was, as Watson referred to in his book 'A Company Of Tanks,' a "faggot"
of brushwood weighing over one ton. Known as a fascine in military terminology, this would be deposited by the
tank as the driver activated a rope mechanism, the fascine rolling from the roof into the trench, thus assisting
the crossing of the latter obstacle. A novel solution but effective.
By September the plan now began to evolve.
As the offensive at Ypres gradually ground on and as winter fast approached that would eventually lead to the hell of
Passchendaele, Byng, the enthusiastic supporter of this combined arms operation was given the order to proceed by Haig on
the 13th October. However, there was a proviso. The attack, if not going to plan, would be closed down in 48 hours, or less,
by Haig.
It simply had to succeed after the serious losses incurred at Third Ypres as morale in the Army was
by now probably at its lowest ebb at this stage of the War. Cambrai would give the opportunity, after meticulous
planning, to strike the enemy a decisive blow, one, where he least expected it.
The Plan
The
attack of III Corps, under the command of Lieutenant-General Sir William Pulteney and consisting of the 6th Division
on the left flank and the 20th (Light) Division on the right, north to south respectively, would initially penetrate
the Hindenburg Line front and support trenches. The 6th Division would attack the enemy's line on a frontage of over 2,500
yards taking the village of Ribecourt. They would then form a defensive flank on the left of III Corps as far as Premy Chapel.
The task allocated to the 20th (Light) Division was the capture of La Vacquerie whereupon they were to form the
continuation of the defensive flank to a point at Les Rues Vertes.
The 29th Division would then pass through and
press on and secure the crossings of the St. Quentin Canal at Marcoing and Masnieres and high ground to the south-west of
Rumilly and the Premy Chapel spur. Siezing bridges over the St. Quentin Canal, they were then to advance on the Masnieres-Beaurevoir
Line allowing the Canadian Brigade, 5th Cavalry Division to join the attack.
The 12th (Eastern) Division, operating on
the extreme right flank of the Corps boundary to cover its flank, was to secure the Bonavis Ridge and then form a defensive
flank near Banteux.
Attached to III Corps for the assault would be 294 tanks.
IV Corps, Lieutenant-General
Woollcombe, would attack with the 51st (Highland) Division on the right flank, Major-General George Montague Harper G.O.C.,
whilst the 62nd (West Riding) Division, Major-General Walter Pipon Braithwaite, G.O.C., would advance on the left.
The
objectives of both divisions were the enemy's front and support lines, the 'Blue' and 'Brown'
Lines and the villages of Flesquieres and Havrincourt. Once these had been captured and the Flesquieres Ridge cleared,
a second advance was to be carried towards Cantaing, Fontaine and Bourlon, roughly stretching from the Bois des Neuf or Neuf
Wood to the south-west of Noyelles-sur- l'Escaut to the Graincourt Sugar Factory or Sucrerie on the main Bapaume-Cambrai
Road to the north of Graincourt.
Both divisions would be supported by 147 tanks. It was a crucial that the infantry cooperated
with the tanks for the assault to succeed, however, in particular, Major-General Harper had a deep mistrust of the concept
of this strategy. This would have dire consequences in the days that followed.
The main thrust of the operation
would fall on III Corps in the breaking of the main line of resistance, i.e. the Hindenburg Line and the crossings of the
St. Quentin Canal between Masnieres and Marcoing. This would allow the cavalry to cross the waterway and in effect 'cut
off' Cambrai from the rear severing vital communication links. Any enemy forces would now remain isolated and would either
be eliminated or forced to withdraw from what in effect had become a salient.
The attack of the 62nd (West Riding)
Division would be conducted by the 185th Infantry Brigade, Brigadier-General Viscount Hampden, O.C., on the right flank, whilst
the 187th Infantry Brigade, Brigadier-General Reginald Thomas O'Bryen Taylor, O.C., would advance on the left. Once initial
objectives had been gained, the 186th Infantry Brigade, Brigadier-General Roland Boys Bradford V.C., O.C., would pass through
to the Graincourt Sugar Factory and the enemy trenches located to the north of the Bapaume-Cambrai Road. The division then
with the support of the 1st Cavalry Division would press on to capture Bourlon Wood and the village located on the northern
side.
To the north, the 36th (Ulster) Division and the 56th (1st London) Division would assault on the western side
of the Canal du Nord, at this period, 'dry,' as the War had halted construction.
It is now that we will
turn our attention to the advance of the 2/6th West Yorkshire Regiment and the actions of the 185th Infantry Brigade as a
whole disposed as thus:
2/6th West Yorkshire's Left Flank O.C. Lieutenant-Colonel Charles
Hervey Hoare
2/8th West Yorkshire's Right Flank O.C. Lieutenant-Colonel Archibald Hugh James
2/5th West Yorkshire's Rear Of 2/6th O.C. Lieutenant-Colonel Richard Henry Waddy *
2/7th
West Yorkshire's Rear Of 2/8th O.C. Lieutenant-Colonel Charles Kenneth James
* Colonel
Waddy had replaced Colonel John Josselyn on the 23rd September 1917
The 2/6th and the 2/8th West Yorkshire's
were to assault and capture the 'Blue' Line, the enemy's front line system, whilst the 2/7th and the
2/5th were to leap frog and capture the 'Brown' Line, the second line of defence. Advancing behind the tanks
but in front of the 2/8th and the 2/6th battalions, one company of the 2/7th and one of the 2/5th respectively, were to neutralise
the German Outpost Line before the lead battalions reached their first objective. The impetus of the attack would
therefore, as it was planned, would go unhindered.
Of the tanks, "G" Battalion and parts of "E"
and "D" Battalions, 1st Tank Brigade, the latter two battalions primarily supporting the
advance of the 51st (Highland) Division, would spearhead the advance under the commands of Lieutenant-Colonels Edward Barnard
Hankey, William Frederick Robert Kyngdon and John Charles Burnett.
|
|
| Havrincourt Sector, Extract From Official History Of The War |
Battle Commences
As stated previously, the 2/6th West Yorkshire Regiment had left the confines of Havrincourt Wood at 1.45
a.m. and had then followed tapes previously laid to the forming up position in Trescault Trench, located to the north-east
of the village of Trescault and running west-east just north of the civilian cemetery.
At 4 a.m. it may have seemed that
the enemy knew of an impending attack as he placed a heavy barrage on the trench. The leading platoon of "D"
Company, detailed to capture the Blue Line, and the leading platoon "B" Company, tasked with the
attack on Havrincourt village from the south-east, both suffered numerous casualties. Despite the actions of the enemy artillery,
the whole of the battalion was reported formed up by 5.45 a.m.
"A" Company of the 2/5th West Yorkshire's,
attached to the 2/6th and tasked with seizing the Outpost Line ahead of the main attack, moved into position relieving
troops of the 36th (Ulster) Division. This initial assault would be carried out by four platoons with the support of
six tanks. Prior to "Zero Hour" the men left the safety of the British Line and crawled out into No Man's
Land. All they had to do now was to wait for the commencement of the barrage and the arrival of the tanks.
At 6.20 a.m.
the barrage, performed by five Field and Army Brigades of the Royal Field Artillery erupted on the German positions. Along
the length of Hubert Road located in Havrincourt Wood, the 62nd Divisions own artillery under the command of Brigadier-General
Austin Thomas Anderson added to the fury as shell after shell reigned down. It was now that the spearhead units of the 185th
Infantry Brigade advanced on the German Outpost Line.
|
|
| Schematic Of 185th Infantry Brigade 'Jumping Off' Positions, Trescault |
As "A" Company of the 2/5th
West Yorkshire's advanced across No Man's Land they immediately met stiff resistance from the enemy's Outpost
Line. Two tanks that were tasked with advancing to the right of the of the 2/5th and the 2/6th West Yorkshire's along
a road leading up the Glade had failed to arrive on time. As a consequence, part of the enemy's Outpost Line
near the Glade that was due to be attacked by "A" Company, 2/5th West Yorkshire's that would have
been following the leading tank, was not assaulted. The failure of this tank to arrive on time was to have severe consequences.
As the 2/6th commenced the advance at "Zero Hour," the leading platoon of "C" Company advancing
on the right of the battalions frontage met stiff opposition at this enemy strong point that had failed to be neutralised.
Desperate fighting now ensued as the attackers attempted to gain control of this trench that crossed the Glade, so
much so that it was only eventually captured by the use of Stokes mortars that had been brought forward from the rear of this
leading platoon.
Casualties sustained however to wrest control of this part of the enemy's Outpost Line had
been considerable and led to some confusion. Due to the severity of this action, the position being assumed to have been taken
by, as the War Diary records, "Other Troops," it was also assumed by the only surviving platoon commander
of "C" Company that they had in fact penetrated the Blue Line, the first system of the Hindenburg Line.
Reporting that they had reached their objective, the mistake was not identified until some time later whereupon Colonel
Hoare sent forward his Intelligence Officer, Second-Lieutenant John Moor, accompanied by one platoon of "D"
Company from the Battalion Reserve, to ascertain the exact position and with orders to secure the Hindenburg Line.
Immediately pushing forward "C" Company to the actual position of the Blue Line located to the northern
aspect of Havrincourt Village, Second-Lieutenant Moor continued forward with the platoon of "D" Company with the
objective of strengthening "B" Company who had advanced on the battalions left flank.
The
Advance Of "A" and "B" Companies
"A" Company under the command of Captain
Walter Moorhouse had managed to penetrate through the Hindenburg Line without the support of tanks and had by now established
a position along the line of the road running north north-west from the Grand Ravine, a valley, slightly hidden from
view, to the south-west corner of the village of Havrincourt. Then this position extended northwards along the eastern outskirts
of the village where any further advance was held up by machine-gun and rifle fire from buildings and Havrincourt Chateau. "B"
Company came up on the left flank and it was now that the latter reinforced by "D" Company continued the advance
entering the village with the assistance of one tank under the command of Second-Lieutenant Frederick W. McElroy. This young
Second-Lieutenant warrants a special mention during the course of this narrative as after advancing on two enemy held craters
and capturing them,one of these positions possibly the enemy crater referred to as Snowden, the tank burst into flames.
Refusing to leave the confines of the burning tank as the survivors managed to evacuate, McElroy kept the enemy at bay firing
one of the tanks Lewis guns.
Eventually exiting the tank himself, he protected his crew, many who were wounded and taking
cover in a shell hole, by firing his revolver and accounting for eight of the enemy. For this brave act, McElroy was awarded
the D.S.O. his citation being published in the London Gazette dated, 16th July, 1918.
The force now occupying a
position in the Hindenburg Line Trenches still remained under harassment from enemy machine-guns located in Havrincourt Park
and the Chateau. Subsequently a party was organised by the Brigade Major, John Francis Harter accompanied by Second-Lieutenant
Moor, to eliminate pockets of enemy resistance. By 10.15 a.m. the Wood (Park) and also the village were cleared resulting
in the capture of 100 prisoners.
For this action Second-Lieutenant Moor would be awarded the Military Cross, Captain
(Acting Major) Harter, the Distinguished Service Order for assisting Moor in the clearance of the Wood, establishing a new
Headquarters once the first objective had been gained and also numerous acts of reconnaissance in the days that followed providing
vital intelligence.
The advance on Havrincourt had cost the 2/6th West Yorkshire's two officers killed; Second-Lieutenant
Alan William Bedford, a native of Bradford, and Captain Robert Bickerdike, a native of Barkston Ash, who had been awarded
the Military Cross for actions at Bullecourt. In addition to the loss of these two officers, five others were wounded; Captain
George E.J. Brooksbank, Second-Lieutenants John R. Allett, Basil J.A. Pratt, James W. Worth and one Second-Lieutenant Walter
Mellor of Wetherby, wounded for the third time, receiving shrapnel wounds to his shoulder in his first action with the 2/6th
Battalion.
In Other Rank casualties, the battalion had suffered 23 killed, 68 wounded, and 59 posted as missing. An analysis
of both Soldiers Died and the CWWGC databases now informs us that of the above, 37 Other Ranks were killed
or died of wounds on the 20th November, with a further 5 succumbing to their wounds during the following day.
The Advance Of The 2/5th West Yorkshire's
The 2/5th West Yorkshire's, minus
"A" Company, would attack on the left of the 2/7th exiting "C" Sap at "Zero Hour." Attacking
behind the advance of the 2/6th West Yorks, "C" Company would form the first wave and consequently assembled in
"C" Sap with orders to manoevre to the right to obtain touch with the advance of the 2/7th West Yorks who would
debouch from "B" Sap to the right.
Following this lead wave, "B" Company would assault on the left
of the battalions frontage whilst "D" Company on the right respectively.
Shortly before the commencement of
the barrage the battalions scouts exited the trench to cut gaps in the enemys barbed wire defences. As the barrage reigned
down at 6.20 a.m. "C" Company commenced its advance followed by the remaining companies of "D" and "B"
respectively.
Tank support allocated to the battalion had not arrived but it was observed that some of their number had
advanced to the east, negotiating the terrain to the right of Femy Scrub.
"C" Company encountered at first
heavy enemy opposition from a machine-gun post located in Femy Scrub but this was subsequently dealt with by the battalions
specialists, who fired rifle grenades into the enemy position resulting in the 20 occupants surrendering.
It
was now that the battalion proceeded to its second assembly position, a sunken road to the south of "T" Wood, now
'grubbed out' but located to the east of the the south-eastern corner of Havrincourt Village. It was unfortunate that
enemy artillery managed, possibly on pre-arranged coordinates, to fire into the confines of the road resulting in over 20
casualties to the men of "B" and "C" Companies.
Reorganising of the battalion took place in this
location and after a period of about 30 minutes completing this action the 2/5th West Yorkshire's once again rose to the
advance at about 7.30 a.m.
Two tanks that had initially been tasked with the advance on the first objective arrived to
support this further advance.
|
|
| Trench Map Extract Sheet 57c N.E.4. Trenches Corrected To 20/9/17 |
At about 8.15 a.m.
the advance of the 2/5th West Yorks commenced once again but their right flank came under fire from an enemy machine-gun located
in "T" Wood. The position was rushed at bayonet point by an unknown platoon sergeant as the enemy subsequently fled
into a dug out. This was attacked with grenades and the machine-gun was then 'liberated' and placed in one of the
accompanying tanks.
As the advance continued northwards towards the cemetery the leading waves of the battalion were
once again subjected to machine-gun fire from the cemetery itself. "C" Company, supported by one tank, then continued
the advance but the supporting waves were delayed by enfilade machine-gun fire from the east of Havrincourt village. With
the assistance of a tank, this position was also neutralised and the follow up waves proceeded to join in the attack on the
cemetery resulting in the taking of thirty prisoners.
It was at this position that the battalion started to experience
fire from the front i.e. north, forcing the battalion to take cover in the road to the east of the cemetery, this location,
partly sunken, and covered by the railway embankment.
Yet another tank responded to the tactical situation and eliminated
this troublesome position however the battalion were still experiencing enfilade machine-gun fire from the direction of Havrincourt.
Suppressing fire from four Lewis guns was opened up on this position by "B" Company who subsequently attacked and
captured the gun and its associated personnel.
The momentum of the attack had to continue and it was now that "C"
Company continued the advance to the the first objective, positions in the Blue Line, leap-frogging the latter, both
"B" and "D" Companies would press on towards positions allocated in the Brown Line (Hindenburg
Support Line, position, west of Flesquieres) which was accomplished with little opposition and with consolidation of the position
beginning immediately. Contact was then made on the left flank by "C" Company of the 2/5th West Yorkshire's
with that of the 2/5th Yorks. & Lancs., 187th Infantry Brigade, 62nd Division, and on the right with the 2/7th West Yorkshire's,
185th Infantry Brigade.
The advance resulted in 1 officer killed, Second-Lieutenant Norman Herbert Smith, a native of
Bradford, and one wounded, Second-Lieutenant Albert John Watson, commissioned from the ranks of the Bradford "Pals."
In Other Ranks, the battalion suffered 113 casualties of whom 17 were either killed or succumbed to their wounds on the
20th, with a further 4 dying of wounds during the following day.
Right Flank: Advance Of The 2/8th
West Yorkshire's
The battalion, would advance on the right flank of the 2/6th West Yorkshire's
led by "C" Company of the 2/7th West Yorkshire's, attached, whose objective was to quell any resistance in the
enemy Outpost Line in the vicinity of The Tip. The initial advance of the 2/8th West
Yorks was to be conducted by "B" Company on the left flank whilst "A" Company would advance on the right
respectively. Each company would advance in two waves with a frontage of 100 yards allocated to each company.
Once breaking
through the Hindenburg Line, "A" Company were to consolidate the position and associated communication trenches
whilst "C," "B" and "D" Companies would pass through and to the second and third objectives.
As the barrage commenced at "Zero Hour," "C" Company of the 2/7th West Yorkshire's, in conjunction
with the plan of attack, waited to see if they could discern their allocated tank support moving onto their objective,
i.e. the enemy Outpost Line. At about 6.30 a.m. the tanks were finally spotted moving into action near The Tip.
It was at this juncture that "C" Company rose to the assault exiting the line from "B" Sap whereupon
they proceeded to assault the enemy's positions at Femy Scrub.Very little enemy opposition was encountered resulting
in the capture of 100 of the enemy in addition to four machine-guns. Bitter experience had taught the West Yorkshire's
that it was vital to clear all dug outs and trenches thoroughly of the enemy and on completion of this task the company organised
itself into platoon formation as the 2/8th West Yorkshire's began to press northwards to assault the front line trenches
of the Hindenburg Line.
In the wake of the tanks, the 2/8th West Yorkshire's advanced behind the latter at
a distance of about 100 yards. It was at about 6.50 a.m. that the leading platoons of "A" and "B"
Companies reached the enemy front line trenches of the Hindenburg Line. Resistance was once again minimal with 80 of the enemy
made prisoner and the capture of six machine-guns plus one minenweferfer (trench mortar).
It was then that "A"
Company began the process of consolidation whilst "C" Company continued the advance supported by tanks to the next
objective, part of the enemy's trench system located to the west of Triangle Wood, south of the Grand Ravine.
The enemy had sited his machine-guns well as each of these three trenches to the west of the wood contained 'nests','
the wood also, the latter being an objective of the 51st (Highland) Division. It was at this crucial juncture of the
assault that momentum had to be maintained. As a consequence, the wood was assaulted on either flank and the position taken.
It was now, after nearly an hour into the attack, that "C" Company had attained all its objectives.
It was
now that "D" and "B" Companies moved forward to capture the battalions final objectives in the Blue
Line.
It was on the right of the brigade boundary, ie. the boundary with the 51st (Highland) Division that "B"
Company began to suffer numerous casualties due to the effects of long range machine-gun fire from the direction of Ribecourt
as it supported the attack of "C" Company on Triangle Wood. Dangerously exposed to this enfilade fire it
was not until the timely arrival of a tank, possibly of "D" Battalion supporting the 153rd Brigade, 51st (Highland) Division's
attack on Flesquieres, that the flank was protected.
"D" Company advancing on the left flank had also
incurred numerous casualties including all its officers before reaching "T" Wood. Taking command, a senior sergeant
led the company on however to the ultimate objective, the Blue Line. Realising the significant loss of officers to
the company, Lieutenant Priestley Jowett of "A" Company set forth and assumed command of the company.
Only
three days later, Lieutenant Jowett would be gazetted the award of the Military Cross for actions at Bullecourt.
It was
at "T" Wood that further resistance was met in the form of an enemy machine-gun position. The position was subsequently
bombed and those that had not either fled or become wounded were dealt with.
Continuing to advance past the wood machine-gun
fire was now encountered emanating from a concrete fortification possibly located in one of either two copses to the
immediate north of "T" Wood. The enemy were engaged in the immediate vicinity which resulted in twenty of his
number being killed and about sixty three captured including three officers.
Casualties to the battalion amounted to
3 officers and 95 Other Ranks. Soldiers Died In The Great War indicates that the battalion lost 12 Other Ranks killed
on the 20th.
One of these men, Private Richard Petty attested for service in August 1916. Richard, a native of
Dunsop Bridge, located in the Ribble Valley, the village then forming part of the West Riding of Yorkshire, was previously
employed as a Water Bailiff, no doubt policing either the waters of the River Dunsop or that of the Hodder.
Posted to
the 83rd Training Reserve in June 1917, he was sent to France in early November 1917 to the 33rd Infantry Base Detail (Depot)
located at Etaples. Originally destined as a draft for the 10th (Service) Battalion, West Yorkshire Regiment, this was rescinded
with Richard being posted to the 2/8th West Yorkshire's on the 16th November. Just four days later he was to be killed
in action.
2/7th West Yorkshires
The objective of the 2/7th West Yorkshire's
was to advance and occupy the enemy's trench system in the Brown Line to the west of Flesquieres, a trench in
the Hindenburg Support Line referred to as Darwin Alley.
The battalion, minus "C" Company who had
been detailed to attack the enemy's Outpost Line ahead of the advance of the 2/8th West Yorks, assembled in Trescault
Trench with "A" Company forming up just to the left of the cemetery and with "B" Company just to
the right of the latter. "D" Company would occupy a position in the rear in Trescault Support Trench.
At
about 07.05 a.m. the companies advanced passing through the now subdued enemy Outpost Line where they rendezvoused
with "C" Company who would advance in the rear of the three leading companies.
The assembly position, the sunken
road just to the south of "T" Wood was reached at 07.50 a.m. whereupon the battalion made ready for its objective
in the Brown Line. Once the battalion was formed up in attack formation, "A," "B," "D"
and "C" respectively, the 2/7th West Yorks rose to the advance proceeded by allocated tank support at 10.15 a.m.
Moving northwards and crossing the road east of Havrincourt and to the west of the Cemetery, "A" Company succeeded
in penetrating and capturing the enemy's trench system to the north of the Cemetery/Chapel. Consolidating this position,
"B" and "D" Companies now assaulted the Hindenburg Support Line to points west of Flesquieres capturing
150 of the enemy and 7 machine-guns.
"C" Company, who had been in the assault from "Zero Hour"
now passed through the latter two companies to establish a position of defence in Darwin Alley where this latter
trench crossed a sunken road that led to Graincourt.
An analysis of Soldiers Died In The Great War indicates
that on the 20th November, 14 Other Ranks were killed. During the following day a further 7 O/R's were killed plus 1 officer,
Lieutenant Walter Ravenhill Brown, possibly, as the 185th Infantry Brigade moved forward to positions to the south and west
of Graincourt. Also on this date 2 Other Ranks succumbed to wounds.
During the course of research, the Author located
the surviving service record of one man who was killed on the 21st, namely, Private Richard Nicholson Taylor, 200101. Richard,
a native of Aldborough, near Boroughbridge, had previously served with the 1/5th and the 2/5th Battalions of the West Yorkshire
Regiment. Transferred to the Army Service Corps, Horse Transport Depot in mid 1915, he returned to his battalion, the
1/5th, in early 1916, only to seriously sprain an ankle and fracture his fibula in May 1917 that required further treatment
and convalescence in the United Kingdom.
Family troubles at home that had ultimately resulted in the abandoning
of his four children by his wife had unfortunately led to court proceedings and as a consequence, the children were placed
in the joint care of Richard's mother and a Mrs Wray.
Deemed once more fit to return to the Western Front, Richard
arrived at the 33rd Infantry Base Depot (Detail) located at Etaples in late October 1917. Originally assigned as a draft to
the 1/8th Battalion, West Yorkshire Regiment, 49th Division, Richard's posting was changed to that of the 2/7th West Yorkshire's
which he duly joined on the 4th November 1917. In just 17 days, Richard was killed.
Unfortunately the location of his
grave could not be identified after the War, therefore, he is now commemorated on the Cambrai Memorial located at Louverval.
Just one man's 'story' and life amongst many that are now carved on the panels that commemorate the missing.
The Advance Of The 187th Infantry Brigade: The Left Flank
On the left of the
185th Infantry Brigade's attack frontage lay that of the 187th Infantry Brigade under the command of Brigadier-General
Reginald O'Bryen Taylor. The task allocated to the brigade was the capture of Havrincourt village and its associated environs
on its right flank, i.e. left flank of 185th Brigade. The attack on the left flank, right flank of the 36th (Ulster) Division
respectively, would constitute an advance to the north-west of Havrincourt village to a position between the latter and
that of the Canal du Nord, as yet, 'dry' and not completed as the outbreak of the War had halted construction.
Leading the assault, the 2/4th King's Own Yorkshire Light Infantry, commanded by Lieutenant-Colonel Rowland Ewart Power,
would attack the objectives on the right flank, Havrincourt area, whilst the 2/5th K.O.Y.L.I., under the command of Lieutenant-Colonel
Baptiste Johnstone Barton, would advance to their objectives on the left. Once this initial phase of the operation was completed,
the 2/4th and the 2/5th Battalions Yorks & Lancs, under the commands of Lieutenant-Colonels Arthur Edward
Maitland and Leonard Herbert Pocock Hart respectively, would leap frog
the lead battalions and continue the assault northwards. "Zero Hour" was set for 6.30 a.m. (Authors note: Source,
Wyrall's History Of The 62nd (West Riding) Division. This would seem at variance with available
material at this time to the Author. 2/4th Yorks & Lancs were commanded by Lieutenant-Colonel Frederick
St. John Blacker, the 2/5th, as per Wyrall's History, Colonel L.H.P. Hart who had
replaced Colonel Peregrine Prince due to his wounding in the Bullecourt Sector in July. Hart
would eventually replace Blacker as C.O. of the battalion due to his wounding in March 1918. A further
examination on these anomalies is therefore crucial to accuracy).
Prior to the hour of attack, enemy artillery bombarded
the area causing numerous casualties as the assembled leading battalions awaited their tank support.
Although some tanks arrived late, the advance of the 2/4th K.O.Y.L.I. commenced at the appointed hour and as the enemy Outpost
Line was crossed, minimal opposition was met. The terrain now sloped down towards a small copse, Dean
Copse, located to the south-west of Havrincourt, and it was on reaching this position that the lead companies began to
experience heavy enemy machine-gun fire from the direction of the copse and from an enemy strong point just to the north of
the latter position and referred to as Etna, a mine blown by the enemy resulting in a high lipped crater
consequently fortified. These two positions were stormed and subdued however further to the east in an area
known as Boggart's Hole further resistance was encountered but the enemy machine-gun position
in this area was subsequently taken with the assistance of a tank. As the K.O.Y.L.I.'s pressed on northwards towards the
village yet further fortified enemy mine craters were encountered, Snowden, located on the western edge of Havrincourt Park, and Vesuvius, located to the east of the Canal and to the west of the village.
From these positions enemy machine-guns opened up on the advancing men but Vesuvius was attacked and captured by
units of both battalions with Snowden also being taken despite heavy machine-gun fire from the direction of the Park.
|
|
| Attack Frontage Of The 187th Infantry Brigade |
It was now that patrols were sent forward
into the environs of Havrincourt Wood that was still occupied by the enemy and as it yet had not been subjected to any
advance. To this end a psition of defence was established in the western extremes of the wood so as to protect the right flank
of the brigade.
As the advance continued into the village itself, the fighting now degenerated into that of an urban
nature with the enemy occupying ruined houses, cellars and dug outs. With one company moving northwards, and another assaulting
the village from the western approaches, the village was systematically cleared as far as the road that led to Grancourt,
the position of the Blue Line. However, as this position was reached along the whole of the divisions front about
8.30 a.m., the enemy garrison at Havrincourt Chateau still held on tenaciously for a period of about two hours until it finally
capitulated.
An attempt was made to gain touch with the left flank of the 185th Infantry Brigade, the 2/6th West Yorkshire's.
Attempts were made on two occassions but each attempt at linking up with this flank proved to be unsuccessful.
Lieutenant-Colonel
Hoare, 2/6th West Yorkshire's would later comment in part on communications per se;
"At
the commencement of operations, there was no lateral communication direct between Battalions whether within the Brigade or
with the flanking Battalions of other Brigades."
Due to the delay of the tanks allocated to support the
infantry advance, the 2/5th K.O.Y.L.I.'s along with their sister battalion rose to the attack at "Zero" plus
15, i.e. 6.35 a.m.
Despite the lack of tank support, the 2/5th quickly broke through the enemy's Outpost Line
whereupon the right flank objective, the fortified mine crater Etna was overun by a composite force of both
the 2/5th and the 2/4th.
The advance continued northwards protected on the left flank by the Canal du Nord. It was at
this point that the enemy position Vesuvius was encountered but this was similarly dealt with by a pincer movement
conducted by both battalions.
Pressing on, the 2/5th now took and captured Wigan Copse, now non existent but
originally located to the south of the road that led eastwards to Havrincourt and west to a demolished bridge
over the canal. Crossing the road the battalion now arrived in an enemy trench located just to the east of the canal where
it crossed a sunken road, possibly the trench located to the west of Railway Trench. It was here that the company
under the command of Captain Alfred Cecil Lynn accompanied by Second-Lieutenant William George James engaged
the enemy with bayonet, bomb and rifle butt as they broke into the position. This hand-to-hand fighting resulted
in the capture of a large number of prisoners and enemy materiel. Those who resisted were eliminated.
During
the action Captain Lynn accounted for four of the enemy in addition to forcing eight of their number to surrender. Second-Lieutenant
James led the platoon under his command into the thick of the fighting and accompanied by two men they accounted for eighteen
of the enemy. After heavy officer casualties were sustained, James took command of the battalion at a most critical time when
both flanks were exposed managing to hold off the enemy until reinforcements arrived.
For their actions, both men were
awarded the Distinguished Service Order, their citations for these acts being published in the London Gazette dated 2nd July
1918.
An analysis of both the Commonwealth War Graves Commission and Soldiers Died In The Great War now
indicates the following casualties suffered by the 2/4th K.O.Y.L.I. between the 20th - 21st November; 1 officer killed, Second-Lieutenant
Henry Arthur Eric Barker, 1 officer Died Of Wounds received during the attack, Captain Malcolm David McNicoll, Officer Commanding
"C" Company.
In Other Ranks the battalion lost 47 O/R's Killed In Action, 20th, Died Of Wounds, 8, 20th,
and 5 Other Ranks Died Of Wounds on the 21st.
Of the 2/5th Battalion, 23 Other Ranks were Killed In Action on the 20th
whilst 1 Died Of Wounds. Two O/R's would succumb to their wounds on the 21st.
Authors note: There are variances or
anomalies in both dates and battalions in both sources utilised to compile the above casualty figures.
At
about 8.30 a.m. the enemy's Blue Line was reached to the west of Havrincourt. It was now the turn of the 2/4th
and 2/5th Yorks & Lancs to advance upon their objectives located in the Brown Line.
At 7 a.m. both battalions
were ready in their assembly positions located in Havrincourt Wood and at 8.35 a.m. they commenced their advance to the west
of the village.
The 2/5th, advancing on the right flank, that nearest Havrincourt Village, began to suffer casualties
as they progressed to the west of the village. In a complex manoeuvre, the battalion then altered the line of advance so as
to proceed northwards to its objectives in the enemy's Brown Line, Hindenburg Support Line, and to a final position
located to the west of Darwin Alley.
The advance of the 2/4th Yorks & Lancs, with its left flank resting on
the bank of the Canal du Nord progressed with little opposition due to the rapid advance of the 109th Infantry Brigade, 36th
(Ulster) Division on the western side of the canal. The latter had stormed a fortified spoil heap, rectangular in structure,
that occupied a position to the north of Canal Copse.
Advancing towards their final objective in the enemy's
Brown Line, the 2/4th Yorks & Lancs took up a position in the Hindenburg Support Line just to the south of Lock
Number 7.
Casualties to both battalions amounted to 1 Officer, Captain Reginald Clifford Hall, 2/5th Yorks &
Lancs, gazetted the Military Cross only a few days after his death, and 14 Other Ranks Killed In Action, one of these
men succumbing to his wounds on the 20th instant.
The Advance Of The 186th Infantry Brigade
At 9.am., Brigadier-General Roland Boys Bradford V.C. committed his brigade to the attack.
The brigade
had assembled in Havrincourt Wood and at about 8 a.m. were disposed as follows; 2/6th Dukes (Duke of Wellington's) along
with the 2/4th Dukes, right flank, in the wood west of Trescault. Major R. Coombe (Authors note: Source, Wyrall's
History but presumably Major, Temporary Lieutenant-Colonel Leslie Jackson Coombe, attached
from 4th Yorks & Lancs) and Lieutenant-Colonel Henry Edmund Palmer Nash Officers Commanding respectively.
The 2/5th Dukes and the 2/7th Dukes, Officers Commanding, Lieutenant-Colonels Thomas Andrew Dunlop Best and
Frank Stanley Thackeray would advance on the left flank, to the north-west of the latter. The dividing line between
both flanks being a ride through the wood referred to as Shropshire Spur.
The advance was to be supported by
six tanks attached from "G" Battalion, Tank Corps, under the command of Lieutenant-Colonel Edward Barnard Hankey.
Cavalry was also ordered to move up in support of the brigade. Three squadrons of the 1st King Edward's Horse took up
a position in Havrincourt Wood and with the assistance of tank support, their objectives were to exploit the anticipated breakthrough
by capturing bridges and to proceed to advance on the village of Graincourt.
Moving in a north-easterly direction,
the right flank units of the brigade, 2/6th, 2/4th and the 2/7th Dukes respectively, advanced by companies detailed into
four columns. As the battalions exited the wood they reorganised into artillery formation. This tactic basically constituted
the 'spreading out' of the formation, for example, the adoption of a diamond shape, so as to minimize the effects
of enemy artillery. It must be noted however that different types of formation were adopted but with the fundamental issue
of control of the force being paramount.
Proceeding north-eastwards through Femy Wood, the advance of the Dukes
continued to the east of Havrincourt Village and northwards towards "T" Wood.
The 2/6th Dukes, advancing on
the left flank, now came under shell fire from the direction of Flesquieres at about 10.a.m. German artillery batteries of
the 54th Division, occupying positions on the reverse slope of the Flesquieres Ridge, now also had full observation of the
advance on the village by the 51st (Highland) Division. As the latter, supported by tanks attempted to press home their attack,
the tanks allocated support the Highlanders were knocked out as they came over the crest of the ridge by 77 mm field guns.
Although enemy resistance was beginning to stiffen on the Flesquieres front, the 2/6th Dukes with the 2/7th advancing on
their right flank with the 2/4th in a support role, still managed to maintain the impetus of the advance as they proceeded
onwards towards the objective, the Blue Line.
Once this objective was reached the advance continued in a north-westerly
direction towards positions in the Hindenburg Support Line to the east of the Canal du Nord between Lock Numbers 7, located
to the south, and 6, to the north respectively. The trenches to be attacked, Hughes Switch and Hughes Support,
ran west to east across the road to Graincourt; these would have to be taken if the village of Graincourt was to be assaulted.
The 2/5th Dukes, who had assembled for the attack at Place Mort Homme located in Havrincourt Wood started to move
forward for their advance at about 9.15 a.m. Shortly after the commencement of the advance of the 186th Infantry Brigade
the battalion soon ran into trouble as they approached the western flanks of Chateau Wood. Machine-gun and rifle fire
from an area thought to be pacified soon took its toll killing the Commanding Officer Lieutenant-Colonel Thomas Andrew Dunlop
Best along with Lieutenant John George Bodker who was attached to the battalion from the Yorks & Lancs Regiment.
A further two officers were wounded, one, Lieutenant James Aspinall Haigh, succumbing to his wounds two days later. In Other
Ranks at this juncture of the advance, the battalion sustained 26 casualties.
With the loss of Colonel Best, the Adjutant,
Captain Herbert Selwyn Jackson assumed command of the battalion and continued the advance onwards towards the Brown Line.
"D" Company, under the command of Captain Tom Goodall who were moving across the whole frontage of the
advance detracted from the latter to eliminate pockets of resistance in the vicinity. The latter, consisting of snipers and
machine-guns was subsequently dealt with resulting in the capture of 1 officer and 58 of the enemy along with 2 machine-guns.
In addition to this, one officer of the Intelligence Corps who had previously been posted missing and one N.C.O. were liberated.
Captain Frank Arthur Sykes now assumed command of the battalion as the men reorganised and continued the advance towards
the jumping off position located in a sunken section of the Graincourt-Demicourt Road. Moving forward in a formation of line
of sections, "D" Company along with one platoon of "A" Company who would protect the left flank of the
advance headed for their objective, Kangaroo Alley. However, on moving forward to the allocated jumping off position,
the battalion experienced concentrated machine-gun and rifle fire from a point in the enemy's trench system near the sunken
road, i.e. the Graincourt-Demicourt Road. A platoon of "D" Company was therefore sent forward under the command
of Lieutenant Douglas Black to eliminate this pocket of resistance. On approaching the latter, Black encountered a tank
that had ditched, possibly in the road, being attacked by the enemy with bombs. The tank commander and his crew were defending
the tank in the open along with Captain Charles Stone Moxon who had followed the tank into action. Black's platoon
now manoeuvred around the strong point and ultimately rushed it killing 5 of the enemy and capturing 3. The remainder of the
garrison fled the position down the road towards the direction of Graincourt but were shot down by Lewis guns with heavy
casualties being inflicted on the escaping enemy.
Now free from harrassing fire, the battalion formed up and pressed
on towards the objective accompanied by tank support. The objective, Kangaroo Alley, running west to east from Lock
Number 6 fell to the men of "D" Company. Lock Number 6 and an associated strong point fell to the men of "C"
Company with the capture of 2 officers and 64 men. Some resistance however was still encountered with a number of the enemy
retreating into a dug out. Refusing to leave the the relative safety of this structure, a "P" Bomb, phosphorus bomb,
was thrown in and the dug out set on fire. What had been thought to be a sanctuary, now proved to be a tomb.
Still Lieutenant
Black and his platoon pressed on down eastwards down Kangaroo Alley encountering yet another enemy strong point.
This also fell with the capture of 2 officers and 59 men in addition to 2 machine-guns. For his actions during the day, Lieutenant
Douglas Black was to be awarded the Military Cross, his citation appearing in the London Gazette dated 2nd July 1918. Black
was no stranger to the award of medals for gallantry for he had also gained the D.C.M. as a Corporal with the 1/5th Dukes,
49th (West Riding) Division.
Continuing the advance, "A," "B" and "C" Companies now leaped
frogged through "D" Company. As the Bapaume-Cambrai Road was reached, 1 platoon under the command of Second-Lieutenant
Victor Greaves captured another enemy strong point just to the north of the road. This yielded a further 2 officers and 12
men plus 2 machine-guns.
This was to be the final position held by the 2/5th Dukes on the 20th November. Positions won
during the day were now consolidated with "C" Company occupying the left flank and in touch with the 36th (Ulster)
Division, "A" Company in the centre with "B" Company on the right forming a defensive flank position down
the Hindenburg Support Line to the west of the Sugar Factory. "D" Company were in support along with Battalion Headquarters,
both located in Kangaroo Alley.
The battalion had during the day captured 353 prisoners, 15 machine-guns and
1 trench mortar however three officers were dead including the Colonel and one wounded. In Other Ranks the battalion suffered
10 killed, 55 wounded and 4 missing. An analysis of the Commonwealth War Graves Database and that of Soldiers Died now
indicates 18 Other Rank killed, with 1 succumbing to wounds on the 20th instant.
One young Wetherby man, Private George
Atack aged 19 years was to survive the attack however George was to unfortunately lose his life in the days that followed.
It is with some sad irony that George was also a resident of Sandringham Terrace, Number One. The house next door to that
of the Pratt family.
The Capture Of Graincourt
Despite the spectacular advance
of the 62nd (West Riding) Division, Flesquieres, the objective of the 51st (Highland) Division had failed to fall. As a consequence
of tactics adopted by Major-General Harper, i.e. the men had followed the assault of the tanks in waves contrary to their
training prior to the attack which dictated that they advanced in columns, Harper became a figure of some controversy. Whatever
the reasons Harper had for this change of tactics is a subject even discussed today. There is no doubt however that he
had the protection and safety of his men of his paramount concern. The decimation of the tanks as they crossed the Flesquieres
Ridge being a prime example that if his men had been in close support, the fate that awaited the tanks would have also befell
his men.
Due to the fact that Flesquieres had not fallen, an opportunity had arose of the possibility of a flank
attack from the west on the village by the 62nd (West Riding) Division. Communications on the battlefield however were poor.
Hoare himself once again states that on a brigade level communication was not readibly available.
"No
communication by wire was ever established by Brigade Headquarters to Battalions after the commencement of operations. I do
not consider that this was creditable."
So, the opportunity offered to take the village from the west
was never realised or at least no reply was ever communicated. Due to this confusion and mindful of the tactical situation
on his right flank, Major-General Braithwaite therefore issued orders that there was to be no further advance northwards beyond
the line of the Bapaume-Cambrai Road or any further advance undertaken beyond Graincourt.
Deciding to commit an attack
to the west on the village in support of the Highlanders, Braithwaite ordered that any surviving tanks be ordered to
proceed towards the latter. Bradford however, due to either lack of communication or aware that a further advance in to enemy
held positions was feasible due to mounting artillery support, pressed onwards with the right flank units of the 186th Infantry
Brigade. The prize of the villages of Graincourt and Arleux was there for the taking.
Artillery now pounded Graincourt
as a prelude to an infantry assault supported by tanks. Mustering what ever armour was still available the attack commenced.
Almost immediately the tank support ran into trouble as they approached the village of Graincourt when enemy 77 mm artillery
pieces opened fire and disabled six tanks. The enemy artillery fire from this position was soon disrupted by the arrival of
three tanks as the 2/4th Dukes reorganised as a prelude to the assault of the village. Accompanied by one tank the assault
commenced against the enemy garrison who had ensconced themselves in the ruined buildings and quickly the Dukes became embroiled
in what can only be described as fighting of an urban nature. The village finally fell after a resolute defence by the enemy
at around 3.30 p.m.
On the right flank the 2/6th Dukes proceeded to advance on the village of Anneux to the north-east
supported by the 2/7th Dukes along with two squadrons of the King Edward's Horse of IV Corps Cavalry fighting as dismounted
troops. Shortly after the fall of Graincourt, Brigadier-General Bradford finally received the order to halt the advance however
the 2/4th Dukes had by now succeeded in continuing the advance as far as the Bapaume-Cambrai Road resulting in the occupation
of the Sugar Factory just to the north of the road. Anneux it was ascertained was strongly held by the enemy but a reconnaissance
to the north conducted by the remaining tank support concluded that Bourlon Wood was ripe for the taking and appeared to be
undefended. At this juncture Bradford ordered his battalions of the 186th Infantry Brigade to take up a defensive stance in
the village of Graincourt. Although Anneux had yet to fall, "B" Company of the 2/4th Dukes maintained a forward
position occupying the Sugar factory.
It was near the location of the factory that a large body of the enemy were detected
marching in column towards the direction of Cambrai. Second-Lieutenant Joseph Percy Castle assessed the situation as the column
approached. To attempt to capture the whole of this party was impossible as the number of the enemy was estimated at 100 plus.
Approaching stealthily the last three men at the rear of the enemy column and accompanied by his platoon sergeant, Castle
raised his revolver at one of the men. With his sergeant covering one man at the point of the bayonet, the three enemy soldiers
attempted to reach and raise their weapons whereupon Castle hit one of the enemy in the face with his revolver. Surprisingly,
there was no cries for help from the now captured enemy who were led off with back to Castle's platoon. Quickly organising
a Lewis gun into position, its associated team were ordered to fire down the road and it was ascertained later that the gun
had done good execution on the enemy party. For this and further actions in the days that followed, Castle was awarded the
Distinguished Service Order. The opening day of the Battle of Cambrai had proved to be an outstanding success. The men of III Corps
had advanced as far as the St. Quentin Canal whilst IV Corps, in particular the 62nd (West Riding) Division had spectacularly
advanced over 7000 yards from their original start positions. Across the front the anticipated breakthrough by the cavalry
had not materialised due to a number of factors and on the front attacked by IV Corps the 51st (Highland) Division had met
fierce enemy resistance at Flesquieres. Casualties sustained by the infantry however were minimal compared to previous
engagements but the losses to the tanks and their crews who had gallantly smashed their way through the barbed wire defences
of the Hindenburg Line had proved to be extremely costly. The
outcome of operations conducted during the following day would now dictate the course of the battle. In IV Corps sector, the
capture of Bourlon Wood and its associated village offered the chance of an advance towards the north of Cambrai. If this
could be exploited, the latter would threaten the vital rail link between Douia and Cambrai, thus, severing one aspect of
the enemy's logistical supply lines. As Haig had anticipated, the enemy would most likely begin to reinforce his front
within 48 hours of the commencement of operations. His dilema, wether to call off the battle if objectives had not been gained
would now be resolved within the next 24 hours during the actions of the 21st November.
21st November: The Attack On Anneux
During the course
of the advance of the 186th Infantry Brigade on the third objective the previous day, Lieutenant-Colonel
Hoare had reorganised the 2/6th West Yorkshire's into the following positions; 1 Company in the road to Flesquieres running from the north-east corner of Havrincourt Village, 1 Company,
between Femy Scrub and Femy Wood stretching to the west of Havrincourt Park, and 2 Companies to the rear of the latter with
their left flanks also resting on the boundaries of the Park. At
about 7 p.m. orders were received for the battalion to proceed northwards and to concentrate at Havrincourt Cemetery. It was
here as the rain began to fall and the wind increased that William and his comrades prepared to bivouac for the night. Cold
and exhausted, rations were not received by the battalion until 12.30 a.m. and no doubt a most unpleasant and uncomfortable
night was spent as the prospect of another advance loomed during the following day. At dawn on the morning of the 21st, it was intended that the
51st (Highland) Division would commence an advance on Flesquieres. Patrols sent out during the night however indicated
that the village had been abandoned by the enemy and as a consequence the village was taken with little or no opposition.
Moving forward into the enemy's Brown Line north of the village, the Highlanders were now tasked with an advance
on Cantaing to the east of Graincourt. Taking this objective, the advance would continue northwards towards Fontaine-Notre-Dame.
On the left flank, the 186th Infantry Brigade, 62nd (West Riding) Division, would advance from Graincourt and seize the village
of Anneux and then proceed across the Bapaume-Cambrai Road in a northerly direction to take Bourlon Village. In this advance,
the brigade would have to penetrate the Masnieres-Beaurevoir Line that crossed the high ground from the west of Bourlon Wood
and continued in a westerly direction towards the village of Moeuvres. The 185th and the 187th Infantry Brigades of the 62nd
Division would not be committed to the attack although during the morning as the attack progressed both brigades pushed forward
their respective units into support positions. The attack of the 186th Infantry Brigade was to be supported by the 62nd Divisional Artillery, however the latter
had great difficulty in moving forward to their allocated positions due to the only major road in the area being a veritable
quagmire resulting in the guns becoming bogged down. Nonetheless the right flank battalion of the brigade, the 2/4th Dukes,
supported by two tanks, commenced their attack on the village of Anneux that was held by a small but determined
enemy garrison. As the centre company fought their way into the village they were subjected heavy enemy machine-gun and rifle
fire from ruined buildings and the fighting became of a protracted nature. The left company of the battalion had commenced
their advance from the village of Graincourt and proceeded to the west of Anneux heading for the Sugar Factory on the Bapaume-Cambrai
Road. Continuing the advance eastwards towards the north of Anneux, the company headed for a small wayside shrine or chapel
situated alonside the Bapaume-Cambrai Road and a quarry located just to the north of the latter to the east of the road leading
northwards from Anneux to Bourlon Village. These two locations in the enemy's line were strongly held but with the support
of a tank the positions soon fell to the Dukes who began to reorganise for an advance on Anneux in conjunction with the right
hand company of the battalion who had advanced to the east of the village accompanied also by one tank. Performing a
pincer movement on the village, the latter finally fell to the Dukes but with stubborn enemy resistance from the direction
of Bourlon Wood in the form of heavy machine-gun and rifle fire, any further advances to the east towards the Cantaing Line
proved to be impossible. Also advancing from the direction of Graincourt were
the 2/7th Dukes who proceeded in a northerly direction towards the Bapaume-Cambrai Road and the Sugar Factory. Advancing up
a sunken road that ran north from the Factory, any further advance was checked by thick barbed wire defences and despite the
arrival of tank support any further advance was checked by heavy fire from the direction of Bourlon to the west. On the far left of the brigade advance, the 2/5th Dukes, now under the command of Major Frank
Brook, bombed up the enemy's trenches to a position west of the sunken road. With no tank support and also finding the
enemy's barbed wire defences impassable, an enemy strong point was encountered just to the north but this was taken. Under
increasing enemy pressure from the direction of Moeuvres to the north-west, a block was established in the enemy trench. At
this point any further progress proved to be impossible but a tank, that had lost direction was seconded and a further advance
attempted that succeeded in advancing the position of the battalion to about 800 yards east of Lock Number 5. The positions
were consolidated but the enemy counter-attacked on at least two occasions but these were broken up by Lewis gun and rifle
fire. As the units of the 186th Infantry Brigade maintained their advanced
positions, during the day the 185th Infantry Brigade had also begun to move forward. The 2/6th West Yorkshire's had received orders to this effect at 9.30 a.m. during the morning and proceeded
to dug outs located in the Hindenburg Support Line in the vicinity of Hughes Switch and Hughes Support Trenches.
This movement was completed by 11.30 a.m. but there were few completed dug outs to accomodate the battalion. Those that
could not be put into some comparative safety and secour of an underground structure, had to remain in the exposed trenches. In the late afternoon the 185th Infantry Brigade received orders to commence a relief of the
186th Infantry Brigade. Under the cover of darkness the following reliefs now took place:
2/6th West Yorkshires (With "A"
Company 2/5th West Yorks attached) - 2/5th Dukes, north of the Sugar Factory 2/7th West Yorkshire's - 2/4th Dukes, Anneux and north of the latter including the Chapel and Quarry positions 2/8th West Yorkshire's - 2/7th Dukes, (2/8th West Yorks also relieving the
two right companies of the 2/6th Dukes in a sunken road running in a north-westerly direction from near Anneux. Length of
frontage including that occupied by "C" Company, 2/5th West Yorks about 500 yards) 2/5th West Yorkshire's ("C" Company attached to 2/8th West Yorks) - Relieving 2 companies
of the 2/6th Dukes occupying the left positions in the above sunken road.
The day had also witnessed the advance
of the 51st (Highland), as far as the village of Fontaine-Notre-Dame but the situation on this part of the front held
by the Highlanders was precarious. The advances of III Corps had failed to make any progress towards the breaking of the Masnieres-Beaurevoir
Line ultimately leading to a cessation of operations on this part of the front. Haig therefore now decided to concentrate
the effort against the Bourlon Ridge. This had to be taken or a withdrawal to the Flesquieres Ridge would have to be conducted. In a Third Supplement to the London Gazette dated the 4th March 1918, the Field-Marshal
now declared his intentions:
"The forty-eight hours after
which it had been calculated that the enemy's reserves would begin to arrive, had in effect expired, and the high ground
at Bourlon village and wood, as well as certain important tactical features to the east and west of the wood, still remained
in the enemy's possession. It now became necessary to decide whether to continue the operation offensively or to take
up a defensive attitude and rest content with what had been attained. It was not possible, however, to let matters stand as they were. The positions captured by us north of Flesquieres
were completely commanded by the Bourlon Ridge, and unless this ridge were gained it would be impossible to hold them, except
at excessive cost. If I decided not to go on a withdrawal to the Flesquieres Ridge would be necessary, and would have to be
carried out at once. On the other hand, the enemy showed
certain signs of an intention to withdraw. Craters had been formed at road junctions, and troops could be seen ready to move
east. The possession of Bourlon Ridge would enable our troops to obtain observation over the ground to the north, which sloped
gently down to the Sensee River. The enemy's defensive lines south of the Scarpe and Sensee Rivers would thereby be turned,
his communications exposed to the observed fire of our artillery, and his positions in this sector jeopardised. In short,
so great was the importance of the ridge to the enemy that its loss would probably cause the abandonment by the Germans of
their carefully prepared defence systems for a considerable to the north of it." After the initial shock of the opening blows of the Cambrai offensive the enemy hurried forward his
immediate reserves to hand however this was only in sufficient number to replace his losses incurred during the previous two
days of fighting. Of the British divisions that led the assault, the men were in a complete
state of exhaustion and would have to be relieved. This would take time, time that if lost would
witness the German Army pushing forward fresh infantry divisions to stop any further incursions into their lines. Bourlon
Ridge, as yet not held by the enemy in great number was there for the taking.
Thursday 22nd November 1917:
The Death Of Private William Pratt Lieutenant-Colonel
Hoare and the 2/6th West Yorkshire's now proceeded forward in the dark, Hoare himself reaching the Battalion Headquarters
of the 2/5th Dukes in the line at 10 p.m. Guides then arrived shortly before 11 p.m. to assist in movement towards the
front line positions to be occupied. Great difficulty was experienced in moving forward not only due to the dark but also
of the limited knowledge of the guides who had no doubt had little if any time to perform a comprehensive reconnaissance of
the area and as a consequence the battalion was delayed in moving forward. Colonel Hoare had been assured by the Commanding
Officer of the 2/5th Dukes, Major F. Brook, that the Dukes were in touch with one of their sister battalions on the right
flank and on the left flank with units of the 36th (Ulster) Division about 1500 yards east of Lock Number 5. By 1 a.m. Colonel Hoare had still not received confirmation that the relief had been completed despite
battalion runners being dispatched with each company from Battalion Headquarters. Moving forward the Colonel now ascertained
the exact positions held by his battalion. Two platoons of "D" Company now held positions just to the north of the
Sugar Factory and to the west of the Sunken Road heading north from the latter building. Extending northwards to what Hoare
refers to as the Hindenburg Line but to be more concise is a juncture of the Hindenburg Support Line.
Here the two platoons of "D" Company formed their left flank but
did not occupy this juncture in the line. (Authors note: Due to enemy trenches being partly constructed).
Continuing Northwards, one platoon of "D" Company were then followed by "B," "A"
and "C" Companies, the latters left flank resting about 1300 yards due east of Lock Number 5.
The position was far from ideal.
There were a great many partly dug trenches stretching for a distance of about 100 yards in the line and Colonel Hoare was
himself unsure about the exact positions held by his battalion. Furthermore, to the north he
suspected that a communication trench running northwards had been occupied instead of a position being established
in the Hindenburg Support Line. On
the right flank, there was no sign of any contact with any unit. It was vital that the
Colonel knew the exact positions on his flanks so he ventured forward himself over a distance of about 500
yards pushing forward patrols in advance. On reaching the extreme north of his position, the
same situation soon became apparent due to the positioning of his sentries. On occupation of this part of the line the battalion
had been guided to a position where the outgoing battalion, the 2/5th Dukes,
had not configured their position to that of the enemy. In effect the battalion found itself
holding a salient with one trench, and another 200 yards in depth, Hoare realised the enormity of the situation. With just 200 men under his command, both sides of the trench were manned and the
men stood to arms. As dawn broke, yet another more problematic
feature of the terrain occupied slowly came into view. On the northern extremity of the line the latter was
dominated by about three or four large spoil heaps situated 100 yards to the east. (Authors note: Of
an unknown origin but possibly spoil originating from the excavation(s) of the Canal du Nord or for some construction
purpose apertaining to the latter). Recognising this key feature, Hoare sent forward two rifle sections
to occupy the positions but this manoeuvre was immediately responded to by the enemy who began to open fire. Despite the attentions
of the enemy, the spoil heaps were occupied but the tactical situation was now proving to be unfavourable
as it became clear that a counter-attack by the enemy was developing. With events happening apace, the Colonel proceeded down
his line to report the situation to Brigade Headquarters the 2/6th West Yorks were coming under
increasing pressure. It was now that a large force of the enemy attempted
to advance to the left of the West Yorkshire's and the positions held by one platoon of "D,"
"B" and "A" Companies, south to north respectively. In three seperate actions
the enemy were driven off with Hoare recording that he personally witnessed "many Germans fall." (Authors note: In Hoare's narrative of
events there is no mention of the actions involving "C" Company. Occupying the extreme north of the
position, one may surmise that already at this stage, the company may have been overun). Recognising that the left of his position was in danger and needed to be secured, the Colonel ordered "A"
Company of the 2/5th West Yorkshire's under the command of Second-Lieutenant Philip Morris
Davidson to move forward and form a defensive flank. It was at this juncture that very heavy rifle and machine-gun
was opened up and retiring men reported that they had been attacked from all sides of the salient and had been
almost surrounded necessitating the expenditure of all their ammunition. Believing that the left flank would be shortly secured
by Second-Lieutenant Davidson, Hoare then turned his attention to his right flank. Sending
forward his Headquarters under the commands of Lieutenant Gerald Fitzgerald Stuart (Authors
note: Spelt Stewart in Colonel Hoare's narrative) and Second-Lieutenant John Moor with about 30 men, this party
had orders to form a defensive flank on the right. Gathering together all available ammunition and with his men in extended order, the Colonel and
his men advanced towards the crest of the Bourlon Ridge. The men however were exhausted, compounded by the fact that they
had not received any rations, the latter being about to be distributed just as the counter-attack
took place at 6 a.m. Despite suffering from exhaustion and with nearly all their officers casualties, by 10 a.m. the crest was occupied as the enemy retreated suffering numerous casualties
in the process. At about 10.15 a.m. it became apparent that "A" Company of
the 2/5th West Yorks had still not secured the left flank and the situation was becoming even more critical
as a large party of the enemy were observed advancing in extended order and in column in an attempt to work
around the left flank. Before the Colonel could rectify the situation and in his own words,
"the line crumbled up from the left, eventually all coming back to the Cambrai - Bapaume Road, where I was able to rally
it." One platoon of "B" Company, 2/5th West Yorkshire's was now sent forward to occupy what
is referred to as a wire barrier located about 200 yards to the left of the 2/6th West Yorkshire's. Contact however was not established with the 2/6th West Yorkshire's for reasons that are unclear but one would
assume that this was not possible due to the confusion that ensued on and around the Bapaume - Cambrai Road.
So much so was this confusion that the Officer Commanding 2/5th West Yorkshire's, Lieutenant-Colonel Richard Henry Waddy
sent out a patrol consisting of one officer and two Other Ranks. This patrol was never heard from again. Colonel Hoare now advanced
with 60 men to a bank about 300 yards to the north of the Road sending out patrols forward from this feature in an
attempt to regain the crest of the ridge. All companies were now intermingled but the line was organised along
the length of the bank with the 2/6th West Yorkshire's on the right flank and the 2/5th West Yorkshire's
on the left respectively. In particular, the right flank now came under pressure as about a company and a half
of the enemy attempted to outflank the position. The right of the position was held by Lieutenant Stuart and
Second-Lieutenant Moor and the 30 men of Battalion Headquarters. Although exposed to heavy fire, the flank held
fast and the attack of the enemy eventually beaten off. For this action Lieutenant Gerald Fitzgerald Stewart was awarded the Distinguished Service Order. As all the events were
unfolding on the left flank it is now that we must turn our attention to the right, where the 2/8th West Yorkshire's were
defending the Sunken Road along with "C" Company of the 2/5th West Yorks, to the south-west of Bourlon
Wood. It was from the direction of the north-west that all the enemy's attacks were eminating, trying
to exploit a large gap of about 1000 yards that existed between the flank of the 2/6th and that of "C"
Company, 2/5th, attached to the 2/8th West Yorkshire's. Lieutenant-Colonel Archibald Hugh James, Officer Commanding 2/8th, was well aware of the fragile state of his position. As the enemy began his attacks, "C" Company of the
2/5th West Yorks on the left flank, bore the brunt of the enemy's advances but these were dispersed
by rifle, machine-gun fire and grenade. With the Colonels Headquarters located in the ruins of the Sugar Factory,
James soon recognised the enemy's intentions. With "D" Company of the 2/5th West Yorkshire's
placed at his disposal, the Colonel sent forth orders for this company to plug the gap between his left flank
and that of the right of the 2/6th West Yorkshire's. It is unclear of the exact events that transpired but for whatever
reason "D" Company, 2/5th, did not take up its allocated position. However, further
to the left, the now reorganised "B" Company, 2/5th West Yorkshire's did move forward to take up a position
near the right flank of the 2/6th, north-west of the Sugar Factory. On the left
flank of the positions held by the 2/6th and "A" Company of the 2/5th West Yorkshire's, a battalion
of the Royal Irish Rifles of the 36th (Ulster) Division had arrived at about 11.30 a.m. (Authors note: Hoare's narrative
does not record unit designation however this would be an advancing unit of the 108th Infantry Brigade. The 36th (Ulster)
Division having commenced an attck east and west of the Canal du Nord at about 11 a.m). Reporting
to Colonel Hoare's Headquarters, the battalion advanced west and northwards up a trench,
presumably, towards the flank held by "C" Company, 2/5th West Yorks. The Colonel recorded that at
first their progress was slow and that they were driven back once, but eventually they succeeded
in continuing the advance. At Noon, further reinforcements arrived in the form of two companies of the 2/4th
Yorks & Lancs of the 187th Infantry Brigade, 62nd (West Riding) Division. Arriving at a position
near the front of the Sugar Factory, the men at first proceeded to sit down on the ground but were then assembled and were led forward through the 2/6th lines by Colonel Hoare to a position just below the Bourlon Ridge, the Colonel then returning to Battalion Headquarters. Between 1 and 3 p.m. (time
undecipherable), the Colonel reported that there was a certain amount of shelling by enemy artillery. Moving
out from his position he observed "these companies," no doubt referring to the two companies of the Yorks & Lancs, "streaming back towards
the Sucrerie." Hoare noted that the men were very tired, possibly the reason that on arriving at
the Sugar Factory, the men sat down, and with very few officers left, the retirement could not
be halted until the Sucrerie was reached. The Colonel encouraged the men to go forward once again to the crest
line where they took up position, but any further advance along the Hindenburg Support Line in an
attempt to fill the gap was not attempted by the exhausted men. Hoare knew that enough had been asked of the Yorks & Lancs
so as a consequence the gap was filled by the 2/5th West Yorkshire's, presumably by men of either, "B," "D" or "C" Companies whilst he extended the line of the 2/6th along the bank in support.
At 7 p.m. the 2/6th West Yorkshire's were
relieved and marched back to billets located at Havrincourt. During the counter-attack, which
was at times fought at close quarters of between 50 and 100 yards, Lieutenant-Colonel Hoare himself had been wounded. In officers
the battalion had lost Captains Walter Moorhouse, Geoffrey Barker, Harold Smith
(posted missing but later pronounced killed), Second-Lieutenants Philip Haywood and John George Booth. Wounded, Captain George R.S. Walker, Lieutenant Frederick C. Lawrence, Second-Lieutenants John Moor,
Dudley N. Vize, Henry Potterton (died of wounds 13th December), Geoffrey Lezaire Bonsor.
In Other Ranks, the War Diary records 13 Killed, 60 Wounded and 36 Missing. An analysis of Soldiers
Died In The Great War now records those killed as 30, one dying of wounds on this date. One of their number was
Private William Pratt. It is impossible to ascertain at which stage of the battle he was killed, but as "C"
Company were holding the extreme left of the line, it is possible that William lost his life
somewhere in this northern sector of the line close to the Spoil Heaps. His War had started in mid 1915 near the border of France and Belgium. Wounded during the Battle of the Somme in 1916 and
sent home to recuperate, it had now ended on the Bourlon Ridge in his unfortunate death. William, like so many
of his comrades who fell, now have no known grave. These men who fell
at Cambrai between the months of November and December 1917 are therefore now commemorated on the Cambrai Memorial,
Louverval, located to the east of Bapaume on the northern side of the Bapaume - Cambrai Road.
Cambrai Memorial, Louverval, Nord, France
The Cambrai Memorial, located to the east of Bapaume on the northside of the Bapaume-Cambrai
Road, the D930, now commemorates just over 7000 servicemen of the United Kingdom and South Africa who died in the Battle of
Cambrai between the months of November and December 1917 and who now have no known grave. The Memorial is located on a terrace adjoining the Louverval Military Cemetery, the latter containing 124 burials dating from April 1917 to October 1918.
|
|
| Cambrai Memorial: Panel Number 5 |
|