|
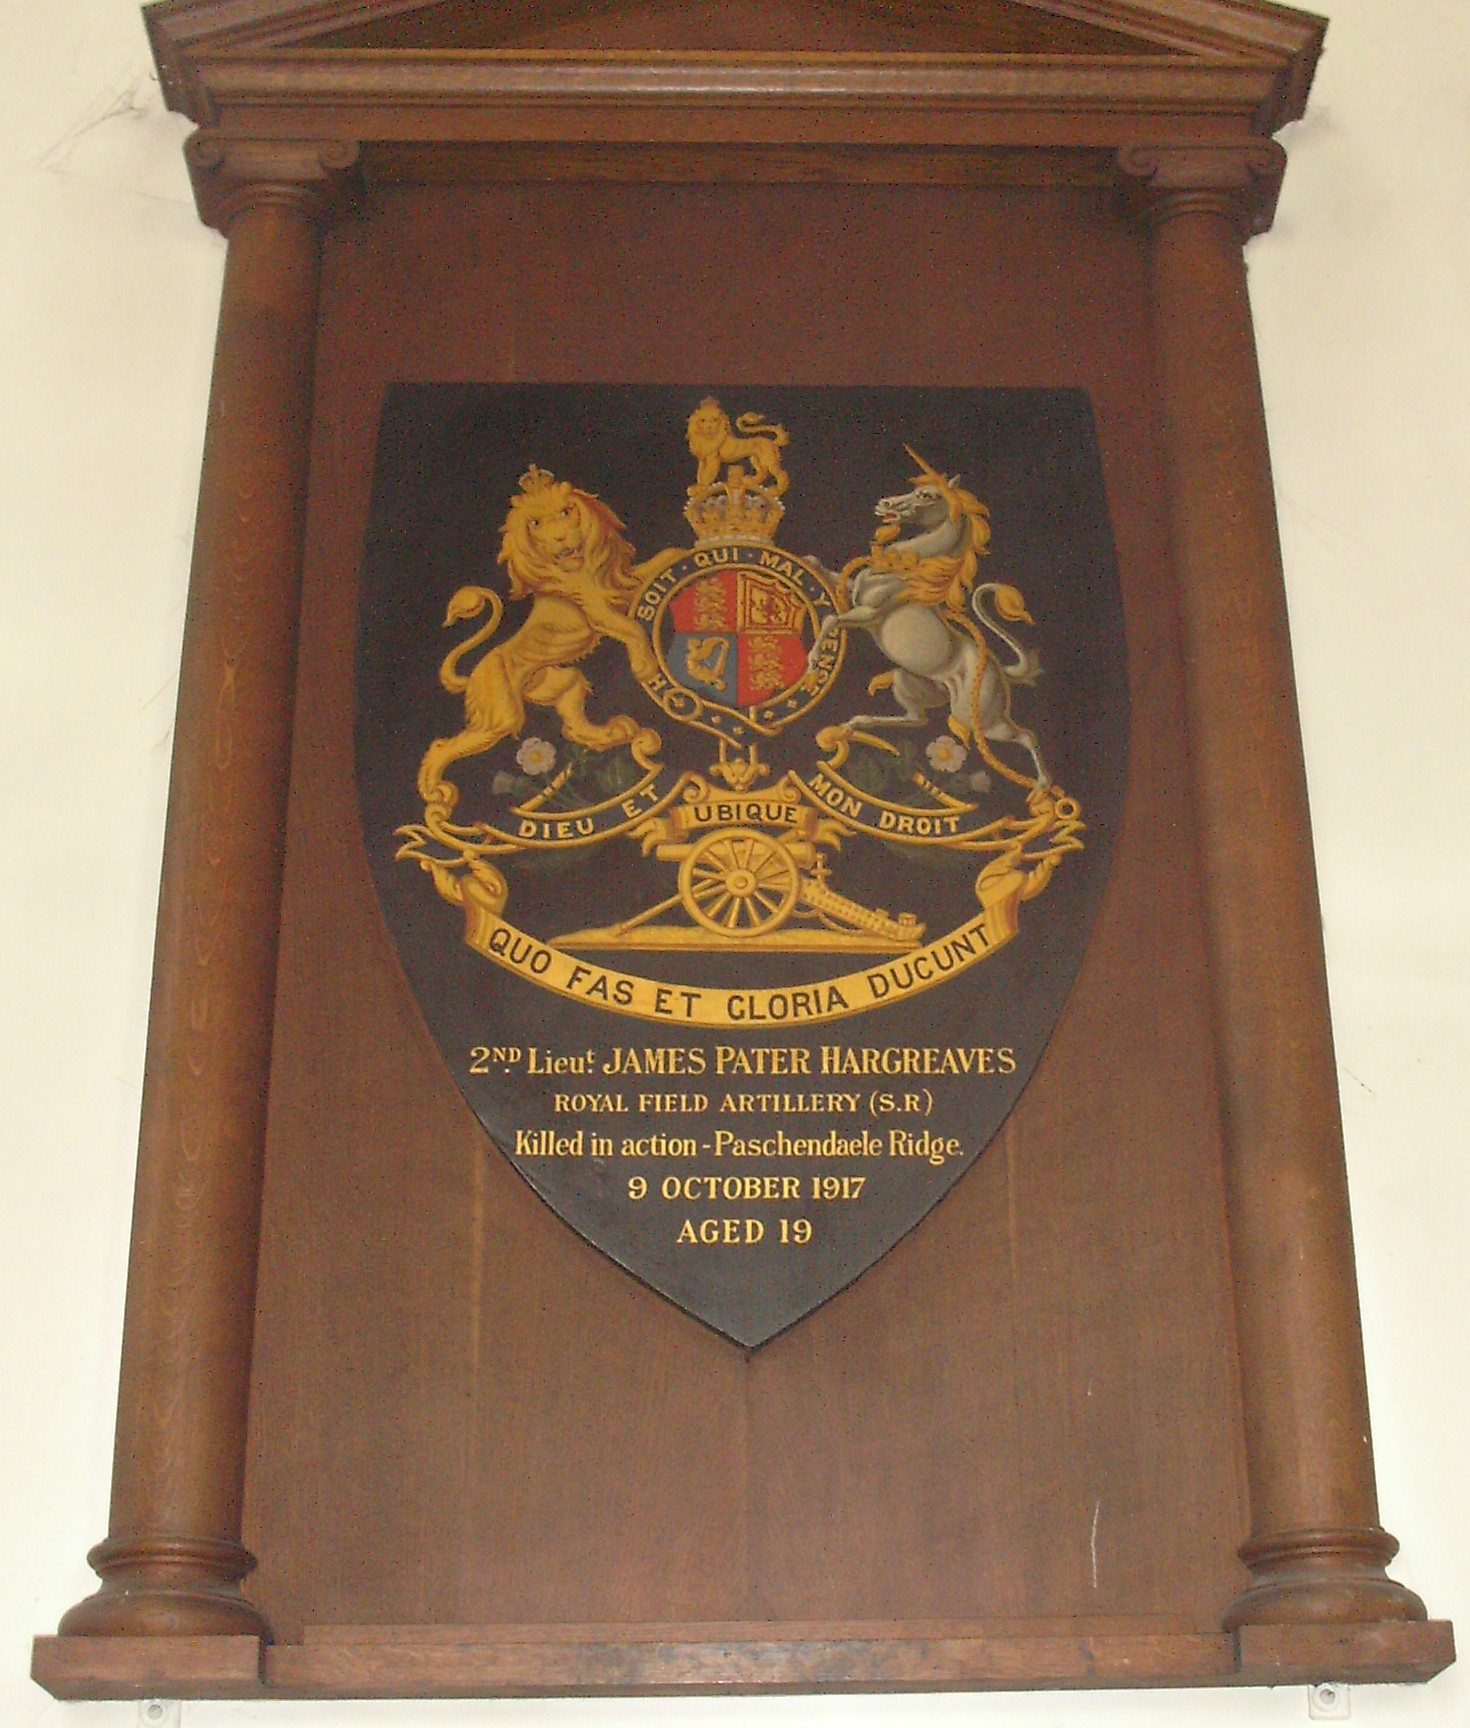
126th Brigade, Royal Field Artillery
Died Tuesday 9th October 1917, age 19
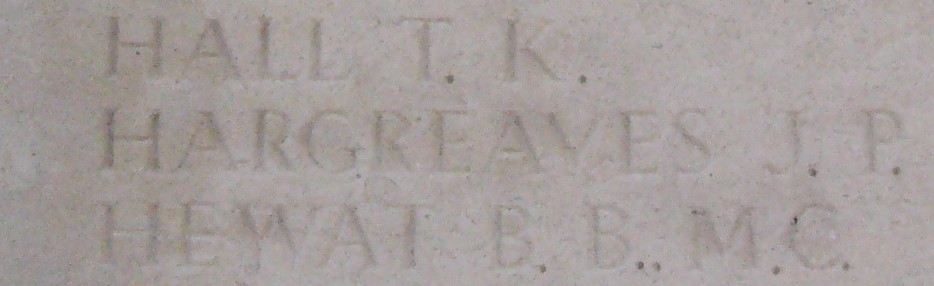
Cemetery : Tyne Cot Memorial, Zonnebeke,
West Vlaanderen, Belgium
Grave Reference or Panel Number : Panel 4 to 6 and 162
Son of Dr. James Arthur Hargreaves, Medical Officer for the Wetherby District, and Annie
Hargreaves, Wetherby House, Market Place, Wetherby. Born at Wetherby on the 27th April 1898, James was educated at the Leys School,
Cambridge. Following in the footsteps of his father, James registered for studies in medicine in July 1916 and after undergoing
two preliminary examinations to enter medical school on the 21st September 1916 at the Leys School, he enrolled in October
in Emmanuel College, Cambridge, to commence his professional training. An accomplished cricketer, James played for the Leys
School first eleven during the years 1915-16. Enlistment James Pater Hargreaves enlisted into the ranks of the
British Army about December 1916. Posted to the Depot of the West Yorkshire Regiment he was allocated the serial number 39085
(no overseas service). Commissioned into the Royal Field Artillery from an Officers Cadet Unit (London Gazette dated 8th April
1917), Second-Lieutenant Hargreaves was posted overseas to the Western Front on the 19th September 1917. He would then be
posted and serve with the 2/1st Warwickshire Royal Horse Artillery, contained in the 126th Brigade, Royal Field Artillery. 126th
Brigade, Royal Field Artillery Originally attached to the 32nd Division in early 1915, the brigade were
then posted to the 37th Division and sent to France in July 1915. In early 1917, due to an extensive reorganisation of artillery
units, the brigade was effectively 'broken up' until it was reconstituted as an Army Field Artillery Brigade. Posted
overseas to the Western Front on the 21st of June 1917, personnel only and minus guns, the 126th Army Field Artillery Brigade
contained the following units:-
2/A H.A.C. (Honourable Artillery Company 2/B H.A.C.2/1st Warwickshire Royal Horse Artillery Western
Front 1917 The
brigade, under the command of Lieutenant-Colonel Charles Clifford V.D. embarked on the S.S. "Victoria" at
Folkestone at 9.30 a.m. on the 21st of June 1917, arriving at Boulogne two hours later. The following officers proceeded overseas
with the brigade and their respective commands and units are as follows:- Brigade Headquarters Lieutenant-Colonel Charles Clifford V.D. Officer Commanding
Captain Sidney Edwin Earnshaw
(Adjutant) Captain George
Basil Henley Jones (Attached R.A.M.C.) 2/A H.A.C. Major
Arthur G. Andrews, plus five officers 2/B H.A.C. Major
Archibald Leonard Lucas-Tooth (Sir. Bart.) plus five officers 2/1st Warwickshire R.H.A. Major Charles Edward Pettit, plus five officers Brigade Ammunition Column Captain Thomas Thomas, plus 3 officers On disembarkation at Boulogne, the brigade proceeded to a Rest Camp located
at Saint Martin where orders were received to journey northwards to Belgium and the Ypres Salient. At 10.45 a.m. on the morning
of the 23rd of June, the brigade departed the camp and after a journey of nearly twelve hours duration, they arrived at Poperinghe
at 9.00 p.m. Upon their arrival, the officers were billeted in a convent, the men in a granary, both billets being located
close to the Station. The brigade were met by a Staff Captain of the 18th Corps, Fifth Army, to which the brigade were attached,
orders being issued that on the 25th, the brigade were to move to "G" Camp located near St. Jan-ter-Biezen
whereupon they were attached to the 39th Divisional Artillery for administration and instruction. On the 27th, all units of the brigade each sent working parties comprising
of one officer and 25 men to map reference A.30., Sheet 28, a position that equates to that of the location of Dirty
Bucket Camp, "D" Camp, Border Camp and "O" Camp respectively. In addition to these working
parties, 30 Drivers were also sent to the 39th Divisional Ammunition Column and Second-Lieutenant George Bernard Hooper, accompanied
by a Bombardier and his own Servant, were despatched to the 18th Corps Railway Ammunition Head, one N.C.O. and seven men also
being supplied to the Ammunition Dump. Lieutenant Francis Whitaker Mellor and Second-Lieutenant Harold Ray Whiteman along
with 80 men proceeded as a working party on the 29th to the 51st Divisional Artillery and on this date also, the 126th A.F.A.
Brigade received 3 General Service Waggons in addition to 6 horse teams and 12 riding horses.
Prelude To Third Ypres Third Ypres, as the series of battles became known, commenced
on 31st July 1917 and ended with the fall of Passchendaele village on the 6th November.
The capture of the Messines-Wytschaete
Ridge on the 7th June by the Second Army under the command of General Sir Herbert Plumer had now provided Field Marshall Sir
Douglas Haig with the opportunity of launching a major offensive on enemy forces located in the Salient.
The
attack was to be launched on a front extending from the Lys river to the south to a position north of Ypres at Steenstraat.
It was envisaged that the Fifth Army, under the command of General Sir Hubert Gough, would bear the brunt of the assault.
Attacking on seven and a half mile frontage which extended from the Zillebeke-Zandvoorde Road in the south, to Boesinghe in
the north, Gough's Fifth Army would push on eastwards towards Passchendaele. To the south, the right flank of the attack
would be covered by the advance of X Corps of the Second Army under Plumer whilst to the north, the French First Army under
the command of General Francois Anthoine would cover the left flank.
It was then envisaged that an advance could then
be made northwards towards the Belgian coast. If successful, the outcome would be the capture of the logistically important
town of Roulers located to the north-east of Ypres and ultimately the enemy held ports of Zeebrugge and Ostend thus eliminating
the operations of their U-Boat flotillas and shipping.
Prior to the commencement of the offensive, a vast array
of artillery of all calibres had been massed. Attached to the Fifth Army, XVIII Corps contained the Divisional Artilleries
of 11th, 39th, 48th and 51st with additional brigades, such as the 126th, also attached.
In addition to this concentration
of field guns, to the rear were located numerous batteries of heavy artillery providing fire power of an almost unbelievable
magnitude.
The offensive was originally intended to commence on the 25th July but General Gough and General Anthoine
requested for a postponement. The reasons for this request may be found in Sir Douglas Haig's despatch dated 4th August.
Due to the effectiveness of counter-battery work, the enemy had consequently retired his artillery to more carefully selected
positions. To ascertain the location of these new positions, further aerial reconnaissance was deemed to be prudent but accurate
intelligence was proving to be problematic due to the development of a low cloud base.
Although Haig knew that any postponement
could lead to a further deterioation in the weather and possibly the chance of rainfall, the commencement of the attack was
to be re-scheduled.
"Zero" hour was now to be set for 03.50 hours on the morning of 30/31st July 1917.
The Offensive Commences:- The Battle Of Pilckem Ridge, 31st July - 2nd August
Due to
the fact that the War Diaries of the 126th Army Field Artillery Brigade are 'missing' for the period July/August,
one can only possibly surmise their movements during and after the commencement of the offensive by referring to official
sources.
On the front allotted to XVIII Corps, the infantry assault comprised of the battalions of the 51st (Highland)
Division and those of the 39th Division. The objectives of the Fifth Army were to attack and capture the strategically
important high ground of Pilckem Ridge. The attack was to be undertaken in three 'bounds' i.e. capture of the 'Blue
Line,' 'Black Line' and the final objective the 'Green Line.'
In a brief summary of
the results of the attack, topography and the weather conditions prevailing on the day of the assault need to be given careful
consideration. The weather had deteriorated, as Haig had assumed it would do, turning the ground into a sticky morass that
inhibited movement. In the southern sector of the Fifth Army's attack this, plus numerous concrete fortifications, resulted
in II Corps failing to capture their second objective, i.e. the 'Black Line.'
On the left flank of II
Corps, XIX Corps comprising of the 15th (Scottish) Division and the 55th (West Lancashire) Division, south to north respectively,
had managed to capture both the first and second objectives (the 'Blue' and 'Black' lines).
Both divisions now pressed on to the third objective the 'Green Line' but due to heavy enemy counter-attacks
that had been directed by the enemy using aerial reconnaissance, the aircraft also strafing with bomb and machine-gun bullet, units
of the 15th (Scottish) Division took up positions in the 'Black Line' so as to maintain contact with
elements of II Corps. The advance of the 55th (West Lancashire) Division however succeeded in penetrating the 'Green
Line' and progressed even beyond this, the final objective.
In XVIII Corps sector, on the right flank the
advance of the 15th (Scottish) Division had progressed well advancing over the first two objectives the 'Blue'
and the 'Black Lines' respectively. However, on crossing the 'Steenbeek' stream the latter was
subjected to a counter-attack and withdrew to consolidate.
To the north, the advance of XIV Corps containing the
38th Division and that of the Guards had progressed well as they proceeded to push on through Pilckem eastwards towards the
'Steenbeek' and the 'Green Line.' On the left flank of the Guards attack, the French First Army had
also made good progress eastwards capturing Bixschoote.
Along the length of the 13,700 yard front that was attacked on
the 31st July, some considerable gains had been made. The strategically important Pilckem Ridge had been occupied as had the
Bellewaarde Ridge. Further south in the area of the advance of II Corps, Sanctuary Wood had fallen and the line pushed forward
to the environs of Shrewsbury Forest.
However, as the attack had progressed, the weather had steadily deterioated as
Haig had feared turning the ground into a sea of mud. The offensive was now in danger of not only being halted by the enemy,
but by the weather also.
The Battle Of Langemarck, 16th - 18th August
With
the rain continuing to fall it was not until the 10th August that offensive operations resumed with an attempt to seize enemy
positions on the Gheluvelt Plateau and secure the right flank of the Fifth Army. The assault was to be carried out by the
18th (Eastern) Division and the 25th Division of II Corps under the command of Lieutenant-General Sir Claud William Jacob.
Almost as soon as the attack had commenced the advance was subjected to a heavy enemy artillery barrage. Added to this the
men struggled forward across the morass that the battlefield had now become only to be met with determined counter-attacks
by the enemy. The 18th Division advancing on the right flank of the attack in particular suffered numerous casualties
in their attempts to hold on to positions won however the 25th Division on the left of the attack respectively had managed
to capture and consolidate the village of Westhoek.
In the days that followed, weather conditions had begun to improve
so it was by now, mid August, that Gough ordered the second phase of the offensive to commence.
The attack was now
scheduled to take place at 4.45 a.m. on the morning of the 16th August.
The frontage for the offensive extended
from south to north respectively west of Inverness Copse to the juncture with the French Army to the south of St. Janshoek,
however, on the night of the 15th, rain started to fall once again.
Promptly at "Zero" hour, the British artillery
opened up their barrage on the enemy's positions.
In II Corps area located astride the Hooge-Gheluvelt road the 56th
(London) Division and the 8th Division, south to north respectively, rose to the attack. The pattern of attack sadly reflects
the experiences of both divisions. Of the 56th, tasked with advancing across the Gheluvelt Plateau, the attack pressed on
through Glencorse Wood and then onto Polygon Wood. Here the advance ground to a halt as the Londoner's were subjected
to heavy counter-attacks and exposure to a concentrated barrage by enemy artillery. The 8th Division, assaulting the 'Green
Line' stretching generally from Anzac to the cross-roads on the Ypres-Roulers railway advanced under the cover
of a 'Creeping Barrage.' Initially the attack proceeded well towards positions on the Westhoek Ridge. However,
as the attack progressed touch was lost with the flanks and under increasing counter-attacks being made by the enemy along
the length of the Ridge a general retirement was ordered to positions west of Hannebeek Wood.
On the left flank of II
Corps, the attack of XIX Corps comprising of the 16th (Irish) Division and men of the 36th (Ulster) Division, south to
north respectively, equally proved to be hampered by determined resistance. In particular, various strong-points located on
the Anzac and Zonnebeke Spurs behind the enemy's front line had not been subjected to an adequate bombardment. On
the 16th Division's front for example, these strong-points such as Beck House, Iberian Farm and Borry Farm held up their
advance with concentrated machine-gun fire. Also subjected to counter-attacks by the enemy that were either subjected to artillery
fire too late or not at all, any gains made were subsequently lost.
On the left flank, the advance of the Ulstermen met
a similar fate and by the end of the day both of the Irish divisions had suffered heavy casualties.
In XVIII Corps front
that stretched from just north of St. Julien to the south of Pilckem, the two attacking divisions 48th (South Midland) and
the 11th (Northern) had the benefit of a more concentrated and better planned barrage. On crossing the Steenbeek once again
the men of both divisions came under machine-gun fire from strong-points located in the enemy's line but some progress
was made and any counter-attacks made by the enemy were beaten off.
In the extreme north of the line XIV Corps containing
the 20th (Light) Division and the 29th Division located south to north respectively advanced towards Langemarck. On the
left flank of the 20th Division, elements of the French First Army also attacked with French artillery providing a bombardment
across their own front and that of XIV Corps. The attack on this sector of the front achieved its final objective located beyond
the village of Langemarck, French forces were equally successful in their advance across the Bixschoote Peninsula resulting
in the capture of Drie Grachten located to the north.
Apart from the gains by XIV Corps in the north, the Battle of Langemarck
had failed in achieving any considerable breakthrough in the enemy's line. In terms of casualties, the battle had proved
costly for very little gain. It was now time for a new strategy to implemented which would include a more planned and concentrated
artillery barrage prior to the launch of any attack. In addition to this, objectives assigned to the infantry were to be of
a more limited nature with a more 'realistic' chance of success.
Further Actions
As the Battle of Langemarck ground on, to the south at Lens the First Army under the command of General Henry Horne and
Canadian units under the command of Lieutenant-General Arthur William Currie assaulted and successfully captured the
strategically important Hill 70 to the north of Loos between the 15th - 17th August. In addition, further gains were
made around Lens by the Canadians on the 21st August.
In the Ypres Salient, a series of localized actions had resulted
in some gains around St. Julien by XVIII Corps and to the south, the western fringe of Inverness Copse had been taken
by the 14th (Light) Division.
Haig now deemed that any progress to the north by Gough's Fifth Army would be dependant
on securing the right flank of the latter in particular where the enemy was at one of his most strongest points on the high
ground astride the Menin Road. To avoid the need for Gough to extend his right flank it was proposed that the Second Army
under the command of General Sir Herbert Plumer should extend its left flank northwards to encompass an attack on this high
ground. In conjunction with attacks made by the Fifth Army, Plumer and the Second Army would seize this objective after a
massive preliminary bombardment by the artillery which it was envisaged would clear the ridge almost entirely of enemy forces.
However, preparations for a successful attack would take time. Plumer requested therefore that the next phase of the offensive
be postponed until sufficient ammunition and logistics were in place. This plus the need for accurate aerial reconnaissance
would provide the artillery, of which much was expected, a detailed and varied fire-plan.
As the weather improved, the
commencement of this phase of the offensive was set for the 20th September.
September
The month of September sees the resumption of the War Diary of the 126th Army Field Artillery Brigade and what is possibly
an insight into an incident that occured during the previous two months.
On the 2nd September the War Diary records the
award of the Military Cross by His Majesty the King to Second-Lieutenant (Temporary Lieutenant) Francis Whitaker Mellor, 2/1
Warwickshire R.H.A., and Second-Lieutenant Norman Lubbock Robinson, 126th Brigade Ammunition Column.
Of Mellor, the London
Gazette dated the 8th of January 1918 records:-
"For conspicuous gallantry and devotion
to duty. When his battery was in action a large hostile bomb was dropped which killed fifteen of his men and set alight an
ammunition dump. With the greatest coolness and presence of mind he steadied the men, setting such a fine personal example
that half the battery continued its fire whilst he, at great risk to himself, extinguished the fire". Robinson's
citation for the Military Cross, awarded for actions whlist in command of a cable-laying party is recorded in a Supplement
to the London Gazette dated the 9th of January 1918 reads:- "For conspicuous gallantry
and devotion to duty when in charge of a cable-laying party. He displayed the greatest courage and determination in carrying
out the task allotted to him in face of great difficulties and under heavy shell fire, personally laying the cable, and pushing
on through heavy barrage when the situation was obscure in order to gain information which could not be obtained in any other
way. His energy and disregard of danger cannot be too highly praised".
As regards
the unfortunate incident that witnessed the brave actions of Lieutenant Mellor, a search of various sources reveals that the
date of this was the 20th of July 1917. Of the fifteen casualties who were killed on this date, the Author has located six
of their number, all of whom are now buried in Plot III G., Vlamertinghe New Military Cemetery. Accounts vary as to what actually
happened but in one instance, a shell hit a billet in which some of the men were sheltering killing those inside. Tragically,
two of their number killed during the day were brothers, Shoeing Smith Sidney George Smith, 614384, and Gunner Albert Edward
Smith, 614264, respectively. The Leamington Spa Courier dated the 27th of July 1917 records that they had both enlisted together
at Whitsuntide in 1915, Sidney, a married man of Satchwell Street, Leamington, leaving a widow and two children to mourn his
death. On the 3rd September, Lieutenant-Colonel Clifford, Officer Commanding 126th Brigade
and Headquarters Staff, relieved Lieutenant-Colonel William Tasker Odam and associated H.Q. in the line. Subsequently, Lieutenant-Colonel
Clifford now assumed temporary command of the Left Group, 58th Divisional Artillery located at La Belle Alliance, north-east
of Ypres.
On the 7th September, orders were received by the 58th Divisional Artillery Group to which the 126th Brigade
were now attached to support a raid that was to be launched by 174th Infantry Brigade of the 58th (2/1st London) Division.
The raid would be carried out against a known enemy strong-point and New Trench.
Operation Orders R/11 state:
'(a)
0.0. 2 - 18 pounder batteries open on LANGEMARCK LINE and remain till 0.20 and STOP.
A/126 from C 12.b.85.93 to D 7.a.05.87.
C/126 from D 7.a.05.87. to D 7.a.25.80.
100% shrapnel. Rate of fire 2 rds. per gun per minute.'
There was then to be a 'shoot' '(b) 0.0.' by 3 18-pounder guns of C/103 Battery 'open
on trench' (presumably New Trench').
Consisting of 100% Percussion shrapnel with a rate of fire of 3 rounds
per gun per minute which would also remain till 0.20 and stop.
'(c) 0.0. 3 - 18 pounder batteries open
on LANGEMARCK LINE
C 6.d.87.35. to C 12.b.85.93.
B/126 from C 12.b.85.93. to C 6.77.20.'
In addition
to the fire of the above "B" and "A" Batteries of the 103rd Brigade would also contribute their fire,
the latter battery to 'superimpose on whole line.'
This 'shoot' was to consist of 50% shrapnel
and H.E. (High-Explosive) with a rate of fire of 3 rounds per gun per minute.
At '0.2' the barrage
was ordered to 'Lift and Form Box and remain till 0.20 and STOP.'
This action would form what is effectively
termed as a 'Box-Barrage' to interdict any force entering or leaving the area.
In addition to the above "D"
Battery of the 103rd Brigade would maintain fire on selected targets till '0.30.'
1 gun on a Trench
Mortar position.
2 guns on a machine-gun position.
1 gun on a machine-gun position.
1 gun on a dug-out.
The rate of fire of the above battery would be '0.0. - 0.20. 2 rds. per gun per minute, 0.20. - 0.30. 1 rd.'
At '0.2.' the left hand guns of "B" Battery of the 103rd Brigade were ordered to stop
firing.
The final order contained dictates that '75% of all bursts to be on percussion.'
As
the above example of Operation Orders issued to the artillery records, the planning and execution of a barrage was meticulous.
Timing was of the essence and intelligence of known enemy strong-points was to prove vital to a successful outcome wether
in a raid by the infantry as above, or in the context of the launch of any projected offensive.
At 7.15 a.m. on
the morning of the 9th, the 58th Divisional Artillery with the 126th Brigade still attached commenced a bombardment of the
Langemarck Line. This barrage performed by 18 pounders and 4.5 inch Howitzers was also repeated at 7.45 p.m.
On the following
day, orders were issued by 126th Brigade Headquarters that the Wagon Lines were to move to the south-east of Ypres to a location
known as 'Green Huts.' (Authors note: Now the location The Huts Cemetery).
It was whilst at this location
that on the 12th a bomb was dropped from what the War Diary records as a 'hostile aircraft.' This bomb exploded
on the 2/1st Warwicks Wagon line which killed the Battery Sergeant Major Thomas Henry Matthews and wounded 11 Other Ranks.
On the 14th September, the Brigade was finally relieved in the line by Lieutenant-Colonel Odam Officer Commanding 291st
Army Field Artillery Brigade who now assumed temporary command of the Left Group, 58th Divisional Artillery. However, at 3.00
a.m. on the morning of the 14th the brigade provided a barrage of 3 - 18 pounder batteries to support an attack by the
173rd Infantry Brigade, 58th Division on a fortified German position known as Winnipeg, located in the line east of St. Julien.
On the 19th September, Second-Lieutenant James Pater Hargreaves was posted overseas as recorded on his Medal Index
Card entry. His actual date of attachment to the 2/1st Warwickshire R.H.A. is unfortunately not recorded in the pages of the
War Diary however on the 26th of September, the brigade received 31 reinforcements who were subsequently attached to the 2/1st
R.H.A. The Battle Of The Menin Road Ridge, 20th - 25th September
At
5.40 a.m. on the morning of the 20th September, the British barrage opened onto the enemy's positions.
The frontage
of attack, a distance of about eight miles, extended from the Ypres-Comines Canal, north of Hollebeke, to the Ypres-Staden
railway and then on to the north of Langemarck.
The main thrust of the attack would be performed by Plumer's
Second Army across the Gheluvelt Plateau employing IX Corps, X Corps and I Anzac Corps, south to north respectively. The assault,
set with limited objectives to enable effective artillery support, would advance under the cover of a creeping barrage and
capture enemy held woods and associated strongpoints.
To the north, Fifth Army would also launch a simultaneous thrust
eastwards towards the Passchendaele Ridge with V Corps, XVIII Corps and XVI Corps south to north respectively.
In a brief
summary of the battle, units of the Second Army seized their final objectives on the Gheluvelt Plateau by midday under the
cover of the creeping barrage. In addition to the barrage innovative infantry tactics in particular the use of men specifically
alloted to deal with enemy strong points proved successful. As the day wore on and the weather improved numerous squadrons
of the Royal Flying Corps were employed on assisting the guns in providing intelligence as to fire control and the suspected
massing of enemy forces for any counter-attack. Any attempt by the enemy's infantry to regain positions lost, were quickly
and effectively destroyed by a concentrated artillery barrage.
To the north, Fifth Armies advance had proved to be equally
successful. However a different fireplan had been adopted by the artillery that consisted of a 'Hurricane' bombardment
of enemy positions and strong points as opposed to a methodical attempt at neutralizing the latter in the days previously.
Consequently, some fortifications and trenches did not receive adequate attention by the artillery.
In the days that
followed, intense German counter-attacks ensued, in particular at Polygon Wood on the morning of the 25th. Here, under the
cover of terrific enemy bombardment, the enemy attempted to smash through the line held by X Corps, Second Army. The attack
was eventually broken up by British Artillery but not without significant casualties sustained by the 33rd Division.
Of the 126th Army Field Artillery Brigade, there is no record of any offensive operations being mounted during this period
in the War Diary.
On the 22nd, the brigade received 64 Remounts (Authors note: 'Fresh' horses) and
3 Chargers to bring the unit up to establishment. In personnel, the brigade received 31 reinforcements on the 26th all being
posted to the 2/1 Warwick R.H.A. to replace recent losses.
The next step of the offensive was once again ready to commence.
The Battle Of Polygon Wood, 26th September - 3rd October
The next phase of the
advance was scheduled to take place at 5.50 a.m. on the morning of the 26th September on a frontage of about 4.8 miles.
South of the Menin Road, Second Armies right flank would assault south of the position known as Tower Hamlets. This
series of enemy concrete fortifications that had been an objective of the 41st Division on the 20th was now to be assaulted
by the 39th Division. On the left flank of Second Armies attack north of the Menin Road, I Anzac Corps were to be
tasked with the capture of Polygon Wood and positions to the north of the latter on the Gheluvelt Plateau.
To the north,
V Corps of the Fifth Army would seize Zonnebeke and press on northwards to enable a footing to be gained on the high ground
that was crossed by the Becelaere-Passchendaele Road.
The artillery had now been moved forward into advanced positions,
this movement being made possible by the laying of plank roads over the shell-torn terrain by the Royal Engineers. At "Zero"
hour on the morning of the 26th, the infantry commenced the advance after a two hour preliminary bombardment.
As a whole,
the battle achieved it's objectives, however, to the south, 33rd Division failed in the attempt to seize the 'Tower
Hamlets' position. Tanks alloted to support the attack became bogged down in the mire and a German strongpoint known as
the 'Quadrilateral,' although taken initially, could not be held due to a resilient defence by the enemy.
In
V Corps, Fifth Army, the 3rd Division had to negotiate terrain that had failed to dry out and still remained boggy. The 8th
Brigade of the Division in particular struggled forward to the advance due to the nature of the ground and a heavy mist that
obscured visibility. After a further advance that had been ordered at 6.30 p.m. no further progress was made and Hill 40,
one of the objectives of 3rd Division still remained in the hands of the enemy.
On the left flank of the 3rd Division,
the 59th (2nd North Midland) Division managed to make better progress over the mud soaked ground capturing numerous
strong points astride the Wieltje-Gravenstafel Road, but, Gravenstafel itself was not taken.
The War Diary of the
126th Army Field Artillery Brigade does not record any offensive operations during this period.
At 12 noon on the 30th
September, Lieutenant-Colonel Clifford, Officer Commanding 126th Brigade and Headquarters Staff once again assumed command
of the Left Group of the 58th Divisional Artillery.
Authors note: As regards offensive operations, it is most
likely that the guns of the brigade remained in 'situ' albeit that no location during the latter two offensives are
recorded in the War Diary. The Wagon Lines, last recorded location 'Green Huts,' would also have remained
stationary until ordered to move forward to provide the necessary logistics to support the brigade.
It is also important
to note, that, when the personnel of an artillery brigade 'moved into the line,' not only were guns 'inherited'
from the outgoing brigade, but also ammunition that had been stockpiled in forward 'dumps.'
On the
1st October, 50 Remounts had arrived at Proven located to the north-west of Poperinghe to bring the brigade up to establishment.
Also on this date, three new officers, Second-Lieutenants G. Rogers, J. McGiven and A. Cunningham had joined the brigade,
Rogers and McGiven being posted to the Brigade Ammunition Column and Cunningham being posted to 2/A Battery, H.A.C. respectively.
On the following day, hostile aerial activity once again proved to be prevelant over the Salient, bombs being dropped on
the Wagon Lines of the 2/B Battery H.A.C. which resulted in 49 horses either being killed or wounded.
The
Battle Of Broodseinde, 4th October
Haig now envisaged that the remaining portion of the Passchendaele-Staden
Ridge could now be taken but the first 'stepping stone' to complete this objective would necessitate the completion
of the capture of remaining enemy positions on the Gheluvelt Plateau and the siezing of the stategically important high ground
that constituted the Broodseinde Ridge.
The attack was scheduled to take place on the 6th October to allow the II Anzac
Corps who had relieved V Corps in the battle area time to prepare for the attack. However, with the threat of deterioating
weather conditions Haig brought forward the date of the attack to the 4th October.
On an eight mile front that stretched
from IX Corps to the south to XIV Corps to the north, "Zero" hour was set for 6.00 a.m.
As Haig had feared,
during the night rain had began to fall accompanied by a cold south-westerly wind.
Under the cover of a hurricane
bombardment, the attack commenced.
In the centre held by I ANZAC Corps, German artillery had bombarded the positions
held by the Australians prior to "Zero" for over half an hour. As they advanced towards their objectives on the
Broodseinde Ridge they unexpectedly met a considerable force of German infantry who were occupying trenches preparatory to
an assault of their own. This force had originally intended to assault the day previously, but, due to losses incurred in
previous attempts at counter-attack on the 30th September and the 1st October the attack had been postponed for twenty-four
hours. Under fierce hand-to-hand combat, the Australians carried the position by use of bayonet and rifle butt and proceeded
onto their objectives on the ridge which were gained at about 9.00 a.m.
On the left flank, the New Zealanders of II ANZAC
Corps proceeded to advance eastwards over the Gravenstafel Ridge taking the village itself and progressing to high ground
beyond.
To the northern limits of the offensive, units of XVIII Corps and XIV Corps had equal success in the capture
of the village of Poelcappelle.
It was from here that the Allies would now attempt to gain possession of the northern
expanse of the Passchendaele Ridge.
No offensive operations are recorded in the War Diary for this operation, however,
the latter states that on the 4th, "Major C.E. Pettit was wounded in the leg". (Authors Note:- Major Charles
Edward Pettit, fractured fibula and tibia, source MH 106/1692). Prelude To The Battle
Of Poelcappelle
Anxious to continue the offensive, Haig now believed that German morale was at breaking
point.
After the successes achieved during the Battle of Broodseinde, the plan to attack and capture the Passchendaele
Ridge had been initially formulated to take place in two stages. Once the ridge had fallen and Passchendaele itself
had been captured, an advance on the logistically important town of Roulers would then become a feasible objective. If
this was achieved, then an advance towards the Belgian coast and the enemy occupied ports of Ostende and Zeebruge remained
a distinct possibility.
The first stage of the attack, originally planned to take place on the 10th October, would now
be brought forward by twenty-four hours due to a further deteriotion in the weather.
The Plan Of Attack
The main thrust of the battle was to be performed by Plumer's Second Army whilst to the north Gough's
Fifth Army would mount subsidiary operations assisted by the French Army.
On the southern flank of the attack, X Corps
of the Second Army with the 5th Division on the extreme right flank would assault enemy positions located at Polderhoek
Chateau. To the left of the latter, the 7th Division would move eastwards beyond Polygon Wood to advance on enemy trenches
near the village of Reutel.
On the left flank of X Corps, the 1st Australian Division of I ANZAC Corps would carry
out a raid on Celtic Wood with the objective of diverting enemy artillery fire away from the main thrust of the attack further
north. The 2nd Australian Division on their left flank would simultaneously then advance towards high ground on
the Keiberg Spur located to the north-east of the Gheluvelt Plateau.
II ANZAC Corps consisting of the 66th (2nd East
Lancashire) Division and the 49th (West Riding) Division both attached for the operation from the British Fourth
Army, south to north respectively, were assigned the objective of the capture and consolidation of the Passchendaele
Ridge.
The Fifth Army, with the right flank of XVIII Corps on the left of II ANZAC Corps were to continue the movement
up the spur of high ground to the north of Passschendaele village. This task was alloted to the 48th (South Midland)
Division and the 11th (Northern) Division south to north respectively.
XIV Corps consisting of the 4th, 29th and the
Guards Divisions would assault along the line of the Ypres-Staden railway line in an easterly direction beyond Poelcappelle
village with the French Army covering the extreme northern flank of the whole operation.
As regards artillery support
and its availability, conditions could not have been worse for the carrying out of an effective fire plan.
Forward movement
of the guns proved nigh on impossible as they inevitably sank into the morass. Guns that had been finally placed into suitable
positions became bogged down once again after the firing of a few rounds. The shells themselves, covered in mud after being
manhandled over the battlefield, had to be scrupulously cleaned to avoid any damage to the gun barrels.
On the 6th, the
War Diary of the 126th Brigade records that the Left Group, 58th Divisional Artillery Headquarters moved from La Belle Alliance
to positions east of Kitchener's Wood at "Bund Alberta." (Authors note: a concrete fortification).
The timetable was set and final preparations for the attack were being made.The infantry now struggled forward to their
alloted positions across the eight miles of the front.
In the attack frontage of the II ANZAC Corps and that of XVIII
Corps, Second Lieutenant Hargreaves and the officers and men of the 126th Army Field Artillery Brigade waited for the commencement
of battle.
Tuesday 9th October, 1917: The Death Of Second Lieutenant James Hargreaves
On the 9th October, "Zero" hour being 5.20 a.m., the British barrage opened.
The attack was
to be launched by the 66th Division to the south, the 49th (West Riding) Division in the centre, and the 48th (South Midland)
Division to the north of the latter.
The leading waves of the infantry were to follow an artillery barrage that would
lift at a rate of 100 yards every 6 minutes. Moving to a forward position during the assault, Jame's performed the role
of a Forward Observation Officer, reporting back to the artillery batteries the fall of shot and making due corrections. This
was accomplished either by telephonic communication, which, proved vulnerable to the line being cut by shell-fire, or, signal
lamp, the model issued for this purpose being the 'Lucas Lamp.' The battlefield had become a veritable
quagmire due to recent heavy rainfall. In addition to this sea of mud, the terrain comprised of numerous shell-holes from
previous artillery strafes that had now become full of water. No doubt, James would have occupied one of these shell-holes
to observe the battle and to gain what cover could be obtained by the latter. As the assault progressed, enemy sniper
and machine-gun activity proved to be a major cause of casualties sustained by the attacking battalions. On moving forward
to observe, James became a target for one of the enemy's snipers and was unfortunately shot and killed.
|